Viewing chalk under a microscope reveals a dense, glittering rubble of fine calcite grains — and hidden inside that white dust are the fossil shells of microscopic algae that lived over 66 million years ago. Classroom blackboard chalk, by contrast, is almost always made from gypsum and contains no fossils whatsoever, so what you actually see depends entirely on which “chalk” you place on the slide. This guide walks through slide preparation, what each magnification tier shows, the science behind the material, and the polarized-light trick that makes calcite crystals explode with color.
How to Prepare a Chalk Slide
Chalk is a powder, so there’s no cutting or sectioning involved — but the setup details matter more than you’d expect. Too much chalk and your slide goes completely opaque; too little and you’re squinting for anything. The good news is that preparing microscope slides for chalk is one of the simplest techniques you’ll encounter.
Dry Mount vs. Wet Mount

A dry mount is the fastest approach: scrape a very small amount of chalk dust onto a clean glass slide using a toothpick or the edge of a blade, tap off any excess, and lower a coverslip over it. This works well at low magnifications (40x–100x) and preserves the natural clumping behavior of the grains. The downside is glare — dry chalk scatters light unevenly, making it harder to resolve fine structure.
A wet mount solves most of that. Disperse a tiny pinch of chalk powder in a single drop of water, then lower the coverslip at an angle to avoid air bubbles. Chalk is only slightly soluble in water — the grains stay fully visible rather than dissolving — and the water layer reduces glare dramatically. Use less powder than you think you need; the most common beginner mistake is making the preparation so thick that light can’t pass through it. If you need a refresher on the technique, see our guide on how to make a wet mount slide.
For either mount, start at the lowest magnification on your compound light microscope and work your way up.
Adding Polarized Light (Optional, for Crystal Colors)
If your microscope has a polarizing filter — or if you own two cheap linear polarizing films — you can unlock one of the most striking views chalk has to offer. Place one polarizer below the stage (the polarizer) and one above the objective (the analyzer), rotated 90° to each other so the background goes black. Calcite grains, which are birefringent (doubly refracting), will light up in vivid interference colors: blues, oranges, magentas, yellows. This is the same optical principle used in professional petrology labs to identify minerals in rock thin-sections. Even a basic dark-field microscopy setup is less visually dramatic than crossed polarizers on calcite.

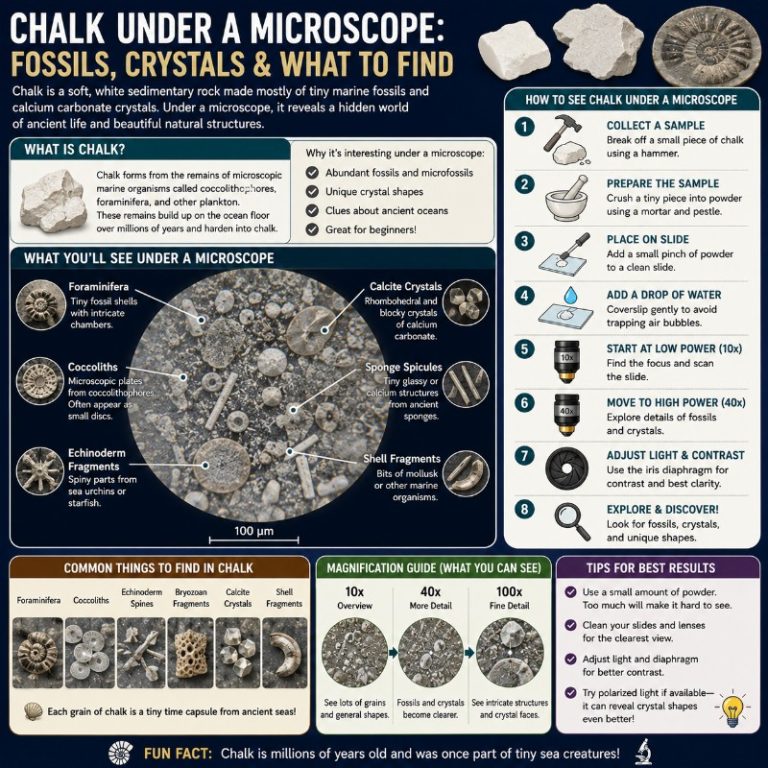
What You’ll See at Each Magnification
Managing expectations here is half the battle. Understanding the relationship between magnification vs. resolution will help you get the most from each tier. Your objective lenses (4x, 10x, 40x, 100x) each reveal something different, but chalk has hard limits at the light-microscopy level.
Low Power (40x–100x): Granular White Mass
At 40x total magnification (4x objective × 10x eyepiece), natural chalk looks like a field of irregular white grains and clumps against a bright background — not unlike fine granulated sugar, but even finer and more uniform in tone. You can see that the material isn’t smooth: there are angular fragments, chunky clumps, and tiny particles trailing off in all directions. The overall impression is of crushed rock, which is exactly what it is.
Step up to 100x (10x objective) and the grain boundaries become clearer. Individual fragments start to show distinct angular or sub-angular shapes, and if your slide preparation is thin enough, you may notice slight differences in grain size — some larger, some almost invisible specks. At this power, natural chalk and blackboard chalk start to look visibly different: natural chalk has more varied grain shapes and sizes, while gypsum-based classroom chalk tends toward more uniform, blocky fragments.

High Power (400x): Grain Shapes, Microfossil Fragments & the Coccolith Limit
At 400x (40x objective), natural chalk becomes genuinely interesting. You’ll see clearly angular calcite grains, occasional shell-like curved fragments, and a range of particle sizes from coarse rubble down to a near-invisible fine mist of sub-micron dust. Some of the larger fragments (~10–50 µm) are identifiable as pieces of foraminifera shells — single-celled marine organisms with intricate chambered structures. These are the most recognizable microfossils you’ll actually see on a light microscope.
As for coccoliths — the star of the fossil story — a word of honest expectation-setting is warranted. Individual coccoliths measure roughly 2–5 micrometers (µm). At 400x under a standard student scope, you’re approaching the practical resolution limit of light microscopy. You may glimpse disc-like hints at the very edge of resolution under excellent optics, but crisp, textbook-clear coccolith wheels are why an electron microscope sees more detail — scanning electron microscope (SEM) images of chalk are breathtaking precisely because no light scope can match them. What you will see is a beautiful jumble that you now know contains millions of ancient fossil fragments, even if the scope can’t fully resolve them.
Classroom chalk at 400x looks comparatively plain: more uniform blocky or prismatic gypsum crystals, often with pigment particles if the chalk is colored. There’s no biological structure hiding in there.

| Magnification | What you’ll see (natural chalk) | What you’ll see (blackboard/gypsum chalk) |
|---|---|---|
| 40x | Dense white granular mass, irregular clumps | Similar granular mass, slightly more uniform |
| 100x | Angular grain shapes, varied particle sizes | More blocky uniform fragments |
| 400x | Calcite grains, foraminifera fragments, hint of disc shapes at resolution limit | Prismatic gypsum crystals, possible pigment particles |
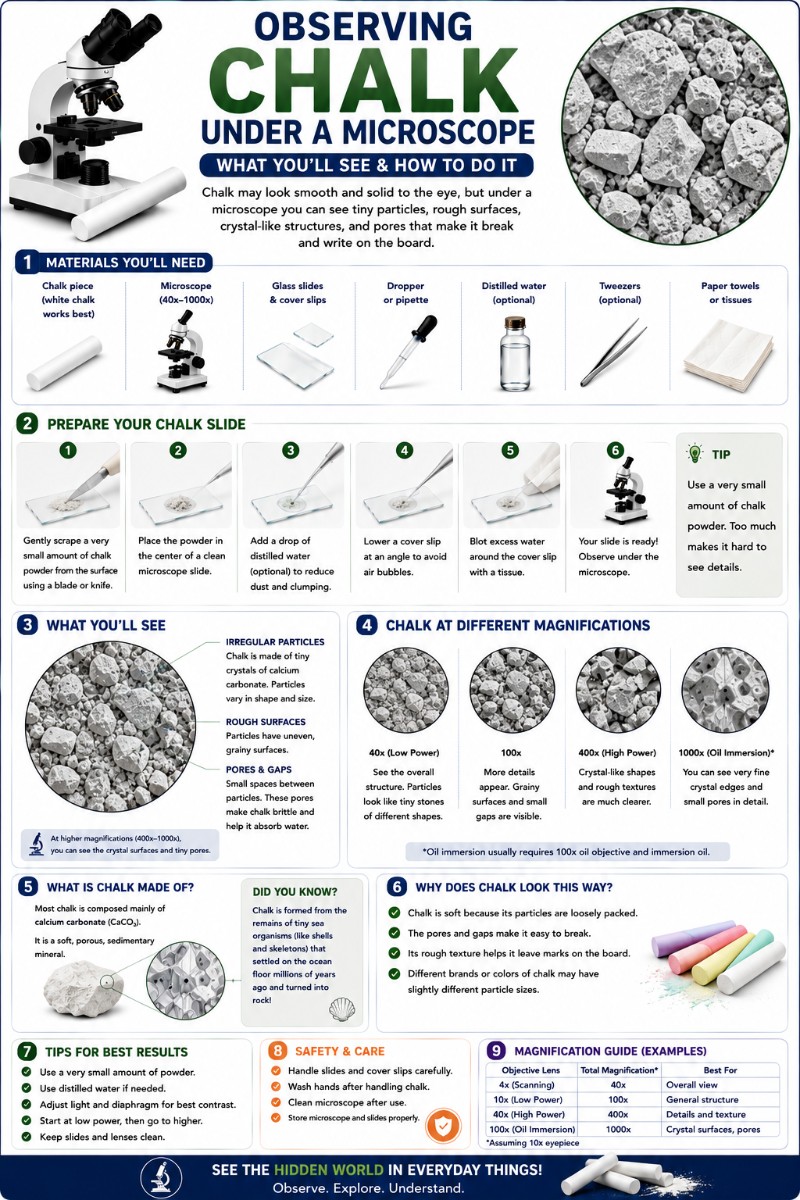
What Chalk Is Actually Made Of
Natural chalk is a soft, white, porous sedimentary rock — technically a fine-grained variety of limestone. Its mineral composition is almost entirely calcium carbonate (CaCO₃) in the crystalline form known as calcite. It formed primarily during the Late Cretaceous period, roughly 100–66 million years ago. (The word “Cretaceous” itself comes from creta, the Latin for chalk — the era is literally named after the rock.) The White Cliffs of Dover in England are one of the most famous exposures of this ancient chalk, formed from the accumulated skeletons of countless microscopic sea creatures.
The calcium carbonate in natural chalk was not deposited chemically from seawater — it was biologically produced by living organisms, which is what makes it so interesting under the microscope. You’re not looking at mineral crystals that grew in a cave; you’re looking at the compressed remains of ancient life.
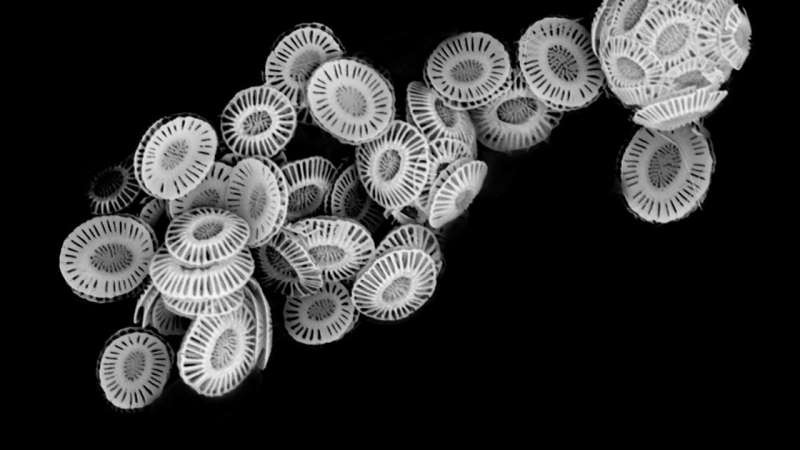
The Fossils Hiding in Chalk: Coccoliths & Coccolithophores
The primary biological builders of chalk were coccolithophores: single-celled marine algae (phytoplankton) that surrounded themselves with tiny calcite plates called coccoliths. When a coccolithophore died, its protective plates sank to the seafloor and accumulated in deep-water sediment. Over tens of millions of years, these sediments compacted into the chalk we find today. A single gram of chalk can contain millions of individual coccoliths.
Coccoliths are disc- or button-shaped structures, typically 2–20 micrometers in diameter, most commonly around 2–5 µm. Under a scanning electron microscope they look like ornate wheel-hub caps or intricate snowflakes — each species has a distinctive pattern. Under a light microscope, as described above, they’re at the very edge of what’s resolvable. The Woods Hole Oceanographic Institution’s coccolithophore resources include SEM images that show what these structures actually look like at proper resolution.
Natural chalk also contains larger microfossils. Foraminifera (forams) are single-celled organisms that built elaborate calcium carbonate shells, typically 50–500 µm in diameter — comfortably within light microscope range. These are the more recognizable fossils you’ll spot at 400x: look for curved, chambered fragments rather than sharp angular chips. The chalk may also contain fragments of bivalve shells, echinoderm plates, and other marine debris.
Comparing how salt and sugar crystals look under a microscope to chalk makes the biological origin of chalk even clearer — salt and sugar form perfect geometric crystals with no organic variation, while chalk’s grain shapes are irregular and biologically derived.
Natural Chalk vs. Blackboard Chalk
This is the most important distinction in the article, because most people in the US have only ever handled classroom chalk — which is not natural chalk at all.
| Feature | Natural chalk (geological) | Blackboard / sidewalk chalk |
|---|---|---|
| Main mineral | Calcite (CaCO₃) | Gypsum (CaSO₄·2H₂O), sometimes CaCO₃ |
| Contains fossils? | Yes — coccoliths, foraminifera | No |
| Under the microscope | Varied angular calcite grains, fossil fragments | Uniform blocky crystals, possible pigment |
| Fizzes in vinegar? | Yes (calcium carbonate + acid → CO₂) | No (or weakly — gypsum doesn’t carbonate-react) |
| Origin | Ancient marine sediment | Manufactured from mined gypsum |
If you want to observe the fossil content of chalk, you need geological chalk — a piece of natural chalk from a rock and mineral supplier, a geology kit, or a science education supplier. You can also find natural chalk in some art supply stores sold as “natural white chalk” or “calcium carbonate chalk.” Sidewalk chalk and standard classroom chalk sticks are gypsum products and will show no biological structures, no matter what magnification you use.
For comparison, sand under the microscope also reveals a surprising diversity of grain types, mineral colors, and even shell fragments depending on where the sand was collected — that same principle of “the material’s history is visible in its grains” applies directly to natural chalk.
Calcite Under Polarized Light
Even if coccolith detail stays frustratingly out of reach, polarized light gives you a genuinely spectacular view of chalk’s mineral character. Calcite is strongly birefringent: it splits a beam of light into two rays traveling at different speeds, which then interfere with each other when recombined, producing vivid interference colors. With crossed polarizers, individual calcite grains in a chalk slide glow in brilliant blues, yellows, oranges, and magentas against a black background, blinking in and out as you rotate the stage.
Gypsum is also birefringent but shows lower-order colors (typically grays and pale yellows at the grain sizes found in classroom chalk), so the polarized view even distinguishes natural from synthetic chalk. This technique is the basis of optical mineralogy, which geologists use to identify rock-forming minerals in thin-section — you’re using the same physics on your kitchen table.
Calcium-based minerals show up beautifully under polarized light across many everyday samples — compare what you see in chalk to salt crystals under the microscope, where sodium chloride’s cubic geometry produces a strikingly different optical signature.

Frequently Asked Questions
Can you actually see coccoliths with a light microscope?
At the limit — barely, and only under excellent optics. Individual coccoliths are 2–5 micrometers across, which puts them at or below the practical resolution limit of a standard light microscope (roughly 0.2–0.5 µm theoretical, but closer to 1–2 µm in real student scopes). You may see faint disc-shaped hints at 400x under oil immersion with high-quality optics, but crisp coccolith detail requires a scanning electron microscope (SEM). For the light scope, the larger foraminifera fragments (~50–500 µm) are far more recognizable.
What magnification do you need to see chalk clearly?
40x total magnification (4x objective, 10x eyepiece) is enough to see the granular texture. 100x starts to show distinct grain shapes. 400x (40x objective) is where the detail is most interesting — grain morphology, larger fossil fragments, and birefringence under polarized light all become apparent at this level. You don’t need oil immersion or 1000x for a satisfying view.
Why does chalk fizz in vinegar?
Natural chalk is calcium carbonate (CaCO₃). When it contacts an acid like vinegar (acetic acid) or dilute hydrochloric acid, a chemical reaction releases carbon dioxide gas — that’s the fizzing. Gypsum-based blackboard chalk is calcium sulfate and does not produce the same vigorous effervescence. The acid test is therefore a quick, easy way to confirm whether your sample is natural chalk or classroom chalk before you even reach for the microscope.
Do I need a special microscope to view chalk?
No. Any basic compound light microscope with 40x–400x total magnification will show interesting chalk structure. Polarizing filters are optional but highly recommended for the calcite color effect — inexpensive polarizing film sheets (a few dollars online) can be cut and placed above and below the stage if your scope doesn’t have built-in polarizers. You do not need phase contrast or fluorescence capabilities.
Where do I get natural chalk for microscopy?
The easiest sources are geology supply websites, science education suppliers (such as Carolina Biological or Ward’s Science), and rock-and-mineral shows. Look for “chalk” sold as a rock specimen, or “calcium carbonate chalk” in art supply stores. Museum gift shops in areas with chalk geology (like the UK or parts of Kansas and Nebraska) often carry small samples. Avoid standard classroom or sidewalk chalk sticks — these are almost always gypsum.
Can I use the same technique to look at other rocks or minerals?
Yes, and it’s a natural next step. Fine-grained limestone, marble dust, and calcium carbonate powders all show calcite under polarized light. Observing salt crystals under the microscope shows the contrast between biologically derived calcite (chalk) and the perfect cubic geometry of sodium chloride. Powdered shells, coral fragments, and eggshell are other calcium carbonate materials worth comparing side by side.
Is chalk dust safe to use under a microscope?
In the small quantities used for microscopy (a few milligrams on a slide), chalk dust poses minimal risk. Standard lab precautions apply: work in a ventilated area, avoid inhaling large amounts of any fine powder, and wash hands afterward. Using a coverslip keeps the powder contained on the slide. Children should be supervised, but the amounts involved in slide preparation are far smaller than what accumulates in a classroom during normal chalk use.
Conclusion
Chalk under a microscope turns out to be one of the most scientifically rich materials you can put on a slide. Natural chalk is a record of ancient ocean life — a sedimentary rock built almost entirely from the fossilized armor of microscopic algae that flourished during the age of dinosaurs. Even when the coccolith detail stays just out of reach at 400x, the birefringent colors under polarized light, the varied grain morphology, and the recognizable foraminifera fragments make it a genuinely rewarding subject. And the natural-vs-classroom chalk distinction — calcite fossils versus plain gypsum crystals — is one of those small revelations that changes how you look at something ordinary forever.
Have you tried this yourself? Drop a comment below — whether you used a student scope or something more powerful, natural chalk or the classroom variety, we’d love to hear what you found and what surprised you most.