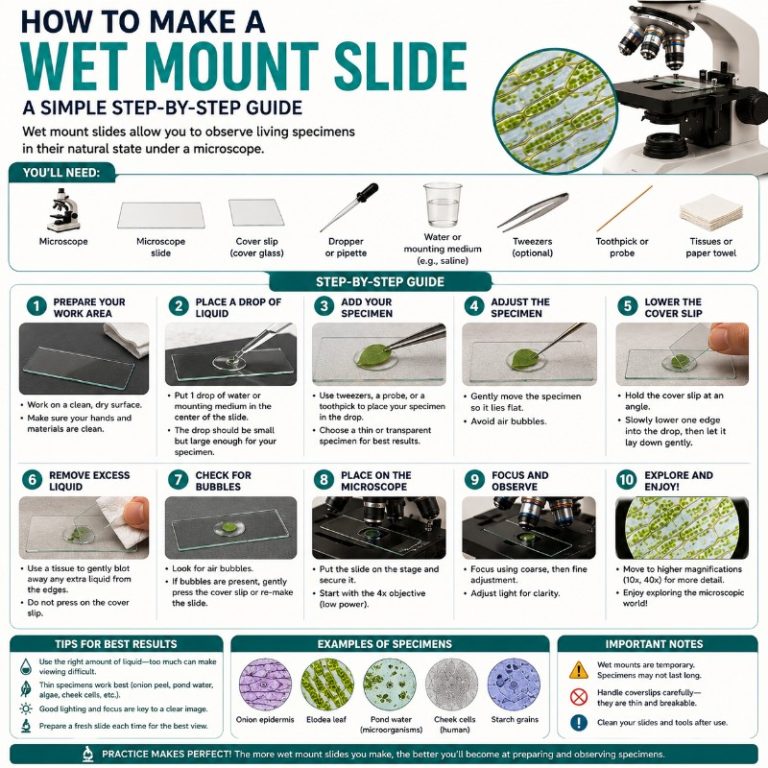
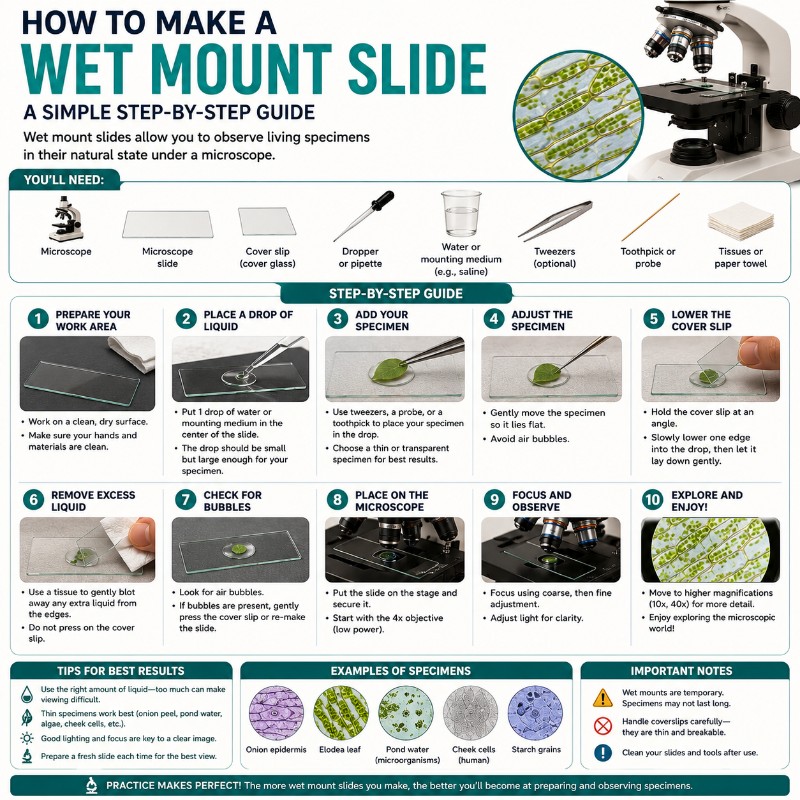
A wet mount slide suspends a specimen in a drop of liquid between a glass slide and a coverslip — the fastest and most beginner-friendly way to observe living specimens under a compound microscope. Here are the six steps at a glance:
- Clean your glass slide and coverslip.
- Place your specimen on the center of the slide.
- Add a single small drop of water (or mounting fluid) directly on the specimen.
- Lower the coverslip at a 45° angle to push air out ahead of it.
- Wick away any excess liquid with the corner of a paper towel.
- Place the slide on your microscope and start at low power.
The sections below explain every step in detail, cover the most common mistakes, and show you how to add stain, choose the right specimen, and extend the life of your mount.
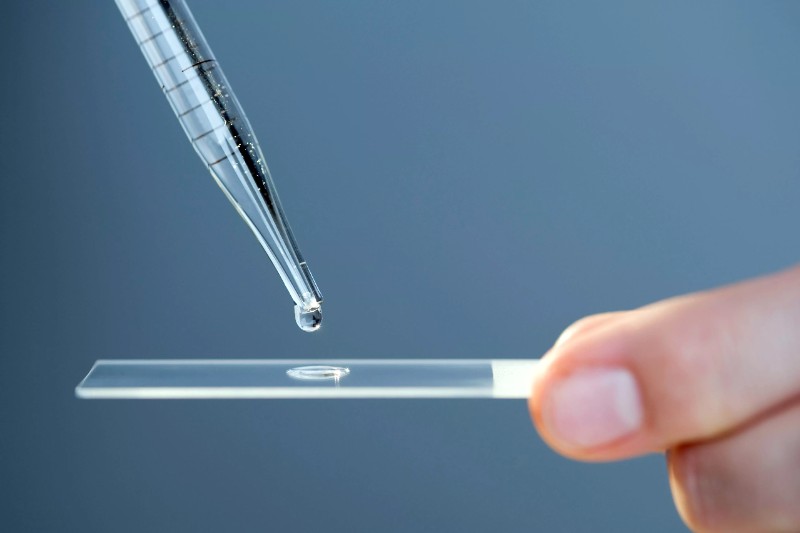
What You’ll Need
- Glass microscope slides (standard 1″ × 3″ / 25 × 75 mm)
- Glass or plastic coverslips (18 × 18 mm or 22 × 22 mm)
- Eyedropper or pipette
- Distilled water (or 0.9% saline, glycerin, or pond/sample water — see below)
- Forceps, toothpick, or mounted needle
- Paper towels or lens tissue
- Optional: stain (methylene blue, iodine/Lugol’s, or eosin)
- Optional: petroleum jelly (Vaseline) for sealing
What Is a Wet Mount Slide?
A wet mount is a temporary slide preparation in which a specimen sits in a drop of liquid on a standard glass slide and is covered with a thin coverslip. The liquid — usually distilled water — keeps the specimen hydrated and visible in its natural state. Because no chemicals are used to kill or fix the cells, you can watch living organisms move, feed, and react in real time under a compound microscope.
Wet mounts are contrasted with dry mounts (specimen placed directly on the slide with no liquid, used for non-living material like hair or fibers) and prepared slides (commercially fixed, stained, and permanently sealed). If you want to understand the full range of options, our guide on how to prepare microscope slides covers all three types in depth.
Step-by-Step: Making a Wet Mount Slide
Step 1 — Clean and Prepare Your Slide
Hold the slide by its edges to avoid fingerprints on the viewing area. Wipe the surface lightly with a clean piece of lens tissue. Fingerprint oils scatter light and create out-of-focus smears that can be mistaken for specimens. Lay the clean slide flat on your workbench.
Step 2 — Place Your Specimen
Transfer a small amount of your specimen to the center of the slide. For pond water or liquid cultures, a single drop from an eyedropper is enough. For solid specimens (like onion epidermis), use forceps or a toothpick to lay one thin, flat layer on the slide. Thin is critical — a thick clump will prevent the coverslip from lying flat, distort the image, and create focus problems.
Step 3 — Add a Drop of Water
If your specimen arrived in liquid (pond water, a culture suspension), it likely already has enough fluid — skip adding more. For dry specimens, place one small drop of distilled water directly on top of the sample. One drop is almost always the right amount. Too much water causes the coverslip to float and the specimen to drift; too little leads to air pockets and rapid drying.

If you’re preparing animal cells (like cheek cells), use 0.9% saline instead of plain water. Distilled water is hypotonic — it causes animal cells to swell and burst via osmosis. Isotonic saline keeps them intact.
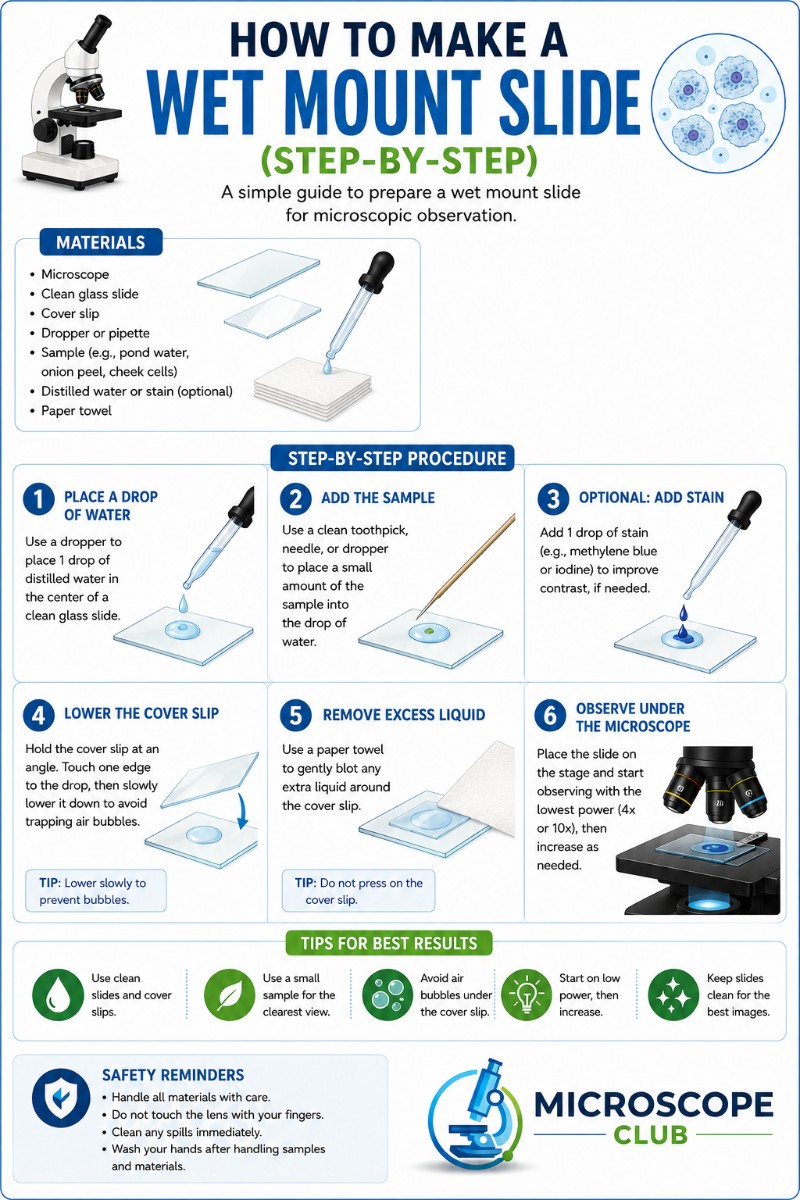
Step 4 — Lower the Coverslip at a 45° Angle
This is the most important skill in making a wet mount, and it’s the one most beginners skip. Here’s how to do it correctly:
- Hold the coverslip between your thumb and forefinger by its edges.
- Touch one edge of the coverslip to the slide surface, right next to the drop of water.
- Use a toothpick, mounted needle, or the tip of your forceps as a prop under the opposite edge, holding it at roughly 45°.
- Slowly remove the prop and let the coverslip descend under its own weight.
As the coverslip descends, the water spreads under it and pushes air out ahead of the advancing meniscus. If you drop the coverslip flat from directly above, a large air bubble becomes trapped in the center. The 45° technique eliminates that problem. For a deeper look at the optics involved, Nikon’s MicroscopyU has excellent detail on why coverslip flatness matters for image quality.

Step 5 — Remove Excess Water
Check the coverslip edges. If liquid has spread out beyond them, touch the corner of a folded paper towel or lens tissue to the edge of the coverslip — capillary action will wick the excess away without disturbing the specimen. Never apply the towel on top of the coverslip; you’ll shift everything.
Step 6 — View on the Microscope (Start at Low Power)
Always begin at the lowest magnification — typically 40× total (4× objective + 10× eyepiece). Scan the slide to locate your specimen and center it in your field of view. Then increase magnification: 100× (10× objective) for a broader look, 400× (40× objective) for cell-level detail. Do not use oil immersion (1000×) on a temporary wet mount — immersion oil is designed for fixed, sealed slides and will contaminate a temporary preparation.
How to Avoid Air Bubbles
Air bubbles are the number-one frustration for beginners. The fix is the 45° technique described in Step 4 — but you also need to recognize bubbles when you see them.
Bubbles vs. cells: Air bubbles appear as perfect circles with thick, dark, sharply defined refractive rings and a bright center. They don’t move, feed, or change shape. Cells and microorganisms are irregular, semi-transparent, and often show internal structure or movement. If you see a large, perfectly round, black-ringed circle — that’s a bubble, not an organism.
If bubbles appear after you’ve lowered the coverslip, small ones often disappear on their own as the liquid redistributes. For persistent bubbles, gently press one edge of the coverslip with a toothpick to encourage the liquid to flow under the trapped air. If the bubble is large, it’s easier to remake the slide with the correct technique.
Wet Mount vs. Dry Mount: Which Should You Use?
| Feature | Wet Mount | Dry Mount |
|---|---|---|
| Specimen state | Living or aqueous | Non-living, dry |
| Liquid used | Yes (water, saline, glycerin) | No |
| Coverslip required | Yes | Optional |
| Longevity | Minutes to 30 min (unsealed) | Indefinite |
| Best for | Pond organisms, cells, algae | Hair, fibers, salt crystals, pollen |
Use a wet mount whenever your specimen is living, aquatic, or needs to stay hydrated. Use a dry mount for powders, fibers, and non-living material that would dissolve or be distorted by water. For thin, sliced specimens, see our guide to the parts of a compound microscope to understand how different objective lenses affect your choice of slide preparation.
Adding Stain for Better Contrast
Living cells are largely transparent — they’re mostly water, and they don’t absorb much visible light. Stains bind to specific structures and add color contrast, making internal features visible. The three most common stains for wet mounts are:
- Methylene blue — stains nuclei and cytoplasm in animal cells such as cheek epithelial cells, and is also a common general stain for bacteria. Note: it kills living cells.
- Iodine (Lugol’s / IKI) — turns starch blue-black, making it ideal for onion cells under the microscope and plant cells. Also stains glycogen.
- Eosin — a pink counterstain that highlights cytoplasm and connective tissue.
How to add stain without lifting the coverslip (wicking method):
- Place a small drop of stain at one edge of the coverslip.
- Touch a folded paper towel or lens tissue to the opposite edge of the coverslip.
- Capillary action wicks the stain under the coverslip and across the specimen in a slow, controlled flood.
This method applies stain evenly without disturbing the coverslip or the specimen. Khan Academy’s microscopy overview provides a helpful primer on why staining improves visualization under light microscopy if you’d like more background on the optics.
Best Specimens for Wet Mounts
| Good Candidates | Poor Candidates (use dry mount or sections) |
|---|---|
| Pond water (paramecium, amoeba, euglena) | Salt or sand crystals |
| Algae (spirogyra, volvox) | Dry pollen or fiber |
| Onion epidermis | Thick, opaque solid tissue |
| Cheek epithelial cells | Anything requiring sectioning |
| Yeast suspensions | Hair (better dry-mounted) |
| Bacterial cultures | Dry powders |
The single best beginner specimen is pond water — a single drop contains dozens of different microorganisms, all moving under their own power. Collect it from a stagnant pond edge or aquarium substrate and observe within a few hours for the most activity.
How to Keep Your Specimen Alive Longer
An unsealed wet mount will start to dry out within 10–30 minutes at room temperature. For extended observation of living organisms, try one of these methods:
- Use glycerin instead of water. Glycerin’s higher viscosity slows evaporation significantly and is excellent when you want to observe a specimen for more than a few minutes.
- Use 0.9% saline for animal cells. Isotonic saline prevents osmotic damage, keeping cells alive and intact longer than distilled water.
- Seal the coverslip edges. Apply a thin ring of petroleum jelly (Vaseline) around all four edges of the coverslip using a toothpick. This creates a sealed wet mount that can last for hours. Clear nail polish also works as a sealant for non-living specimens.
- Work in a cool environment. Higher temperatures speed evaporation. If you’re doing a long classroom observation, a slightly cooled workspace extends slide life.
Troubleshooting Common Problems
| Problem | Likely Cause | Fix |
|---|---|---|
| Large central air bubble | Coverslip dropped flat from above | Remake using the 45° technique |
| Specimen drifting / floating | Too much water; coverslip not seated | Wick excess water from coverslip edge |
| Slide dries out quickly | Too little water; warm room | Add a tiny drop at the edge; seal with petroleum jelly |
| Coverslip floats and moves | Excess liquid underneath | Wick excess with paper towel corner at the edge |
| Blurry image at 400× | Specimen too thick; dirty coverslip | Use a thinner/flatter specimen; clean coverslip |
| Can’t find the specimen | Started at too high a magnification | Drop back to 40× and scan systematically |
| Cells swell and burst | Used distilled water for animal cells | Switch to 0.9% isotonic saline |
For more tips on getting sharp images, our article on depth of field in microscopy explains why focus changes as you increase magnification — a common source of confusion when first observing wet mounts at 400×.
Educators setting up a classroom lab for the first time may also find our guide to the best microscope for kids useful for choosing equipment that makes wet mount preparation easy for young students. For a comprehensive technical reference on brightfield microscopy and slide preparation standards, the NIH’s cell biology resources are authoritative.
Frequently Asked Questions
Is pond water safe to handle when making a wet mount, and how should I collect specimens?
Pond water is generally safe to work with for microscopy, but it can carry pathogens such as E. coli, Giardia, Cryptosporidium, and norovirus, so don’t ingest it and keep it away from your mouth and eyes. Collect a small sample from a stagnant edge or aquarium substrate using a clean jar or pipette, avoid open cuts on your hands, and wash your hands thoroughly with soap and water afterward. Discard the sample after viewing rather than storing it, and clean any tools that contacted it. (Source: CDC — recreational water illness pathogens)
How do you clean and store reusable glass slides between uses?
Rinse slides with a drop of isopropyl or 70% alcohol and warm soapy water, then dry and polish with a lint-free tissue such as a Kimwipe or lens tissue — handle them only by the edges to avoid fingerprint oils. Don’t soak glass slides for long periods, and never reuse a slide that held a pathogenic sample without disinfecting it first. Store cleaned, dry slides flat in a dedicated slide box away from heat, dust, and bright light so they stay scratch-free for next time.
How can I photograph what I see through the microscope?
The simplest method is afocal photography: hold or clamp a smartphone camera directly over the eyepiece so its lens lines up with the lens you look through, then let the phone autofocus and tap to set exposure. A low-cost smartphone-to-eyepiece adapter makes this far easier by holding the phone steady and centered, which is hard to do by hand. Start at low magnification, block stray room light from entering the eyepiece, and keep the specimen still — living organisms photograph best in a quick burst or short video.
How much does it cost to start making wet mount slides?
It’s an inexpensive hobby to begin: a box of 50–100 pre-cleaned glass slides typically runs about $8–$15, and a box of 100 glass coverslips is roughly $5–$11. An eyedropper, forceps, and a small bottle of stain such as methylene blue or iodine add only a few dollars more. Aside from the microscope itself, you can assemble a complete beginner wet-mount kit for under $25 from science-supply retailers like AmScope or Home Science Tools.
Conclusion
Making a wet mount slide comes down to a few core habits: start with a clean slide, use just one small drop of liquid, and always lower the coverslip at a 45° angle to keep bubbles out. From there, the right mounting fluid, a touch of stain, and a sealed edge with petroleum jelly can transform a basic observation into a detailed, extended study. Whether you’re watching paramecia dart across a field of view or examining the cell walls of an onion layer, the wet mount is the fastest route from specimen to image.
Have you tried making a wet mount at home or in the classroom? Which specimen surprised you the most? Share your experience — or drop a question — in the comments below. We’d love to hear what you found.
Originally posted 2026-06-13 13:54:33.