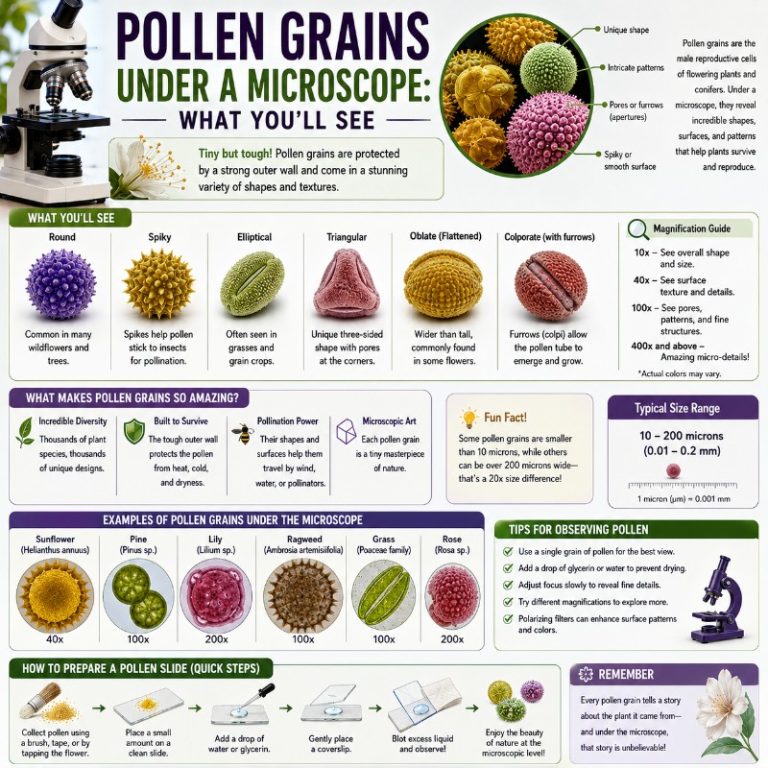
Under a compound light microscope, pollen grains appear as tiny geometric structures — spheres, ovals, and triangles — each species bearing a uniquely sculptured outer wall patterned with ridges, pores, spines, or a honeycomb mesh. They range from roughly 10 to 100 micrometres (µm) in diameter, making them easy targets for a standard compound light microscope at magnifications between 40× and 400×. No two plant families look alike, and that morphological diversity carries real-world weight — from forensics to allergy season.
What Do Pollen Grains Look Like Under a Microscope?
The first thing you notice is variety. Grass pollen appears as smooth, almost featureless spheres; sunflower pollen bristles with sharp spines; pine pollen carries two balloon-like air sacs that look remarkably like a cartoon character’s ears. At 100× magnification, the size differences alone are striking — lily pollen dwarfs birch pollen by a factor of three or four.
The characteristic appearance of each grain comes from its exine — the tough outer wall made of sporopollenin, one of the most chemically resistant polymers in biology. The exine is sculpted into species-specific patterns, and it is riddled with thin spots called apertures through which the pollen tube will eventually emerge to fertilise the ovule. Together, size, shape, aperture number and type, and exine sculpture form a fingerprint that botanists and forensic scientists can use to identify a plant from a single grain.
Most pollen falls in the 15–50 µm range — far larger than bacteria but small enough to drift on the wind. Forget-me-not pollen is one of the smallest at around 5–6 µm; pumpkin and squash (Cucurbita) pollen is among the largest, reaching 100–200 µm and plainly visible as a coarse powder to the naked eye.
What Magnification Do You Need to See Pollen?
A standard compound microscope covers every tier of pollen observation, and you do not need specialist equipment to get meaningful results.
- 40× (4× objective): Pollen grains appear as tiny specks. You can distinguish clumps from individual grains and tell large species (lily, pumpkin) from small ones, but shape and texture are indistinct.
- 100× (10× objective): Individual grains are clearly resolved. Overall shape, size differences between species, and gross features — the twin bladders on pine pollen, the spiny outline of sunflower — become visible. This is the best starting magnification for a mixed sample survey.
- 400× (40× objective): Fine exine sculpture resolves clearly: reticulate (net-like) versus echinate (spiny) versus psilate (smooth) surfaces become obvious. Apertures — the furrows and pores — are also visible at this tier. For most teaching and hobby use, 400× is the sweet spot for detailed observation.
- 1000× (oil immersion): Rarely necessary; used for the smallest grains or to measure fine sculptural detail.
The field of view shrinks as magnification increases, so at 400× you may need to scan the slide to find grains.

Light Microscope vs SEM for Pollen
A light microscope vs electron microscope comparison shows very different use cases for pollen work. A compound light microscope is sufficient for classroom slide work and species identification at the genus level. A scanning electron microscope (SEM) reveals the three-dimensional exine architecture in extraordinary detail — spines with sharp tips, pore margins with raised collars, reticulate meshwork with defined lumina — and is the gold standard in professional palynology. SEM images of pollen are some of the most visually striking in all of microscopy, but the equipment is laboratory-only and unnecessary for routine observation. For classrooms and hobbyists, a good compound scope at 400× delivers excellent results. You can explore further in our electron microscope images gallery for a sense of what SEM reveals.
The Anatomy of a Pollen Grain
Every pollen grain, regardless of species, shares the same basic wall architecture. Understanding the layers and their function makes everything you see under the microscope make sense.
The exine is the outer wall. It is made of sporopollenin, a biopolymer so chemically robust that it resists most acids, bases, and decay processes — which is why pollen grains survive intact in geological sediments for millions of years, making them invaluable in climate reconstruction and forensic science. The exine is the sculpted layer: its outer surface carries the bumps, ridges, spines, and mesh patterns visible at high magnification.

Inside the exine sits the intine, a thinner inner wall made of cellulose and pectin, surrounding the living cytoplasm — the two sperm cells and vegetative cell that will carry out fertilisation.
Apertures — Colpi, Pori and Why They Matter
Apertures are strategically thinned or open regions in the exine. They serve two functions: they are the exit point for the pollen tube at germination, and they allow the grain to swell or contract as humidity changes (a stress-relief mechanism).
There are two fundamental aperture types:
- Colpi (singular: colpus) — elongated furrows or grooves running toward the poles of the grain.
- Pori (singular: porus) — rounded, compact pores.
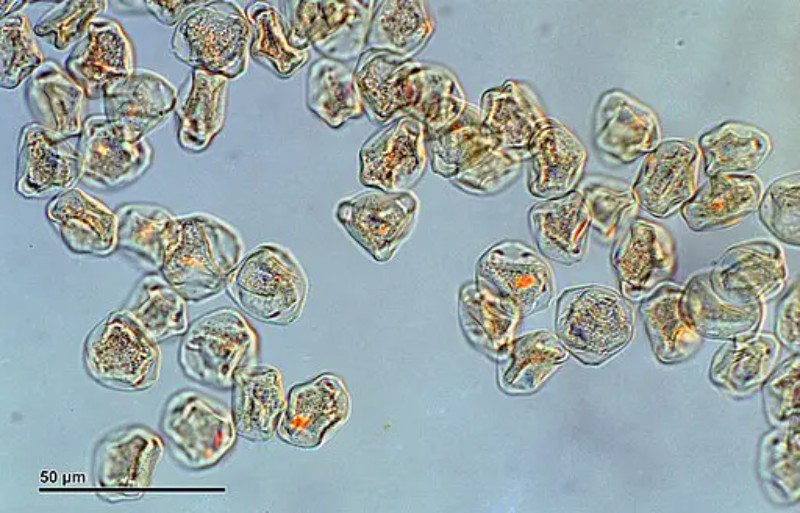
These are described by number plus type: tricolpate (three furrows — the hallmark of eudicots, the largest flowering plant group), monocolpate (one furrow — typical of monocots such as lilies, and of conifers), triporate (three pores — birch, hazel), or tricolporate (three furrows each bearing a central pore). Aperture count and type is one of the most diagnostic features in palynology.
Exine Surface Patterns (Sculpture)
The named surface patterns you will encounter most often:
- Psilate — smooth; typical of wind-pollinated grasses.
- Reticulate — net-like or honeycomb mesh; clearly visible on lily pollen at 400×.
- Echinate — spiny or spiked; characteristic of the daisy family (Asteraceae), sunflowers, hibiscus, and hollyhocks.
- Striate — parallel ridges or grooves running in one direction.
- Verrucate / gemmate — warty or knobbed protrusions.
At 400× on a well-stained slide, the difference between reticulate lily pollen and echinate sunflower pollen is immediately obvious and visually striking — a great demonstration for students.

Pollen Grains by Species: A Visual Comparison
The table below summarises six commonly observed species. Size values are approximate; actual grain dimensions vary within a species depending on hydration state and preparation method.
| Species | Approx. size | Shape | Aperture type | Surface texture | Pollination |
|---|---|---|---|---|---|
| Grass (Poaceae) | 20–40 µm | Spherical | Monoporate (1 pore) | Psilate (smooth) | Wind |
| Oak (Quercus) | 25–35 µm | Oval | Tricolpate (3 furrows) | Finely granular | Wind |
| Birch (Betula) | 20–30 µm | Triangular | Triporate (3 pores) | Smooth to granular | Wind |
| Lily (Lilium) | 80–100 µm | Elongate/oval | Monocolpate (1 furrow) | Reticulate (net) | Insect |
| Sunflower / daisy (Asteraceae) | 30–50 µm | Spherical | Tricolporate | Echinate (spiny) | Insect |
| Pine (Pinus) | 45–65 µm body | Body + 2 air sacs | — (sacci aid dispersal) | Smooth bladders | Wind |
Pine pollen deserves special mention. The two large air sacs — called sacci or bladders — flanking the central body give pine pollen an unmistakable silhouette resembling Mickey-Mouse ears. These sacs are hollow extensions of the exine filled with air, which dramatically reduces the grain’s effective density and allows it to travel hundreds of kilometres on the wind. Once you have seen pine pollen under a microscope, you will recognise it instantly in any future sample.
Grass pollen is equally instructive but for the opposite reason: at 400× it looks almost plain — a smooth sphere with a single small pore — which makes it a useful baseline for comparing the elaborate sculpture of insect-pollinated species. For more on what grass under a microscope reveals beyond the pollen, our dedicated article covers the full plant structure.
How to Prepare a Pollen Slide (Step by Step)
Pollen slides are among the easiest biological specimens to prepare. Fresh pollen from a backyard flower is all you need to start.
- Collect the pollen. Tap the anthers of a freshly opened flower directly onto a clean glass slide, or transfer pollen with a fine brush or a folded strip of clear tape. Lilies, sunflowers, and hibiscus shed pollen generously and are excellent first subjects.
- Add a mounting medium. Place a small drop of water, glycerol, or commercially prepared mounting medium (e.g. glycerine jelly) over the pollen.
- Stain for contrast. The most useful stain for pollen is safranin or basic fuchsin, both of which bind strongly to sporopollenin and stain the exine red or pink — making sculpture and apertures stand out clearly. Lugol’s iodine stains starch-containing grains dark blue and works well for fresh pollen. A dilute methylene blue solution is a convenient home alternative, though it stains less specifically. Apply a small drop of stain to the edge of the mounting medium and allow it to diffuse under the coverslip.
- Apply the coverslip. Lower the coverslip slowly at an angle — lower one edge first, then let the other side fall — to minimise air bubbles trapped beneath it.
- Begin at low magnification. Start at 40× to locate pollen grains on the slide, then step up to 100× to survey shape and size, and finally to 400× to examine exine sculpture and apertures.
For more detail on mounting technique, our guide to how to prepare microscope slides covers the full process including coverslip handling and air-bubble removal.
Advanced note — acetolysis: Professional palynology uses a technique called Erdtman’s acetolysis to chemically strip the cytoplasm and intine from pollen grains, leaving a clean exine for taxonomic identification. The process uses glacial acetic acid and acetic anhydride and is strictly lab-only — not suitable for classrooms or home use. The result is a highly durable grain that can be embedded in resin for permanent reference slides.
Fresh vs processed pollen: Fresh pollen still contains cytoplasm and starch, which can obscure aperture margins and wall detail. Staining improves contrast considerably; acetolysis or simple clearing with glycerol and gentle heating improves it further. If your first slide looks muddy at 400×, try a dilute safranin stain.
Why Pollen Shape Matters: Allergies, Forensics and Palynology
Morphology and Hay Fever
A widespread misconception is that the most visually dramatic pollen — the spiky, colourful grains of roses and sunflowers — is responsible for hay fever. The opposite is true. Wind-pollinated plants such as grasses, birch, oak, and ryegrass produce pollen that is small (20–40 µm), smooth, lightweight, and produced in enormous quantities. These grains drift freely on air currents, penetrate deep into the airways, and are the dominant cause of allergic rhinitis worldwide.
Insect-pollinated plants produce heavier, spikier, stickier pollen designed to adhere to visiting insects. These grains rarely become airborne in quantity and seldom reach human airways, so they are not significant allergens despite looking dramatic. The next time someone blames their hay fever on a bouquet of sunflowers, the microscopy tells the story clearly.
In Australia, ryegrass and other pasture grasses are the leading hay-fever triggers, with peak pollen season running from spring through early summer (roughly September to December) in the Southern Hemisphere. Introduced deciduous trees such as birch and oak, uncommon in most Australian cities but present in cooler southern regions, contribute in early spring.
This morphology-to-allergy relationship is backed by clinical allergy research that consistently identifies grain size and aerodynamic properties — both functions of pollen morphology — as the key determinants of allergenic potential.
Forensic Palynology
Because sporopollenin is virtually indestructible, pollen grains survive on clothing, shoes, vehicles, and objects long after the event that deposited them. Forensic palynologists — scientists who specialise in identifying pollen assemblages — can place a person or object at a specific location, season, or even a particular field or garden. Pollen assemblages are geographically specific: the mix of species in a suburb of Melbourne differs from those in a wheat paddock in the Riverina, and a forensic analyst can sometimes narrow a provenance down to a single property. This application is documented by The Palynological Society and has been used in criminal cases across Australia, New Zealand, and the United Kingdom.
Palynology and Climate Reconstruction
The same durability that makes sporopollenin useful in forensics makes it invaluable in palaeobotany. Pollen deposited in lake sediments, peat bogs, and polar ice cores survives for millions of years in a recognisable state. By identifying the species in a sediment core and dating each layer, palynologists can reconstruct past vegetation and climate — tracking forest advance after ice ages, the spread of agriculture, or the impact of drought cycles. Britannica’s palynology entry provides a good overview of this field.
The same structural features you observe at 400× on your classroom slide — aperture type, exine sculpture — are the features used to identify grains in a 50,000-year-old sediment sample. That continuity between the practical and the scientific is one of the most compelling reasons to learn pollen morphology properly.
For anyone curious about other biological specimens that work well in a botany or biology unit, our guides to spirogyra under the microscope and blood cells under the microscope make useful companion observations.
Frequently Asked Questions
What do pollen grains look like under a microscope?
Pollen grains appear as small geometric shapes — spheres, ovals, or triangles — ranging from roughly 10 to 100 µm in diameter. Their outer surface is sculptured with species-specific patterns including smooth coatings, honeycomb meshes, ridges, or sharp spines. Each grain also has apertures (pores or furrows) through which the pollen tube emerges at germination. The exact appearance varies considerably by species — grass pollen looks very different from lily or pine pollen, even at the same magnification.
What magnification do you need to see pollen grains?
You can see individual pollen grains at 40× (4× objective), where they appear as small specks. At 100× (10× objective), overall shape and gross features are clearly visible. For exine sculpture, apertures, and fine detail, 400× (40× objective) is ideal. Oil immersion at 1000× is rarely required. A standard compound microscope covers all these tiers.
Can you see pollen with a light microscope?
Yes. A compound light microscope is entirely sufficient for pollen observation and species-level identification. Most pollen grains (15–100 µm) are well within the resolution range of a standard 40× objective. A scanning electron microscope reveals finer three-dimensional detail of the exine but is not needed for classroom or hobby use.
How do you prepare a pollen slide?
Tap pollen directly from flower anthers onto a clean glass slide, add a drop of water or glycerol mounting medium, apply a stain such as safranin or dilute Lugol’s iodine, and lower a coverslip slowly at an angle to avoid air bubbles. Start observation at 40×, then step up to 100× and 400×. Fresh pollen from lilies, sunflowers, or hibiscus is ideal for beginners.
Why are pollen grains different shapes?
Pollen shape is genetically determined and reflects evolutionary adaptation to different pollination strategies. Wind-pollinated species benefit from small, smooth, aerodynamically efficient grains produced in large quantities. Insect-pollinated species benefit from larger, stickier, often spiny grains that adhere to pollinators. The aperture number and type is related to the plant’s lineage — eudicots typically have three-furrowed (tricolpate) pollen, while monocots typically have a single furrow (monocolpate).
What is the outer layer of a pollen grain called?
The outer layer is called the exine. It is made of sporopollenin, one of the most chemically resistant biological polymers known. The inner wall — thinner and made of cellulose and pectin — is called the intine. The exine’s extraordinary durability means pollen grains can survive in sediments for millions of years, which is why they are so valuable in palynology and forensic science.
What stain is used for pollen grains?
Safranin and basic fuchsin are the preferred stains for pollen work — both bind strongly to the sporopollenin exine and stain it red or pink, making surface sculpture and apertures clearly visible. Lugol’s iodine is a useful alternative for fresh pollen that contains starch. Dilute methylene blue works as a home substitute. For advanced palynological work, the acetolysis method is used to strip the cytoplasm first, leaving a clean exine for permanent mounting.
How big is a pollen grain in micrometres?
Most common pollen falls in the range of 15–50 µm (micrometres) in diameter. Grass pollen is typically 20–40 µm; oak and birch are 20–35 µm; sunflower is 30–50 µm; lily is notably large at 80–100 µm; and pumpkin/squash pollen reaches 100–200 µm. Forget-me-not pollen is among the smallest at around 5–6 µm. For reference, a human hair is approximately 70 µm wide.
Conclusion
Pollen grains are one of the most rewarding specimens for a light microscope. In a single slide prepared from a backyard flower, you can observe the exine sculpture, count apertures, identify wind versus insect pollination strategy, and connect what you see to allergy science, forensic investigation, and deep geological time. The vocabulary — exine, colpi, pori, sporopollenin, reticulate, echinate — sounds technical, but each term describes something directly visible at 400× once you know what to look for.
Have you tried making a pollen slide at home or in the classroom? We would love to hear which species you observed and what features stood out — share your experience in the comments below.