
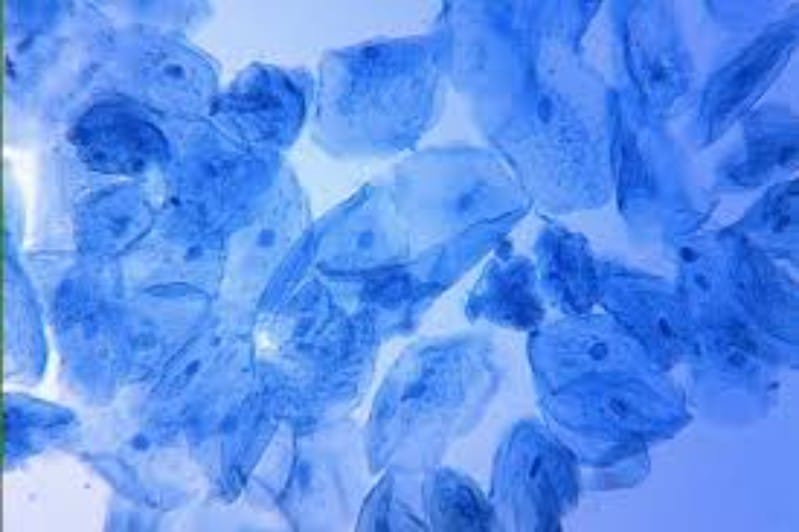
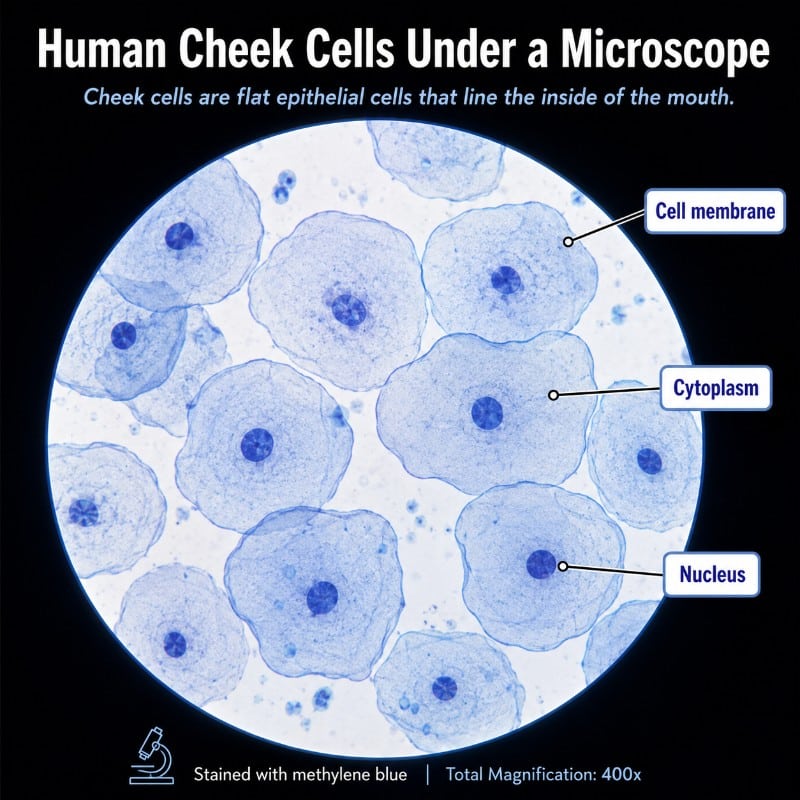
Under a light microscope, human cheek cells appear as large, flat, irregularly shaped cells with a clearly stained, dark central nucleus surrounded by pale cytoplasm and a thin, floppy outer boundary. Correctly called buccal epithelial cells — a type of squamous epithelium — they measure roughly 50–70 micrometres (µm) across and are one of the easiest human specimens to prepare: no dissection, no specialist equipment, and results are visible within minutes. At 400× magnification with methylene blue stain, the dark-blue nucleus stands out sharply against the lightly tinted cytoplasm, making this the definitive first-encounter specimen for animal cell biology.
What Do Human Cheek Cells Look Like Under a Microscope?
Cheek cells are squamous epithelial cells — squamous meaning flat and scale-like. Because they line the buccal mucosa (the soft tissue inside your cheek), they are constantly shed and replaced, which is why a gentle swab collects them so easily. They are eukaryotic animal cells: they have a membrane-bound nucleus but no cell wall, no chloroplasts, and no large central vacuole.
Once stained and mounted, they appear scattered across the slide in irregular clusters, often overlapping. Their outlines are soft and irregular — nothing like the neat rectangular grid of onion cells under the microscope. That floppy, informal arrangement is the first visual clue you are looking at an animal cell.
The Three Structures You Can See
- Nucleus: The standout feature. A single, round to oval body, densely stained, usually positioned near the centre of the cell. With methylene blue it stains deep blue; with iodine, dark yellow-brown. This is the structure the practical is designed to reveal, and at 400× it is unmistakable.
- Cytoplasm: The pale, slightly granular region filling the space between the nucleus and the cell boundary. It stains lightly — enough to define the cell’s area without obscuring the nucleus.
- Cell boundary (plasma membrane outline): Visible as the cell’s irregular edge. The actual lipid bilayer is only 7–10 nanometres thick — far below the resolution of a school light microscope — so what you see is the cell’s outline, not the membrane itself. This is a common misconception worth noting in your lab report.
What You Cannot See With a Light Microscope
Standard bright-field microscopy at school magnifications does not reveal mitochondria, ribosomes, endoplasmic reticulum, or the membrane bilayer. A nucleolus is occasionally visible inside the nucleus at 400× with very high-quality staining, but it is not guaranteed. Do not record these structures unless you can genuinely see them — marks are lost for claiming organelle detail that requires electron microscopy.
Why Cheek Cells Are a Classic Student Specimen
Cheek cells tick every box for a first microscopy practical:
- Large and flat: At ~60 µm across, they are among the largest readily available human cells. Their flat profile means they lie in a single focal plane, making focusing straightforward.
- Accessible and ethical: Collection is non-invasive. A cotton bud (cotton swab) and 10 seconds is all it takes.
- Excellent nuclear visibility: The nucleus is large relative to cell size and stains strongly, giving students a clear, unambiguous result.
- Perfect animal-cell model: Cheek cells demonstrate every key animal-vs-plant difference — no cell wall, no chloroplasts, no large vacuole — which is exactly what Year 9–11 biology curricula require students to understand. The Khan Academy cell structure overview is a useful companion resource for understanding these differences.
- No specialist equipment: Any compound light microscope capable of 400× will do.
What You Need
- Compound light microscope
- Clean glass microscope slides and coverslips
- Cotton bud (cotton swab) or clean flat wooden spatula
- Stain: methylene blue solution (preferred) or iodine (Lugol’s solution)
- Dropper or pipette
- Mounting needle or pencil
- Filter paper or tissue
- Gloves (optional but recommended — methylene blue stains skin and clothing)
Safety note: Methylene blue stains skin and fabric permanently. Work over a protected surface and wear gloves if available. Iodine (Lugol’s solution) is a mild irritant and stains — handle with care and keep away from eyes.

How to Prepare a Cheek Cell Slide (Step by Step)
- Collect the sample. Using the flat side of a clean cotton bud (or wooden spatula), gently scrape the inside of your cheek with a light circular motion. No pressure, no digging — you want surface cells, not a wound. The swab will look blank; that is normal.
- Apply the smear. Swab the collected material thinly across the centre of a clean glass slide. A thin, even smear gives better results than a thick blob — fewer overlapping cells and easier focussing.
- Add the stain. Place one small drop of methylene blue (or iodine) directly onto the smear. One drop is enough; excess stain creates crystals that obscure the cells.
- Apply the coverslip. Hold the coverslip at approximately 45° to the slide, touch one edge to the slide beside the drop, then slowly lower it using a mounting needle. This technique pushes air out ahead of the coverslip rather than trapping it beneath — the primary cause of air-bubble artefacts.
- Blot excess stain. Press a small piece of filter paper or tissue against the edge of the coverslip to wick away any stain that has squeezed out. This prevents the stain from creeping under the objective lens.
- Place on the stage and focus. Start at low power (40× total magnification) to locate the smear area, then increase to 100× to find individual cells, then switch to 400× for detailed observation. Always focus down slowly to avoid crashing the objective into the slide. See the section on how to prepare microscope slides for general slide technique.
Methylene Blue vs Iodine — Which Stain?
Both stains work; your choice depends on what you want to see most clearly and what is available in your school’s science kit.
| Property | Methylene Blue | Iodine (Lugol’s) |
|---|---|---|
| Colour result | Nucleus: deep blue. Cytoplasm: pale blue. | Nucleus: dark brown. Cytoplasm: yellow-brown. |
| Nuclear contrast | Excellent — strongest differentiation between nucleus and cytoplasm | Moderate — nucleus slightly darker than cytoplasm but less distinct |
| Best for | Cheek cells, any animal cell specimen | Plant cells (especially starch detection); works on cheek cells but not optimal |
| Cost / availability | Low cost; standard in AU school science kits | Very low cost; also standard in AU school science kits |
| Staining risk | Stains skin and fabric — gloves advised | Mild irritant; stains surfaces |
| Recommendation | First choice for cheek cells | Acceptable substitute if methylene blue unavailable |
Iodine is the standard stain for onion cells and plant specimens because it also stains starch (turns blue-black), which is useful in plant-cell practicals. For cheek cells, methylene blue gives cleaner results and is the recommended choice.
Choosing the Right Magnification
Total magnification equals the objective power multiplied by the eyepiece power. Most school microscopes have a 10× eyepiece, so the figures below assume that standard configuration. Understanding your microscope’s objective and eyepiece will help you calculate total magnification correctly before you start.

| Total magnification | Objective | What you see |
|---|---|---|
| 40× | 4× | The smear area as a whole; scattered specks and clusters. Good for locating cells but too low for structure. |
| 100× | 10× | Individual cells visible and countable. Cell boundaries and a hint of the nucleus are apparent. Good for an overview of cell distribution and size. |
| 400× | 40× | Recommended for detail. Nucleus, cytoplasm, and cell outline all clearly resolved. This is the standard working magnification for this practical. Scan the slide systematically — the field of view is small at this magnification. |
| 1000× | 100× (oil) | Rarely needed for cheek cells; overkill for school purposes. Requires immersion oil and offers minimal additional detail for this specimen. |
Workflow tip: Always start at 40× to locate a region with well-spread cells, move to 100× to choose a good individual cell, then switch to 400× to study it. Never jump straight to 400× — you will spend most of your time hunting for cells in a small field of view.
Cheek Cells vs Onion Cells — Animal vs Plant
The cheek cell–onion cell comparison is one of the most common questions in first-year biology, and for good reason: these two specimens are often done as a pair to demonstrate the fundamental differences between animal and plant cells.
| Feature | Cheek cells (animal) | Onion epidermal cells (plant) |
|---|---|---|
| Cell wall | None — flexible plasma membrane only | Present — rigid cellulose wall gives a firm rectangular outline |
| Shape | Irregular, floppy, rounded edges | Regular, rectangular / brick-shaped |
| Arrangement | Scattered, overlapping, informal | Tidy tile / brick-wall pattern |
| Chloroplasts | None | Absent in inner epidermal layer (present in leaf cells) |
| Central vacuole | None (may have tiny vacuoles) | Large central vacuole visible |
| Nucleus | Prominent, central, dark-staining | Present but pushed to edge by vacuole |
| Best stain | Methylene blue | Iodine |
| Size | ~50–70 µm | ~200–400 µm long (larger, easier to resolve at low magnification) |
The most visually obvious difference is arrangement: cheek cells look like scattered fallen leaves, while onion cells look like a neat tiled floor. Both specimens are covered in Australian Year 9–10 biology, and comparing them in a single lab session is an effective way to anchor the animal-vs-plant distinction. Robert Hooke coined the word “cell” in 1665 after observing cork tissue — a classic piece of history covered in the history of the microscope.
What a Healthy Cheek Cell Looks Like vs Artefacts
Knowing what a healthy cell looks like helps you quickly dismiss the noise on your slide. A properly prepared, well-stained cheek cell has:
- A smooth, irregular but continuous outline
- Pale, relatively uniform cytoplasm
- A single, clearly defined, darkly stained nucleus — round to oval, roughly one-third the cell’s width
- A flat profile (no three-dimensional lumps or sharp angular edges)
For comparison with human blood cells under the microscope, cheek cells are substantially larger and more irregular in outline.
Common artefacts students misidentify:
- Air bubbles: Perfectly circular with a thick, dark, sharply defined ring. They look almost like cartoon cells. If it is a perfect circle with a heavy border and an empty interior, it is a bubble, not a cell. Reduce these by using the 45° coverslip technique.
- Bacteria: Tiny rods or spheres (cocci) — completely normal in a mouth swab. They are far smaller than any cell structure. Students sometimes mistake dense clusters of bacteria for organelles. They are not — they are just the natural microbiome of your mouth. For a detailed look at bacterial forms, see our guide to bacteria under the microscope.
- Stain crystals / precipitate: Sharp-edged, geometric blue specks. Caused by too much methylene blue or allowing the stain to dry before applying the coverslip. Use one drop only and work quickly.
- Overlapping / folded cells: Two cells on top of each other look like one oddly shaped cell with two nuclei, or a cell with an unusually thick region. Focus up and down slightly — if you see two distinct layers, it is two cells.
- Debris and food particles: Irregular dark blobs with no discernible structure. Brushing teeth 30 minutes before the practical reduces food particle contamination.
Note that the cells you collect are shed squamous cells — mostly dead or dying. You will not see cells dividing (mitosis) on your slide. This is expected, not a sign of poor preparation. For context on what actively dividing cells look like, the National Geographic cell overview covers cell cycle basics clearly.
Troubleshooting Your Slide
- No cells visible at any magnification: The smear was too light. Re-swab with firmer circular pressure and re-smear. Check you are focussing on the stained area of the slide, not the blank glass beside it.
- Everything looks too dark / stain blocks detail: Too much stain was applied, or the stain sat too long before the coverslip was added. Prepare a fresh slide with a single small drop of stain and apply the coverslip within 30 seconds.
- Nucleus not visible: You are likely at too low a magnification. Move to 400×. If still not visible, the stain may be too dilute — check the concentration of your methylene blue solution.
- Too many air bubbles: Practise the 45° coverslip lowering technique. Lower slowly and steadily. Bubbles that are already trapped cannot be removed; prepare a fresh slide.
- Cells keep moving / drifting: Excess stain or water beneath the coverslip. Blot the edge firmly with tissue. If the coverslip is floating, add a tiny smear of nail varnish to seal two opposite edges.
Frequently Asked Questions
What do cheek cells look like under a microscope?
Cheek cells appear as large, flat, irregularly shaped cells with a clearly stained dark nucleus at or near the centre, pale cytoplasm filling the rest of the cell, and a soft, irregular outer boundary. They are scattered and often overlapping on the slide. Stained with methylene blue, the nucleus is deep blue and the cytoplasm pale blue. At 400× magnification all three structures — nucleus, cytoplasm, and cell outline — are clearly visible.
What magnification do you need to see cheek cells?
You can see cheek cells at 100× (10× objective, 10× eyepiece), but 400× (40× objective) is the recommended working magnification for detail. At 400× the nucleus, cytoplasm, and cell boundary are all clearly resolved. Start at 40× to locate cells, then increase to 100× and finally 400× to study a single cell in detail.
Why do we stain cheek cells with methylene blue?
Unstained cheek cells are nearly transparent under bright-field illumination — there is very little colour or contrast to distinguish structures. Methylene blue is a cationic (positively charged) dye that binds to acidic cell components, particularly DNA in the nucleus. This stains the nucleus deep blue and lightly tints the cytoplasm, creating the contrast needed to see cell structure clearly. Iodine can be used as an alternative but provides lower nuclear contrast for animal cells.
What structures can you see in a cheek cell?
With a standard school light microscope and methylene blue stain, you can see three structures: the cell membrane outline (the cell’s irregular boundary), the cytoplasm (pale, granular interior), and the nucleus (dark, dense, centrally located). You cannot see mitochondria, ribosomes, endoplasmic reticulum, or the membrane bilayer — those require electron microscopy or specialist staining techniques beyond school level.
Why are cheek cells used in biology experiments?
Cheek cells are ideal for school biology practicals because they are large (~60 µm), flat, easily collected without any invasive procedure, and provide a clear model of an animal (eukaryotic) cell. The nucleus stains strongly and is easy to identify at 400×. They are also free and always available, unlike specimens that require preparation or purchase. They are the standard comparison specimen for demonstrating how animal cells differ from plant cells such as onion epidermal cells.
What is the difference between cheek cells and onion cells?
The key differences are structural. Cheek cells (animal cells) have no cell wall, no chloroplasts, and no large central vacuole — their outline is soft and irregular, and they scatter randomly on the slide. Onion epidermal cells (plant cells) have a rigid cellulose cell wall that gives them a rectangular shape, are arranged in a neat brick-wall pattern, and have a large central vacuole that pushes the nucleus to the cell’s edge. Methylene blue is preferred for cheek cells; iodine is standard for onion cells.
Are cheek cells prokaryotic or eukaryotic?
Cheek cells are eukaryotic. They are human cells and therefore have a true membrane-bound nucleus, along with other membrane-bound organelles. This distinguishes them from prokaryotic cells (bacteria and archaea), which lack a nucleus. The bacteria you may see on your cheek cell slide — tiny rods and spheres — are prokaryotic, which is a useful real-world comparison visible in the same field of view.
Can you see the nucleus in a cheek cell?
Yes — clearly, at 400× with methylene blue stain. The nucleus is the most prominent feature of a stained cheek cell. It appears as a dark blue, roughly circular or oval body, usually near the centre of the cell, noticeably darker than the surrounding cytoplasm. It is the primary learning objective of the cheek cell practical, and a well-prepared slide will make it unmistakable.
For a broader look at human cells visible under a light microscope, see our guides to human blood cells under the microscope, sperm cells under the microscope, and human tears under the microscope — each offers a different perspective on how cell structure relates to function.
Conclusion
Human cheek cells remain one of the most rewarding specimens in school biology — simple to collect, quick to stain, and immediately revealing about what animal cells actually look like. The dark nucleus stained blue against pale cytoplasm is often the first time a student genuinely sees a cell rather than just a diagram. Whether you are preparing a slide for the first time or refining your technique for a class practical, the principles are the same: clean collection, a thin smear, and enough methylene blue to make the nucleus pop.
Have you tried observing your own cheek cells? Did you spot any bacteria or unexpected artefacts in the field of view? Share your experience or questions in the comments below — we would love to hear what you found.