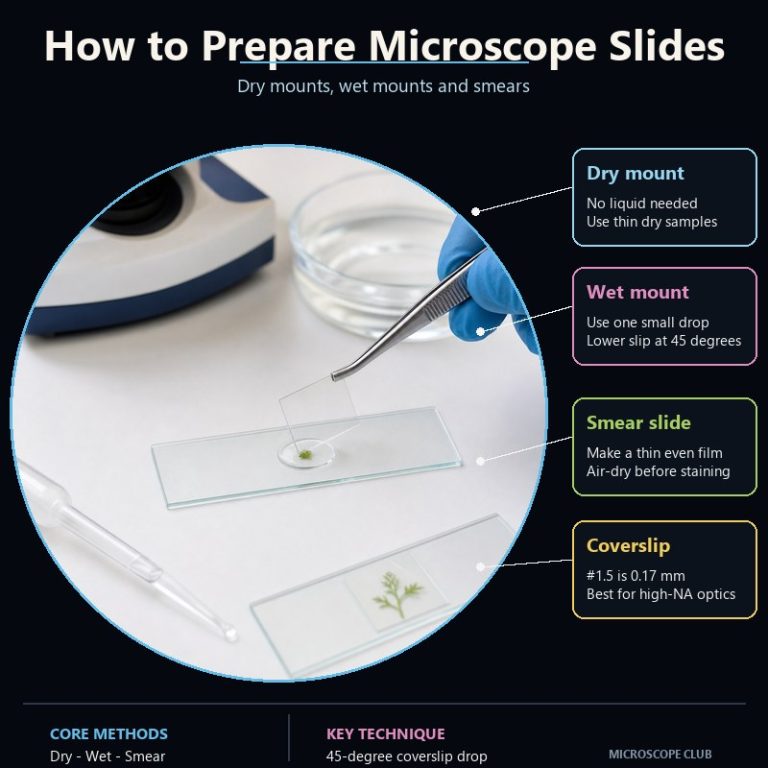
Preparing a microscope slide correctly is the step most beginners skip — and then wonder why everything looks blurry, speckled, or flat. The three core techniques (dry mount, wet mount, and smear) each have one or two decisions that make or break the result, and getting them right turns a muddy image into a sharp, readable specimen.
What you need before you start: clean slides and the right coverslip
Commercial microscope slides are clean enough for most hobby work straight out of the box. For critical imaging — histology, confocal, oil-immersion — store slides in 70% ethanol and wipe dry with a lint-free cloth immediately before use. A fingerprint or grease smear creates an in-focus debris layer that sits right on top of your specimen and kills contrast.
Choosing a coverslip matters more than most guides admit. Standard flat slides need a coverslip for every wet or dry mount. Three grades exist:
| Grade | Thickness | Use |
|---|---|---|
| #2 | 0.17–0.25 mm | General use, lower-power objectives |
| #1.5 | 0.16–0.19 mm (nominal 0.17 mm) | Standard for oil-immersion and high-NA objectives — look for “0.17” engraved on the objective |
| #1.5H | 0.17 mm ±0.005 mm | Super-resolution and confocal (tightest tolerance) |
The industry default for anything above 40× is #1.5 (0.17 mm). Using a thicker #2 slip with an oil-immersion objective introduces spherical aberration that no amount of focus adjustment will fix. (Nikon MicroscopyU; University of Arizona Microscopy)

How to make a dry mount slide
Dry mounting is the most forgiving technique: no liquid, no timing pressure, no evaporation. It suits inorganic specimens and dead dry material — insect parts, pollen, dust, hair, feathers, salt crystals. The single variable that determines your image quality is thickness. A specimen that is too thick blocks light entirely; what you see through the eyepiece is a dark, featureless mass with nothing resolvable. Slice or tease the sample as thin as you can — with pollen or single hairs this takes care of itself; with insect wings or leaf sections, a fresh razor blade makes the difference.
- Prepare the specimen by slicing the portion you want to view as thin as possible. Opaque or dark specimens need to be nearly translucent; hold a thin slice up to a window — if you can see light through it, it’s thin enough.
- Handle the slide by its edges only. Using tweezers, place the specimen on the center of the slide.
- Pick up a coverslip by its edges, hold it at roughly 45° to the slide surface with one edge touching beside the specimen, then slowly lower it flat. This angle-drop method lets trapped air escape rather than sealing a bubble underneath.
- Load the slide onto the microscope stage, centering the specimen under the aperture before focusing.
Common mistake: Dropping the coverslip straight down from directly above. This almost always traps a bubble that sits right over the specimen. The 45° drop is non-negotiable once you’ve done it both ways.

How to make a wet mount slide
Wet mounts are for living organisms, liquid specimens, and anything that needs to stay hydrated — pond water microbes, cheek cells, yeast, onion cells. The clock is against you the moment you lay the coverslip: water evaporates in minutes at room temperature. Glycerin or glycerol is a better mounting fluid when you need more time — it withdraws water slowly and keeps organisms alive and mobile for hours. Seal the coverslip edges with petroleum jelly or clear nail polish and you can extend a water mount to 15–20 minutes. (MicrobeHunter)
- Lay the slide on a flat surface. For a liquid specimen, use a pipette or medicine dropper to place a single small drop on the center — resist the urge to add more; a big drop equals a thick, uneven mount. For a solid specimen, place the sample first, then add one drop of your chosen mounting fluid alongside it.
- Pick up the coverslip by its edges. Touch one edge to the slide surface just beside the drop at approximately 45°, then slowly lower the opposite edge until the slip lies flat. The drop will spread by capillary action and fill the space with minimal air trapping.
- Blot any excess fluid from around the coverslip edges with a torn corner of paper towel — not from the top, which risks shifting the specimen.
- If you see one large bubble, try gently pressing the center of the coverslip with a pencil eraser to push it toward the edge. If bubbles are many and small, the coverslip was dropped too fast — remake the slide.
- Load onto the microscope stage and focus slowly from below, starting at lowest magnification.
Choosing your liquid: plain water for quick observation; glycerin or glycerol for extended work; saline (brine) for marine or brackish organisms; immersion oil only when mounting is media-specific and you are working with an oil-immersion objective.
How to make a smear slide (blood smear technique)
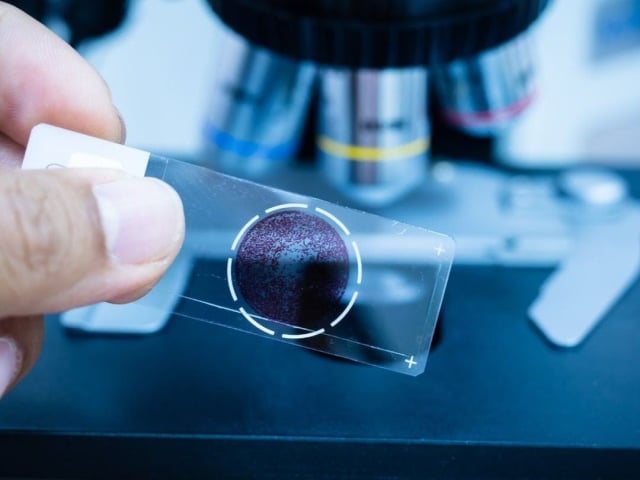
The smear is the most skill-dependent preparation — a poor blood smear is nearly unreadable, and the mistakes are not always obvious until you’re already at the eyepiece. A good smear is three-quarters the length of the slide, shaped like a thumbprint (wider at the base, tapering to a thin feathered edge), and shows a faint rainbow sheen when you tilt it under a lamp. Too thick and you see a dark red mass; too thin and cells are scattered, torn, and uncountable. (Texas A&M Veterinary Medical Diagnostic Laboratory)

- Use a pipette to collect a small sample. Place a drop roughly the size of a small pea near one end of a clean slide — not at the very end, leave a few millimetres of room.
- Place a second (spreader) slide at approximately 30° to the first, edge touching the slide in front of the drop. Back the spreader into the drop until blood spreads along its full edge by capillary action — this step is slower than it looks; wait for the blood to reach the corners before pushing.
- With a smooth, continuous motion, push the spreader forward at constant speed with no downward pressure. Speed and angle control thickness: a lower angle (20–25°) produces a longer, thinner film suited to high-hematocrit samples; a higher angle (35–40°) produces a shorter, thicker film. (Clinician’s Brief)
- Allow the smear to air-dry completely before applying a coverslip or stain. A wet smear covered too early distorts cell morphology.
- Cover the dried smear with a coverslip, or proceed to fixation and staining if differential cell examination is needed.
The feathered edge is your quality check: it should be thin enough that you can see individual cells even without staining. If it ends abruptly in a sharp line or a ragged mass of cells, the angle was too steep or the push too slow.
Fixation and staining: when basic preparation is not enough
A plain smear or wet mount shows structure but not internal detail. Staining exploits the different chemical affinities of cell components to create contrast that is otherwise invisible. Before staining, biological specimens usually require fixation — locking the cellular structure in place so it does not distort during the staining process. Two common approaches:
- Heat fixation — for smears (bacterial or blood): pass the air-dried slide quickly through a flame two or three times, specimen side up. Cells adhere to the glass and are killed without dissolving. Fast, no chemicals.
- Chemical fixation — for tissue sections: formalin (10% neutral buffered formalin) or ethanol. Formalin cross-links proteins and is the standard for histology; ethanol is faster and used for cytology smears.
The two stains beginners are most likely to use:
- Methylene blue — one step, blue, stains nuclei and most cellular material. Flood the fixed smear, leave 30–60 seconds, rinse with water, blot dry. Works on cheek cells, bacteria, and onion cells.
- Hematoxylin & eosin (H&E) — the standard in histology. Hematoxylin (purple/blue) stains nuclei; eosin (pink) stains cytoplasm and connective tissue. Sequence: hematoxylin ≈5 min → rinse → eosin ≈2 min → rinse → dehydrate through ethanol grades → clear → coverslip. The finished slide distinguishes nucleus from cytoplasm cleanly under high magnification.
Mounting media: temporary vs permanent
How long your slide lasts depends on what you mount it in:
- Temporary mounts (water, glycerol, saline) — suited to living specimens and quick observation. Water: minutes. Glycerol: hours to days. Neither should be long-term archived.
- Permanent mounts — for stained tissue sections you want to keep. DPX (distrene-plasticiser-xylene) is the modern standard, replacing Canada balsam. Apply a small amount to the dried, cleared section, lower the coverslip, and let it cure. A properly made DPX slide is stable for decades.
Types of microscope slides

Most compound light microscope work uses standard flat slides, but the right slide for your specimen matters:
Flat slides
Clear soda-lime or borosilicate glass, 1 × 3 inches, approximately 1 mm thick. At least one end is frosted for labeling — use a pencil or lab marker and always label before mounting. Most have clipped or beveled corners to reduce chip risk. A coverslip is required for every mounted specimen.
Concave (well) slides
A flat slide with one or two circular depressions milled into the surface. The well holds liquid specimens without a coverslip and makes it easier to observe hanging-drop preparations of living microorganisms. The bowl depth also accommodates specimens that are slightly bulkier than a flat mount allows. Slightly thicker and more expensive than flat slides, but the same footprint.
Electrostatic charged (poly-L-lysine) slides
Coated with a positively charged layer that bonds negatively charged specimens — tissue sections, cytology preparations, cancer cells — so they cannot slide or float off during staining. Standard in clinical histology labs. For routine hobby work they are unnecessary.
Etched grid / graticule slides
A grid pattern etched or printed onto the surface divides the viewing area into measured zones. Useful for cell counting, sizing, and mapping the position of specific structures so you can return to them after removing and replacing the slide.
Transparent mica slides
Mica is scratch-resistant and optically flat — used for hard, rough particulates (mineral dust, abrasives) that would damage or contaminate glass. A niche tool; not something you will need for biological work.
Other types of microscope slide preparation
Beyond the three core techniques and staining, a handful of specialist approaches exist for specific specimens:
- Squash preparation — soft plant or animal tissue is placed on a slide, covered, and gently pressed with a thumb or lens tissue to spread cells into a monolayer. Used for chromosome analysis and root-tip cell division studies.
- Teased preparation — fibrous tissue is teased apart with mounted needles in a drop of saline to separate individual fibers or cells for examination.
- Cryosection — tissue is snap-frozen and sectioned at −20 °C in a cryostat. Preserves antigens for immunofluorescence work where formalin fixation would destroy the target. Requires lab equipment beyond most educational settings.
These techniques exist on a spectrum from hobby-accessible (squash) to research-lab-only (cryosection). For most microscope types used in education and home microscopy, dry mount, wet mount, and smear cover the overwhelming majority of specimens you will encounter. Advanced techniques like phase contrast microscopy open up unstained living cells that would otherwise be near-invisible in brightfield.
Common mistakes and how to spot a bad slide
| What you see | Likely cause | Fix |
|---|---|---|
| Large bubble over specimen | Coverslip dropped straight down | Press bubble toward edge with a pencil; if stuck, remake the slide using the 45° drop |
| Many small bubbles throughout | Too much liquid or coverslip lowered too fast | Blot the excess, remake — partial fix is rarely worth the time |
| Dark, featureless blob at high mag | Specimen too thick for transmitted light | Re-slice thinner; for very opaque material consider dark field microscopy |
| In-focus debris / haze layer | Greasy or contaminated slide | Clean with 70% ethanol before re-mounting |
| Blood smear: solid red mass, no cells | Smear too thick — angle too high or push too slow | Lower spreader angle (toward 25°), increase push speed |
| Wet mount dries out mid-observation | Water as mounting medium | Switch to glycerin for extended work; seal coverslip edges with petroleum jelly |
| Image blurs at high mag despite sharp focus at low | Wrong coverslip thickness with high-NA objective | Replace with #1.5 (0.17 mm) slip |
Labeling and storing prepared slides
A slide with no label is a slide that will be re-made in three months when you cannot identify the specimen. Mark the frosted end before mounting (pencil survives solvents and wet staining better than pen). Include: specimen name, preparation date, stain used (if any), and magnification range it was made for. For long-term storage, keep slides horizontal in a closed box away from direct light. Stained permanent mounts in DPX last indefinitely in a cool, dry environment. Glycerol wet mounts should be viewed the same session.
FAQ
What liquid is best for a wet mount?
For a quick look: plain water. For extended viewing: glycerin (glycerol), which keeps specimens hydrated for hours versus water’s few minutes. For marine specimens: diluted saline matched to their natural salinity. Never use immersion oil as a wet-mount medium — it is for lens-to-slide contact only.
Why does my wet mount have so many air bubbles?
Two causes: too much liquid on the slide before placing the coverslip, or the coverslip was dropped flat instead of being angled. Use a single small drop, and lower the coverslip from a 45° angle, edge first. If the bubbles are small and numerous after a correct technique, the specimen’s surface may be trapping air — try adding a tiny amount of glycerin to the drop to improve wetting.
What is the correct coverslip thickness for oil immersion?
The standard is #1.5, which is 0.17 mm. Most high-NA oil-immersion objectives have “0.17” engraved on the barrel — that number refers to the required coverslip thickness. Using a #2 (up to 0.25 mm) with these objectives introduces spherical aberration that degrades resolution.
Do you need a coverslip on every slide?
Not always. Stereo microscopes and dissecting scopes are designed for surface imaging and do not require (or typically use) coverslips. Concave slides holding larger liquid preparations can be used coverslip-free. For any transmitted-light compound microscope work, a coverslip is almost always necessary to flatten the specimen and protect the objective lens.
How do you stain a slide without commercial staining kits?
Methylene blue tablets dissolved in distilled water are cheap and available from aquarium suppliers — a 1% solution works for most basic cell staining. For Gram staining of bacteria, premixed Gram stain sets are sold by lab suppliers for under $20 and contain all four reagents. Crystal violet alone (the first step of Gram staining) is also sold separately and stains plant cell walls well. H&E requires four separate chemicals and dehydration steps — not practical without lab access.
Conclusion
Preparing a microscope slide comes down to matching your technique to your specimen: dry mount for inorganic and dead material, wet mount for living organisms (with glycerin when you need more than a few minutes), and smear for liquid biological samples like blood. Across all three, the most common errors — dirty glass, air bubbles, wrong coverslip thickness, and smear angle — have simple, repeatable fixes once you know what a bad result looks like. Start with a clean slide, choose your technique deliberately, and use a #1.5 coverslip any time you push past 40×.
Once you’ve got clean, well-prepared slides, the next step is choosing the right illumination method for your specimen — brightfield works for stained tissue, but unstained living cells often reveal far more under phase contrast. Good slide preparation and good microscope technique reinforce each other. Master the basics here, and your images will improve immediately.
Originally posted 2020-04-21 07:24:14.