Bacteria under a microscope appear as tiny rods, spheres, or spirals measuring just 0.5–5 micrometers long — so small they sit right at the resolution limit of a light microscope. Unstained they are nearly transparent, but after Gram staining they show up as purple (Gram-positive) or pink (Gram-negative) cells. You need at least 400× magnification to spot them at all, and 1000× with oil immersion to resolve their shape clearly.
How Big Are Bacteria?
Bacteria size in micrometers
Most bacteria range from 0.5 to 5 micrometers (µm) long and 0.2 to 2 µm wide. To put that in perspective, a typical human cheek cell is about 60 µm across — meaning you could line up 10 to 100 bacteria end-to-end across a single cheek cell. A classic rod-shaped bacterium like E. coli measures roughly 2 µm long by 0.5 µm wide. Round cocci such as Staphylococcus aureus are only about 0.5–1 µm in diameter.
For another sense of scale: bacteria are much smaller than the protists, algae, and rotifers you see in microbes in pond water. Those pond organisms are visible at 40×–100×; bacteria need far more power. If you want a deeper dive into cell sizes across the tree of life, Molecular Biology of the Cell (NCBI Bookshelf) has a well-cited reference on relative cell dimensions.
Why size dictates the microscope you need
The resolution limit of a standard light microscope is approximately 0.2 µm — set not by lens quality, but by the wavelength of visible light. Because bacteria hover right at that threshold, a compound light microscope can reveal their shape but cannot show fine internal detail or thin surface structures. For anything finer than ~0.2 µm you need electron microscopy. This physics boundary is explained in depth in our post on the resolution limit of a microscope.
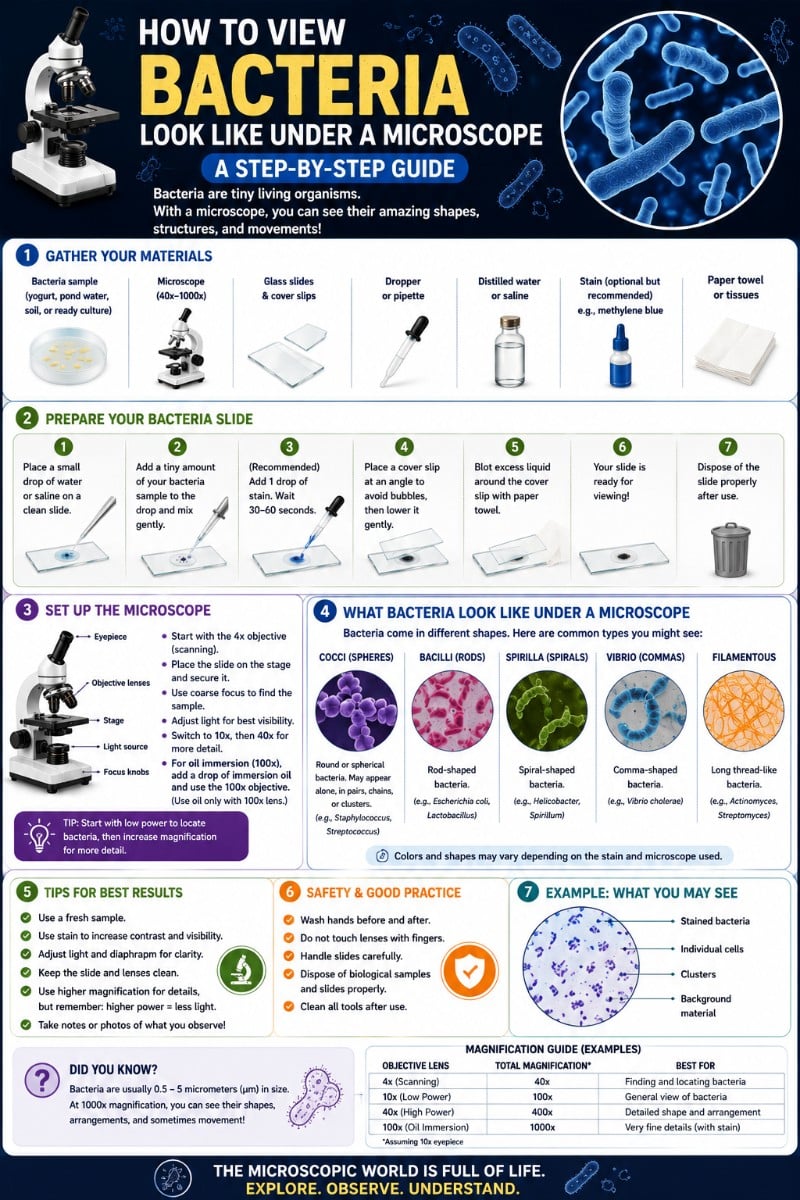
The Magnification You Actually Need
400× to find them, 1000× oil immersion to see them
At 400× (10× eyepiece + 40× objective) bacteria appear as faint, tiny dots or short lines — enough to confirm they’re present but not enough to distinguish a rod from a sphere reliably. To clearly resolve shape, arrangement, and staining color you need 1000× using a 100× oil-immersion objective. Oil immersion works by filling the gap between the objective lens and the slide with immersion oil (refractive index ~1.515), which increases the numerical aperture to around 1.25 and squeezes out as much resolving power as the wavelength of light allows.
Without oil immersion at 1000×, light refracts at the air-glass interface and the image turns blurry and dim. Most reliable bacterial work — Gram staining, morphology identification — depends on that oil-immersion step.
Empty magnification and the resolution limit
Going above roughly 1000–1500× on a light microscope produces empty magnification: the image gets larger but no new detail appears. You’ve already extracted everything the wavelength of visible light can deliver. A 2000× light microscope image of bacteria is just a bigger, blurrier version of the 1000× image. More detail requires a fundamentally different instrument — an electron microscope. See our comparison of a light microscope vs. electron microscope for the full breakdown, or check which instruments reach the highest magnification.

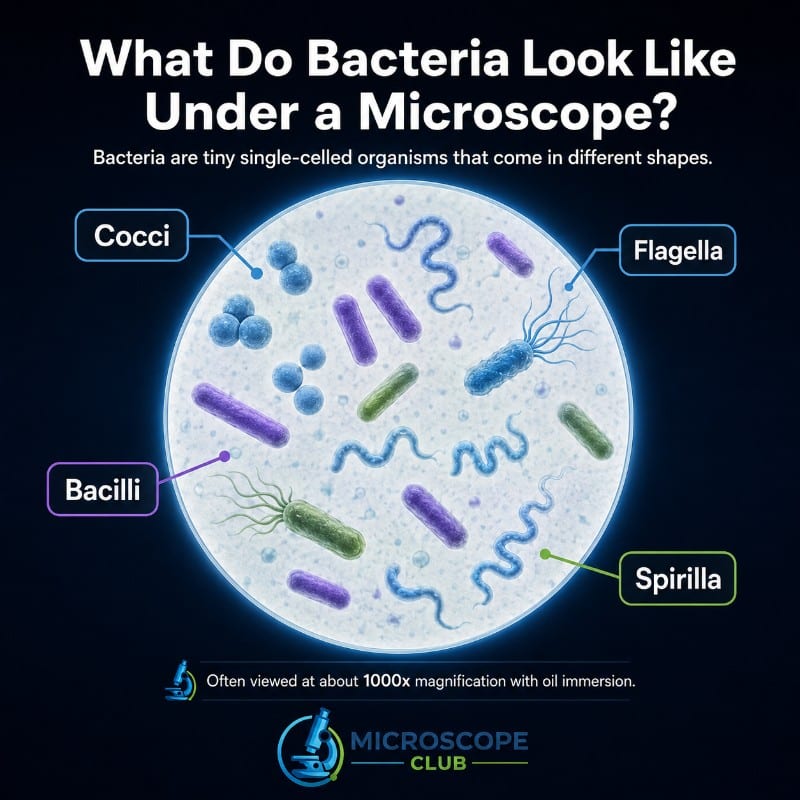
The Three Main Bacterial Shapes
Bacterial morphology — the technical word for shape — is one of the first things a microbiologist uses to narrow down an identification. There are three fundamental categories.
Cocci (spheres) and their arrangements
Cocci (singular: coccus) are round or oval cells. What makes them diagnostic is how they cluster after dividing:
- Diplococci — pairs (e.g., Neisseria gonorrhoeae)
- Streptococci — long chains, like beads on a string (Streptococcus pyogenes)
- Staphylococci — irregular grape-like clusters (Staphylococcus aureus)
- Tetrads — groups of four in a square
- Sarcinae — cubic packets of eight
Staphylococci arrangements are easy to spot at 1000× — the purple grape-like clusters of S. aureus are almost immediately recognizable after Gram staining.

Bacilli (rods)
Bacilli (singular: bacillus) are rod-shaped. They range from fat, stubby coccobacilli to long, slender rods. Like cocci, they form characteristic arrangements: single rods, diplobacilli (pairs end-to-end), and streptobacilli (chains). E. coli is the textbook Gram-negative bacillus — pink rods appearing singly or in loose pairs. Bacillus subtilis is a Gram-positive purple rod often used in school labs because it’s non-pathogenic and forms easily visible endospores.
Spiral forms — vibrio, spirillum, spirochete
Spiral bacteria come in three distinct sub-types that look quite different under the microscope:
- Vibrio — a comma-shaped or single-curve rod. Vibrio cholerae, the cause of cholera, is the classic example.
- Spirillum — a rigid, stiff spiral. Multiple curves, like a corkscrew spring that doesn’t flex.
- Spirochete — a long, thin, flexible corkscrew. Treponema pallidum (syphilis) and Borrelia burgdorferi (Lyme disease) are spirochetes. Their characteristic twisting motility is striking under dark-field microscopy.
Here’s a reference table covering all three main shapes with named species and typical sizes:
| Shape | Common Name | Example Species | Typical Size |
|---|---|---|---|
| Coccus | Sphere / round | Staphylococcus aureus, Streptococcus pyogenes | 0.5–1 µm diameter |
| Bacillus | Rod | E. coli, Bacillus subtilis | 1–5 µm long × 0.5–1 µm wide |
| Vibrio | Comma-shaped rod | Vibrio cholerae | 1–3 µm long |
| Spirillum | Rigid spiral | Spirillum volutans | 2–10 µm long |
| Spirochete | Flexible corkscrew | Treponema pallidum, Borrelia burgdorferi | 5–20 µm long |
What Color Are Bacteria? Gram Staining Explained
Why bacteria are nearly invisible unstained
Fresh, living bacteria have almost the same refractive index as water. Under standard bright-field illumination they look like faint, ghostly smudges — if you can see them at all. This is why staining is not optional in most practical microscopy; it’s the step that turns bacteria from nearly invisible to clearly defined. The American Society for Microbiology has a solid overview of why we stain bacteria if you want the biochemical detail behind each staining method.
The simplest option is a simple stain — methylene blue or crystal violet applied without a decolorization step — which turns all cells the same uniform blue or purple. Useful for shape and arrangement, but tells you nothing about cell wall type. For identification, the Gram stain is the standard.

Gram-positive (purple) vs. Gram-negative (pink)
The Gram stain, developed in 1884 by Danish bacteriologist Hans Christian Gram, remains the most widely used staining technique in microbiology. The four-step procedure — crystal violet, iodine mordant, alcohol decolorizer, safranin counterstain — divides bacteria into two groups based on their cell wall:
| Gram Reaction | Color Under Microscope | Cell Wall | Examples |
|---|---|---|---|
| Gram-positive | Purple / violet | Thick peptidoglycan layer retains crystal violet | Staphylococcus, Streptococcus, Bacillus |
| Gram-negative | Pink / red | Thin peptidoglycan + outer membrane; loses crystal violet, takes up safranin | E. coli, Salmonella, Neisseria, Vibrio cholerae |
Other specialized stains you may encounter:
- Acid-fast stain (Ziehl–Neelsen) — stains Mycobacterium species (TB, leprosy) bright red against a blue background. Their waxy cell wall resists the Gram stain.
- Endospore stain (Schaeffer–Fulton) — reveals dormant endospores inside Bacillus and Clostridium species as green ovals inside pink/red vegetative cells.
- Flagellar stain — coats flagella with a mordant to make them thick enough to see at 1000× light microscopy.
One important misconception to clear up: bacteria are not naturally colorful. The vivid purples and pinks you see in textbook micrographs come entirely from staining dyes. Unstained bacteria are essentially transparent.
Light vs. Electron Microscope — What Each Reveals
What a light microscope shows (and hides)
At 1000× with oil immersion and proper staining, a bright-field light microscope reveals:
- Overall cell shape (rod, sphere, spiral)
- Cellular arrangement (clusters, chains, pairs)
- Gram reaction (color)
- Endospores (with proper endospore stain)
- Approximate relative size

What it cannot show: flagella (typically ~20 nanometers in diameter — far below the 200 nm resolution limit), pili or fimbriae, ribosomes, internal membrane structures, or the true texture of the cell surface.
Dark-field and phase-contrast for live, moving bacteria
Standard bright-field microscopy requires fixed (killed) and stained cells. If you want to watch bacteria alive and moving, you need a different illumination technique:
- Dark-field microscopy — blocks direct light so only light scattered by the specimen reaches the eye. Bacteria glow bright against a black background. Spirochetes’ characteristic corkscrew motility is best observed this way. It’s the technique of choice for identifying Treponema pallidum in clinical samples.
- Phase-contrast microscopy — converts tiny differences in refractive index (invisible to the eye) into contrast differences. Living bacteria appear as dark or bright outlines against a gray background. No staining, no killing required.
Electron microscopy and false-color images
Electron microscopy bypasses the wavelength limit of visible light by using a beam of electrons instead. Resolution drops to single-digit nanometers, revealing flagella, pili, membrane vesicles, and internal ultrastructure in extraordinary detail.
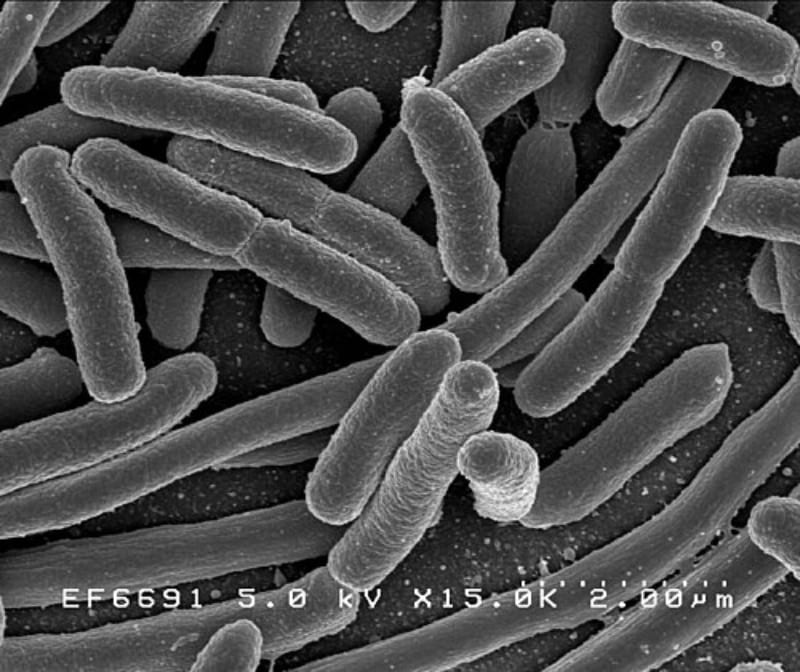
- SEM (Scanning Electron Microscopy) — scans the surface; produces dramatic 3D-looking images of cell shape and surface texture.
- TEM (Transmission Electron Microscopy) — passes electrons through an ultra-thin slice; shows internal cross-sections, ribosomes, and cell wall layers.
An important caveat: electron microscopes produce grayscale images only. The vivid colors in textbook EM photographs of bacteria are false-color — added digitally after the fact to highlight different structures. See our overview of the advantages and disadvantages of electron microscopes for more detail.
Here’s how the different instruments stack up:
| Instrument | Max Useful Resolution | Can See | Cannot See |
|---|---|---|---|
| Bright-field light microscope | ~0.2 µm | Shape, arrangement, Gram color, endospores | Flagella, pili, internal detail |
| Dark-field microscope | ~0.2 µm | Live motility, thin spirochetes glowing against dark background | Internal structures, fine surface detail |
| Phase-contrast microscope | ~0.2 µm | Live unstained bacteria, internal density differences | Flagella, fine surface features |
| SEM | ~1–20 nm | Surface texture, flagella, pili, true 3D form | Internal ultrastructure |
| TEM | ~0.1–0.5 nm | Internal membranes, ribosomes, cell wall layers, cross-sections | Surface topology (samples are sliced thin) |
Can You See Bacteria at Home?
Realistic expectations with a student microscope
The honest answer: yes, but with significant caveats. A quality student or hobbyist compound microscope with a 100× oil-immersion objective can reveal bacterial shape and Gram color if you stain properly. However, most budget microscopes sold as best microscopes for kids max out at 400× or offer a low-quality 1000× that produces blurry, dark images without an oil-immersion objective. At 400× you may see tiny moving dots in a live sample, but resolving shape reliably requires the oil-immersion step.
Phone clip-on microscopes and toy scopes with claimed magnifications of 1000×–2000× almost universally use plastic optics and produce empty magnification. They are fine for looking at fabric fibers or insect wings, but not bacteria.
Easy samples and a quick staining tip
If you have access to a proper compound scope and want to try viewing bacteria, here are approachable sources:
- Yogurt — live cultures of Lactobacillus and Streptococcus thermophilus. Dilute a small amount in water, make a thin smear on a slide, air dry, heat-fix, and apply a simple methylene blue stain. You’ll see rods and chains of cocci.
- Dental plaque — scrape between your teeth with a toothpick, smear it onto a slide, and stain. You’ll find a mix of cocci, rods, and sometimes filamentous bacteria — a mini ecosystem.
- Pond water — bacteria are present but will be dwarfed by protists and algae. Concentrate the sample and stain to make bacteria visible alongside the larger organisms.
Learning to prepare microscope slides properly is the biggest skill gate for home bacterial microscopy. A smear that’s too thick will just be a purple blob; too thin and you’ll struggle to find cells at all.
Bacteria vs. Viruses and Other Microbes Under the Microscope
Students often ask whether bacteria and viruses look similar under the microscope. They don’t — because viruses cannot be seen with a light microscope at all. Viruses range from ~20 to 300 nanometers, far below the ~200 nm resolution limit of visible light. Electron microscopy is required to visualize them.
Compared to other microbes you might find in a pond sample or a prepared educational slide:
- Protists (e.g., Amoeba, Paramecium) — 10–100× larger than bacteria, easily visible at 40×–100×, often visibly moving and complex in shape.
- Yeast — single-celled fungi, 3–10 µm across, visible at 400× without staining. Yeast under the microscope shows oval cells often with visible budding — much larger and rounder than bacteria.
- Algae — range enormously in size; even single-celled algae like Chlamydomonas (~10 µm) are larger than most bacteria and often visibly green due to chlorophyll.
The rule of thumb: if you can see something clearly at 40× or 100× magnification, it’s almost certainly not bacteria. Bacteria require 400×–1000×.
Frequently Asked Questions
Can you see bacteria with a regular light microscope?
Yes, but only at high magnification. You need at least 400× to spot bacteria as small dots, and 1000× with a 100× oil-immersion objective to clearly resolve their shape. Standard student microscopes can do this if they include an oil-immersion objective; cheap toy microscopes typically cannot.
What magnification do you need to see bacteria?
400× is the minimum to locate bacteria in a sample. 1000× with oil immersion is required to see their shape, arrangement, and staining color clearly. Beyond about 1500× on a light microscope you get empty magnification — a bigger but blurrier image with no additional detail.
What color are bacteria under a microscope?
Unstained bacteria are nearly colorless and transparent. After Gram staining, Gram-positive bacteria appear purple or violet, while Gram-negative bacteria appear pink or red. Other stains produce different results: methylene blue turns all bacteria uniform blue, and the acid-fast (Ziehl–Neelsen) stain turns mycobacteria bright red.
What shapes do bacteria come in?
The three main shapes are cocci (spheres), bacilli (rods), and spiral forms. Spiral bacteria are further divided into vibrios (comma-shaped), spirilla (rigid spirals), and spirochetes (flexible corkscrews). Bacteria also form characteristic arrangements — chains, clusters, pairs — that help with identification.
Why do bacteria need to be stained to be seen?
Bacteria are nearly transparent under bright-field illumination because their refractive index is very close to water. Staining dyes bind to cell components (cell walls, nucleic acids, proteins) and add contrast. Without staining, bacteria appear as faint, nearly invisible smudges even at 1000×. Dark-field and phase-contrast microscopy are the main alternatives that let you observe living bacteria without staining.
Can you see bacteria moving under a microscope?
Yes — in a live, unstained wet mount, motile bacteria can be seen moving. At 400×–1000× you can observe swimming bacteria in real time. Dark-field and phase-contrast microscopy make this much easier by providing contrast without killing the cells. Spirochetes, in particular, display a distinctive corkscrew tumbling motion that is characteristic enough to aid identification.
Can a phone microscope or kids’ microscope see bacteria?
Realistically, no. Most phone clip-on lenses and toy microscopes produce poor optics at the magnification bacteria require. You may see small moving dots in a dense yogurt or pond sample around 400×, but you cannot resolve bacterial shape or confirm identification. A proper compound microscope with a 100× oil-immersion objective is needed for reliable bacterial viewing.
What’s the difference between bacteria and other microbes under a microscope?
Bacteria are much smaller than most other microbes visible with a light microscope. Protists, algae, and yeast are all easily visible at 40×–200× and show complex internal structures or color. Bacteria need 400×–1000× and appear as simple rods, spheres, or spirals with no visible internal organelles. Viruses are far smaller than bacteria and cannot be seen with a light microscope at all — they require electron microscopy.
Conclusion
Bacteria are among the smallest living things you can observe with a light microscope — transparent, nearly invisible until stained, and demanding 1000× oil immersion to see clearly. Their three main shapes (cocci, bacilli, spirals) and the purple/pink split of Gram staining give you a practical identification toolkit, while dark-field and phase-contrast techniques open a window onto their living, moving world. Electron microscopy takes you deeper still, revealing flagella, surface texture, and internal ultrastructure invisible to any light-based instrument.
Have you tried viewing bacteria under your own microscope? Whether it was a yogurt smear, a dental plaque slide, or a pond water sample, we’d love to hear what you found — and what surprised you. Share your experience in the comments below.