Cork cells are the reason the word “cell” exists in biology at all. When Robert Hooke pressed a sliver of cork against his primitive microscope lens in 1665, he saw rows of empty, walled compartments so uniform they reminded him of the tiny rooms — cellae — in a monastery. He drew them, named them, and launched the science of cell theory. What you see today under a compound microscope is exactly what he saw: dead, hollow chambers arranged in a tight honeycomb, their walls still standing long after the contents have gone.
What cork cells are — and why they die on purpose
Cork cells belong to the phellem, the outermost layer of a plant’s periderm (bark). The phellem is produced outward by the phellogen (cork cambium), while a living layer called the phelloderm grows inward. Together these three layers — phellem, phellogen, phelloderm — make up the periderm, the secondary protective tissue that replaces the epidermis once a plant begins secondary growth.
Cork cells are dead at maturity by design. As each cell matures, the phellogen deposits suberin — a lipophilic biopolyester of fatty acids, glycerol, and aromatic hydroxycinnamic acid components — into the cell wall. Once suberised, the wall becomes completely impermeable to water and gases, at which point the cell contents die and the interior fills with air. What remains is the wall itself, which in the cork oak (Quercus suber) is approximately 43% suberin, 22% lignin, and 20% cellulose/hemicellulose, with extractives making up the rest [NCBI, “The making of suberin”]. That combination gives commercial cork its famous properties: lightweight, compressible, and a superb seal against liquids and gases.
The periderm in detail: phellogen, phellem, and phelloderm
The three layers work as a unit:
- Phellogen — the meristematic layer (cork cambium itself) that generates both phellem and phelloderm.
- Phellem (cork) — the outward-growing cells that suberise and die, forming the protective outer bark.
- Phelloderm — the inward-growing layer of living parenchyma cells that remains metabolically active.
The visual texture of bark — smooth on young stems, scaly or deeply fissured on mature trunks — reflects how the phellogen grows and fractures over time and across species.
Lenticels: the breathing pores of bark
Once a stem is covered in suberised, gas-impermeable cork, the plant still needs to exchange O₂, CO₂, and water vapour with the atmosphere. Lenticels are the solution: raised, pore-like regions in the periderm made of loosely packed phellogen-derived parenchyma cells with large intercellular air spaces. Because they lack suberin, lenticels remain permeable. They are visible on a low-magnification section (and even to the naked eye on many bark surfaces) as slightly raised lines or dots — they are a macroscopic periderm feature, not simply the gap between individual cork cells as some sources suggest [Oxford J. Exp. Botany].
Robert Hooke, Micrographia, and the birth of cell theory


In 1665, English scientist Robert Hooke published Micrographia — the first major illustrated work of microscopy — describing his observation of thin cork sections [Britannica, Micrographia]. He described the empty, box-like compartments in the cork and named them “cells” after the Latin cella (a small room). He was looking at cell walls, not living cells — the contents had long since dried out — but the name stuck.
A common misconception worth correcting: Hooke’s observation was not “the first recorded use of a microscope.” Compound microscopes existed at least 75 years before Micrographia — Hans and Zacharias Janssen built one around 1590, and Galileo constructed his own around 1609 (the word “microscope” was coined by Giovanni Faber in 1625). What Micrographia represented was something different: the first systematic, published account of what a microscope reveals, rigorous enough to inspire a generation of naturalists — including Antonie van Leeuwenhoek, who read Hooke and went on to observe bacteria in 1674 [Royal Society Open Biology]. For the full story of how microscopy developed from Hooke to modern techniques, see our guide to the history of the microscope.
Cork was the ideal specimen for the first published microscopy precisely because of what it lacks. Its cells are dead, uniform, and structurally simple — empty rooms with sturdy walls. There is no nucleus to confuse, no cytoplasmic streaming to chase, no staining required. A flat cork surface cut with any sharp instrument produces a section you can interpret at a glance. That accessibility made it the perfect first published image, and the observation gave biology its most fundamental vocabulary.

The cork oak: where commercial cork comes from
Commercial cork — the material in your wine bottle stopper, floor tiles, and fishing rod grip — comes from the bark of a single species: Quercus suber, the cork oak, an evergreen oak native to southwestern Europe and northwestern Africa. Portugal produces roughly 50% of the world’s supply and Spain around 30%, together accounting for about 300,000 tonnes per year. Bark is harvested every 9–12 years once the tree reaches around 25 years old, by hand-peeling the outer layers without cutting the tree, which then regrows its bark for the next harvest [Wikipedia, Quercus suber].
Other commercial uses of cork beyond wine stoppers include flooring, insulation, engine gaskets, handles for tennis rackets and fishing rods, bulletin boards, and in aerospace applications as ablative material in vehicle payload fairings for satellite launches.
What microscope do you need?
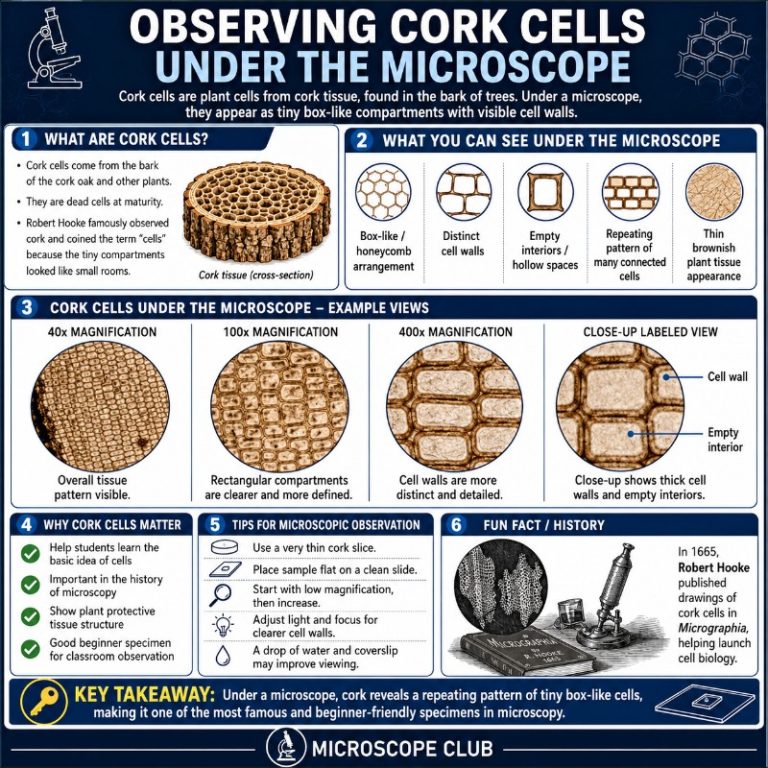
Cork cells are among the most forgiving specimens in microscopy. A standard compound light microscope with a 10x eyepiece and 10x or 40x objective is everything you need. Total magnification equals eyepiece magnification × objective magnification: 10x eyepiece × 10x objective = 100×; 10x eyepiece × 40x objective = 400×. The lower setting (100×) is where you’ll spend most of your time — it shows the honeycomb row pattern most clearly. Stepping up to 400× reveals finer wall detail but shrinks your field of view considerably, making it harder to appreciate the radial arrangement.
You do not need a stereo microscope, a phase-contrast setup, or a fluorescence system. If you have access to a microscope at all, it will work.
How to prepare and observe cork cells
The steps below follow a standard wet-mount approach. If you are new to slide preparation, our guide on how to prepare a microscope slide covers the general technique in detail.

Materials
- Cork stopper or a piece of cork bark (Quercus suber bark if available, otherwise a wine-bottle stopper works fine)
- Single-edge razor blade or sharp craft knife
- Microscope slides and coverslips
- Water dropper or pipette
- Compound light microscope
- Optional: safranin or dilute food colouring for contrast staining
The beginner mistake — and how to avoid it
The single most common problem is cutting sections too thick. A section you can barely see through lets almost no light pass, and at 10x you’ll see nothing but a dark, featureless mass. The fix: forget the sections entirely for your first attempt. Instead, scrape the cut face of the cork with your razor blade and collect the fine dust — those micro-thin shavings are already the right thickness. Alternatively, a wine-bottle-stopper often crumbles into layers when cut, and any fragment thin enough to show a blue tint when held up to a lamp is thin enough to view.
Method 1 — Cork dust (easiest, recommended for beginners)
- Place a small drop of water in the centre of a clean microscope slide.
- Scrape the cut face of your cork sample with the razor blade and tap the dust into the water drop.
- Add a second drop of water on top, then lower a coverslip at an angle to avoid bubbles.
- Blot any overflow from the edges with a tissue.
- Mount on the stage and start at 10x. The dust particles include many naturally thin slivers where the cell pattern is immediately visible.
Method 2 — Thin hand sections
- Place the cork on a firm surface. Hold the razor blade parallel to the cut face and shave off slices as thin as possible — aim for translucent, not white.
- Transfer the thinnest slice onto a water drop on the slide.
- Add another drop of water, coverslip, and blot as above.
- Under the microscope, move to the edge of the section where it tapers thinnest — that is where you’ll get the best view.
Optional: staining for contrast
Cork cells are visible without staining in transmitted light. However, if you’re photographing them or want sharper contrast between walls and empty lumens, a few seconds in dilute safranin (the pink stain common in school labs) will colour the suberised walls pink-red while leaving the air-filled interior clear. Rinse briefly with water, mount, and observe as above. Staining is not required for basic observation — it is only an enhancement.
Viewing procedure
- Set the objective to 10x (total magnification: 100×). Adjust the coarse focus until rows of cells appear.
- Centre the thinnest area of the specimen in the field of view. Fine-tune the focus until individual cell walls are sharp.
- Adjust the condenser and diaphragm until illumination is even and bright — transmitted light from below gives the clearest view of the cell walls.
- Note what you see, then rotate to the 40x objective (400×) and re-focus. Observe how the field of view changes and what new detail appears.
- When finished, return to 10x, lower the stage, and remove the slide.
What you actually see — observations at each magnification

At 10x objective (100× total), the first thing that strikes you is how geometric it all looks. The cells are arranged radially in neat horizontal rows — a tight honeycomb of empty rooms. Each hexagonal or rectangular box is defined by its cell wall; the interior is empty and either air-white or, under slightly reduced illumination, a faint grey. There is no nucleus, no green chloroplast, no cytoplasmic haze — just walls and air. The overall pattern looks more like a brick wall or a cross-section of bubble wrap than anything you’d expect from “cells.”
At 40x objective (400× total), the walls themselves come into focus as distinct structures. You can begin to see variation in wall thickness across cells, and in many sections the lenticel regions become apparent — areas where the regular row pattern breaks down into more irregular, loosely packed tissue where the phellogen-produced parenchyma creates the gas-exchange pathway.
If you are viewing old, dry cork (like from a wine stopper), all cells will be empty and dead — you are seeing only cell walls. Young cork from an actively growing stem may retain some cytoplasmic content in its newest cells, but this is rarely visible without sectioning fresh material and staining immediately.
Cork cells vs. onion cells vs. cheek cells: what beginners expect vs. what they see
Beginners who have looked at onion cells under the microscope or cheek cells often come to cork expecting something similar — a living cell with identifiable internal structures. Cork is the opposite extreme. This table clarifies the differences:
| Feature | Cork cells (phellem) | Onion epidermal cells | Human cheek cells |
|---|---|---|---|
| Living at maturity? | No — dead, suberised | Yes — living | Yes — living |
| Nucleus visible? | No | Yes (with staining) | Yes (with staining) |
| Contents | Air (empty lumen) | Cytoplasm, vacuole | Cytoplasm, organelles |
| Cell wall | Thick, suberised | Thin, cellulosic | None (animal cell) |
| Shape | Rectangular–hexagonal, radial rows | Brick-like, single layer | Irregular, flat |
| Staining required? | No (optional for contrast) | Iodine helps visibility | Methylene blue needed |
| Magnification needed | 10–40x objective | 10–40x objective | 40x objective |
| What you actually see | Empty honeycomb — walls only | Box-like cells with visible walls and (stained) nucleus | Flat, irregular shapes — nucleus visible with staining |
FAQ
Who discovered cork cells and when?
Robert Hooke first described and named cork cells in 1665, published in his book Micrographia. He coined the word “cell” after the Latin cella (a small room) to describe the empty, walled compartments he saw.
Why are cork cells empty?
During maturation, the phellogen deposits suberin — a water- and gas-impermeable biopolyester — throughout the cell wall. Once fully suberised, the cell contents can no longer exchange nutrients and die. The remaining air-filled chamber is surrounded by a chemically robust wall that persists for years.
Can you see cork cells without staining?
Yes. At 10–40x in transmitted light, the suberised walls are visible against the bright empty interior without any stain. Safranin staining adds contrast and improves photography but is not necessary for basic observation.
Do you need a 400x microscope to see cork cells?
No — 400× (10x eyepiece × 40x objective) is more than enough, and 100× (10x × 10x) is often the most satisfying view because you can see the full radial row pattern at once. At 400× the field of view narrows significantly; you lose the honeycomb context and gain little structural information that isn’t already visible at 100×.
What did Robert Hooke actually see when he looked at cork?
He saw only the cell walls — the contents had dried out and died long before. What he drew in Micrographia were the suberised walls of dead cells arranged in uniform rows, which he likened to the cells (rooms) of a monastery.
What is the difference between cork cells and leaf cells?
Leaf cells (parenchyma and mesophyll) are living, contain chloroplasts, and have thin cellulosic walls. Cork cells are dead, contain only air, and have thick suberised walls. If you want to compare the two, see our guide to leaf cells under the microscope.
Conclusion
Cork cells are a paradox that makes perfect sense once you understand their function: a tissue made entirely of dead chambers is one of the most protective structures in the plant kingdom. Their suberised walls resist water, gases, and mechanical damage far better than living tissue could. Under the microscope, they reward the beginner with an immediately readable structure — the same honeycomb pattern Hooke sketched in 1665 — and they reward the more curious observer with a window into suberin chemistry, secondary growth, and the gas-exchange machinery of lenticels. To get started, scrape a little cork dust onto a wet mount, set your objective to 10x, and look at the thin edge of the sample. You will see what Robert Hooke saw, and now you will know exactly why those empty rooms look the way they do.
Originally posted 2020-12-30 10:44:49.