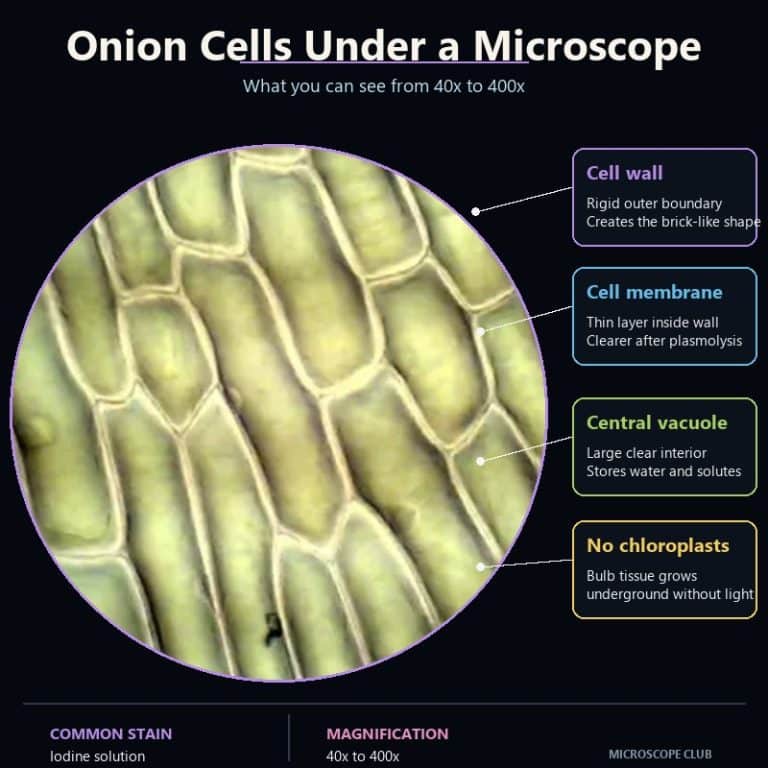
Onion epidermal cells (Allium cepa) appear under a compound light microscope as a tight, regular grid of elongated rectangles — like pale bricks mortared edge-to-edge with almost no gap. The moment you find focus at 40x, the pattern is unmistakable: dozens of identical cells tessellating across the field with a geometric precision you simply do not see in animal tissue. Stain with Lugol’s iodine and the cytoplasm and nucleus take on an amber-brown tint, pulling the internal architecture out of the background.
Structures visible inside an onion cell
The inner epidermis peeled from an onion scale leaf is a single cell thick — no sectioning, no embedding, just peel and mount. That single layer is what makes it the best first practical in school biology: every cell sits flat, transmitted light passes straight through, and all the key plant-cell structures are visible in one focal plane. With bright-field illumination and iodine staining, here is what you can actually resolve:
- Cell wall — The hard, straight line forming each “brick” edge. Cellulose; rigid; this dictates the rectangular geometry. It is the most obvious feature at every magnification. Do not confuse it with the cell membrane.
- Cell membrane (plasma membrane) — Present but invisible at student magnifications because it is pressed flat against the inner face of the wall. It only becomes apparent during a plasmolysis experiment (see below).
- Cytoplasm — A thin, slightly denser lining between the cell wall and the vacuole. Under iodine it appears as a faint amber band — easy to miss if you only look at the centre of the cell rather than the edges.
- Nucleus — A small oval body, darker than the surrounding cytoplasm with iodine, positioned at the periphery of the cell rather than the centre. Total magnification = eyepiece × objective (for a standard school scope: 10x × 40x = 400x); at 400x, the nucleus is clearly resolved. The nucleolus is at the edge of resolution at 400x and is only reliably seen at 1000x oil immersion — do not expect it at school magnifications.
- Large central vacuole — Occupies most of the cell’s interior as a clear, featureless central zone. It is filled with cell sap, not empty (a common misconception). Its size is precisely why the nucleus is pushed to one side. In white onion cells the vacuole is colourless; in red onion cells, anthocyanin pigment stored in the vacuole makes it vivid purple — visible without any staining at all.
- No chloroplasts — Onion bulb tissue grows underground and does not photosynthesise. Epidermal cells contain no chloroplasts, which is why they are white or cream before you even mount them. This distinguishes them from photosynthetic cells such as those in spirogyra or grass leaves.
What you see at 40x, 100x, and 400x
Total magnification = eyepiece magnification × objective magnification. On a standard school scope with a 10x eyepiece: 4x objective → 40x total; 10x objective → 100x total; 40x objective → 400x total. Start at the lowest power and step up — the cell grid is large enough that jumping straight to 400x means you spend minutes hunting for something that is obvious at 40x in two seconds.
| Total magnification | Objective lens | What you see |
|---|---|---|
| 40x | 4x | The full mosaic — dozens of rectangular cells in one field of view. Cell walls are clearly visible as a grid. Internal structures are not resolved. In red onion, the purple colouration of the vacuoles is already obvious at this power without any staining. |
| 100x | 10x | Individual cell outlines are sharp. The large central vacuole appears as a pale central zone. The nucleus may be visible as a faint slightly-darker dot near the cell edge. Cytoplasm distinguishable as a thin denser lining. |
| 400x | 40x | The nucleus is clearly resolved — oval, darker than cytoplasm, at the cell periphery. Cell-wall thickness is apparent. Cytoplasmic detail visible. This is the standard working magnification for the onion prac. |
| 1000x | 100x (oil immersion) | Not used for standard onion practicals. Nucleolus becomes resolvable at this power. Requires immersion oil and a compatible objective. |
Why onion cells are rectangular
The rectangular shape comes directly from the cellulose cell wall. Each cell is encased in a rigid primary wall; adjacent cells are cemented together by the middle lamella — a layer of pectin between cell walls — which is why the tissue holds together as a sheet rather than falling apart when you peel it. Turgor pressure from the water-filled vacuole keeps each cell taut and pressed firmly against its neighbours, but it is the wall that sets the geometry. Remove the wall (as happens when cells are treated with cellulase enzymes) and the cells round up into spheres, just like animal cells. The shape is entirely wall-dependent.
When you look down the microscope, what you are really seeing is a tissue architecture governed by mechanical constraints: every cell expanding equally in all directions but constrained to a rectangular profile because the wall resists lateral deformation. The grid looks almost manufactured. You can compare onion cells with cork cells to see how the same principle — wall-determined geometry — produces a roughly hexagonal mosaic instead.
White onion vs red onion cells
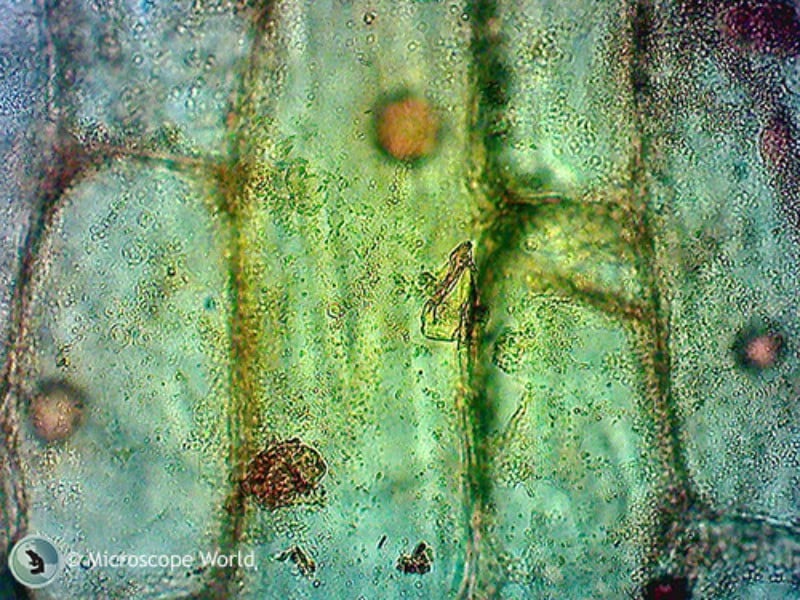
Red onion (Allium cepa, red-skinned variety) inner epidermis is the one specimen where you can skip the iodine entirely and still see dramatic internal structure. Anthocyanin pigment is stored specifically in the central vacuole (not the cytoplasm), and the colour it produces — deep purple to pink depending on cell pH — is visible at 40x the moment you put the slide on the stage. No staining, no preparation beyond water-mounting.
| Feature | White onion epidermis | Red onion epidermis |
|---|---|---|
| Colour unstained | Colourless / transparent | Purple to pink |
| Vacuole visibility unstained | Clear, featureless — hard to see | Clearly coloured — easy to identify |
| Stain needed? | Yes (iodine or methylene blue) | Optional — colour already provides contrast |
| Plasmolysis visibility | Poor — membrane invisible without colour | Excellent — purple protoplast shrinks visibly from wall |
| Best use | Standard iodine prac, nucleus labelling | Plasmolysis extension, unstained observation |
The practical implication: if you want students to actually see the cell membrane rather than just believe it exists, use red onion for the plasmolysis demonstration below. The shrinking purple mass makes the abstract concrete.

Why onion cells have no chloroplasts
Chloroplasts only develop in cells exposed to light and carrying out photosynthesis. The onion bulb grows underground as a storage organ — its job is to stockpile sugars and nutrients for the plant’s next growing season, not to capture sunlight. Before you even pick up the forceps, you can see this: the tissue you are about to peel is white or cream, not green. That colour absence is the direct result of having no chloroplasts.
Students often assume all plant cells contain chloroplasts, or that the absence is something unusual. The rule is simpler — only cells that photosynthesise develop chloroplasts. Onion root tip cells, inner scale-leaf epidermal cells, and the skin you peel for this prac are all non-photosynthetic. Compare them with spirogyra or leaf mesophyll cells, where chloroplasts are packed in and unmistakable — green discs filling the cell interior.
Onion cells vs animal cells
The onion prac is frequently paired with a cheek-cell prac because the contrast between plant and animal cells is striking and immediate.

| Feature | Onion epidermal cell (plant) | Human cheek cell (animal) |
|---|---|---|
| Cell wall | Present (cellulose); rigid | Absent |
| Shape | Regular rectangular / brick-like | Irregular, rounded |
| Chloroplasts | Absent (non-photosynthetic tissue) | Absent |
| Vacuole | One large central vacuole (most of cell volume) | Small vacuoles only, or none |
| Nucleus position | Pushed to cell edge by vacuole | Central (roughly) |
| Cell membrane | Present but hidden behind wall at student magnifications | Present and forms the outer boundary |
| Arrangement | Tessellated grid; cells do not overlap | Irregular; cells may overlap on the slide |
How to prepare an onion cell slide (step by step)
Preparing an onion epidermal slide is one of the best first practicals for anyone learning how to prepare microscope slides. The full method below uses iodine-potassium iodide (Lugol’s iodine / IKI) as the standard stain. Lugol’s iodine is a mild irritant and stains skin and clothing — avoid contact with eyes and work on a surface you can wipe down.
What you’ll need
- A fresh onion (any common variety; red onion if you want to see anthocyanin colour)
- Forceps (fine-tipped tweezers)
- Scalpel or sharp knife
- Microscope slides and coverslips
- Dropper bottle of distilled or tap water
- Dropper bottle of Lugol’s iodine solution
- Paper towel or filter paper
- A compound light microscope — know the parts of the microscope, particularly the objective lenses, before you start
Step-by-step method
- Cut a small section of onion. Break apart one fleshy scale leaf. You want a piece roughly 1–2 cm square.
- Peel the inner epidermis. On the concave (inner, curved) face of the scale leaf you will see a thin, shiny, transparent membrane. Use forceps to gently lift and peel this away. This is your specimen — the inner epidermis, one cell thick. It tears easily; peel slowly.
- Place on the slide. Lay the peeled membrane flat on a clean slide. Flatten any folds gently with forceps. Add one small drop of water to keep it moist.
- Add iodine. Place one small drop of Lugol’s iodine at the edge of the membrane. One drop is enough — more will over-stain and turn everything dark brown.
- Add the coverslip. Hold the coverslip at a 45° angle, touch one edge to the slide just beside the specimen, then slowly lower it down. This technique minimises air bubbles.
- Blot excess stain. If iodine has flooded out from under the coverslip, blot gently with a corner of paper towel at the edge. Do not press on the coverslip.
- View under the microscope. Start at 40x to locate cells, then step up to 100x, then 400x to resolve the nucleus.
What a good slide looks like vs a bad one
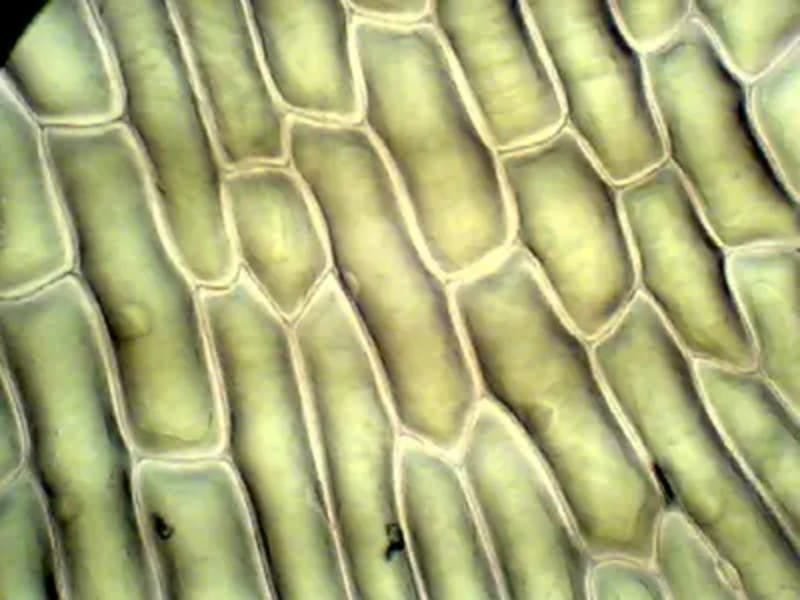
A successful preparation shows a flat single layer of rectangular cells with sharp, well-defined walls, no overlapping layers, and a clear amber-brown stain distinguishing the cytoplasm from the vacuole. The nucleus appears as a darker oval at the periphery of each cell.
A bad preparation typically shows one or more of: large circular dark rings (air bubbles), opaque multi-layered clumps (fleshy tissue included under the epidermis), uniform dark brown throughout (over-stained — too much iodine), or crumpled regions where the membrane folded before the coverslip was placed. If you see any of these, re-mount rather than adjust focus — the problem is the preparation, not the microscope.
Common mistakes
- Air bubbles under the coverslip — caused by dropping the coverslip straight down. Bubbles appear as large circular dark rings and obscure the cells. Re-mount or gently press from one side to push them out.
- Sample too thick — if you accidentally included some of the fleshy onion tissue beneath the epidermis, the sample will be opaque and multi-layered. Peel more carefully; the epidermis alone is nearly transparent.
- Over-staining — too much iodine turns the whole preparation dark brown, making it impossible to distinguish nucleus from cytoplasm. One drop is sufficient; excess can be drawn out with paper towel at the coverslip edge.
- Under-staining (white onion) — without iodine, white onion cells are nearly colourless and the nucleus is very difficult to find. Always stain white onion; red onion is the exception where iodine is optional.
- Folded or bunched specimen — a crumpled piece of epidermis will show multiple overlapping cell layers. Flatten the membrane on the slide before adding the coverslip.
Plasmolysis: how to make the cell membrane visible
The cell membrane is normally invisible at student magnifications — it is pressed flat against the inner face of the cell wall and has no distinguishable colour. Plasmolysis is the one routine technique that makes it observable, and it is best demonstrated on red onion because the anthocyanin-filled vacuole provides a coloured tracer that shrinks visibly.
Plasmolysis occurs when a cell is placed in a hypertonic (high-concentration salt or sugar) solution. Water moves out of the vacuole by osmosis; the protoplast (cytoplasm + membrane + vacuole contents) shrinks and pulls away from the cell wall. The gap between the retracted protoplast and the cell wall becomes visible — proving both that the membrane exists and that it is distinct from the wall.
Plasmolysis protocol (red onion)
- Prepare a red onion epidermal slide in plain water (no stain needed — the purple colour is sufficient).
- View at 100–400x and note the purple vacuole filling the cell interior right to the walls.
- Draw a drop of concentrated salt solution (roughly 10–15% NaCl) under one edge of the coverslip using a dropper. Place a small piece of paper towel on the opposite edge to draw the solution through — it takes 30–60 seconds to replace the water under the slide.
- Watch the cells without refocusing. Over 1–3 minutes the purple mass inside each cell visibly contracts and pulls inward, leaving a clear colourless gap between the purple protoplast and the transparent cell wall. This gap is the cell membrane separating from the wall.
- To reverse (deplasmolysis), draw plain water back through the same way. The cells recover as water re-enters by osmosis.
This is the only routine method to actually observe the cell membrane under a school compound microscope. It also makes osmosis visible in real time — not as a diagram, but as a living cell responding under the lens.
Methylene blue: the alternative stain
Lugol’s iodine is the standard stain for the onion prac, but methylene blue is sometimes used as an alternative, particularly when iodine is unavailable. Methylene blue is a cationic (positively-charged) dye that stains protein-rich structures — nucleus and cytoplasm — blue. Because the cellulose cell wall is negatively charged, methylene blue adheres poorly to it and the wall remains relatively unstained.
The practical difference: iodine gives better overall contrast between cytoplasm and vacuole (amber-brown vs clear), making it easier for beginners to identify all the structures in one glance. Methylene blue makes the nucleus and cytoplasm blue but provides less contrast against the cell wall. For the standard school prac, iodine is preferred. Methylene blue is useful if you need a permanent mount or are out of iodine. For unstained preparations, phase contrast and dark-field illumination are the alternatives — both improve visibility without any dye by converting optical path differences into contrast.
Onion root tip cells vs scale-leaf epidermal cells
The onion root tip is a separate, highly searched school specimen used for observing mitosis — not the same preparation as the inner epidermis prac. Understanding the difference prevents confusion:
- Scale-leaf epidermal cells (this prac): mature, differentiated, non-dividing. Large, elongated, one big central vacuole, nucleus at the periphery. No chromosomes visible. Transparent; iodine stain reveals internal structure easily.
- Root tip meristematic cells: small, densely packed, actively dividing. The cells at the tip are roughly isodiametric (not elongated). At the right moment of preparation you can see mitotic figures — chromosomes in various stages of division. Prepared by squashing and acid-hydrolysis, not by simple peeling; requires a different protocol entirely.
If your practical instructions mention “looking for chromosomes” or “stages of mitosis,” you are doing a root tip squash, not an epidermal peel. The two techniques produce completely different images.
Frequently Asked Questions
What structures are visible in an onion cell under a microscope?
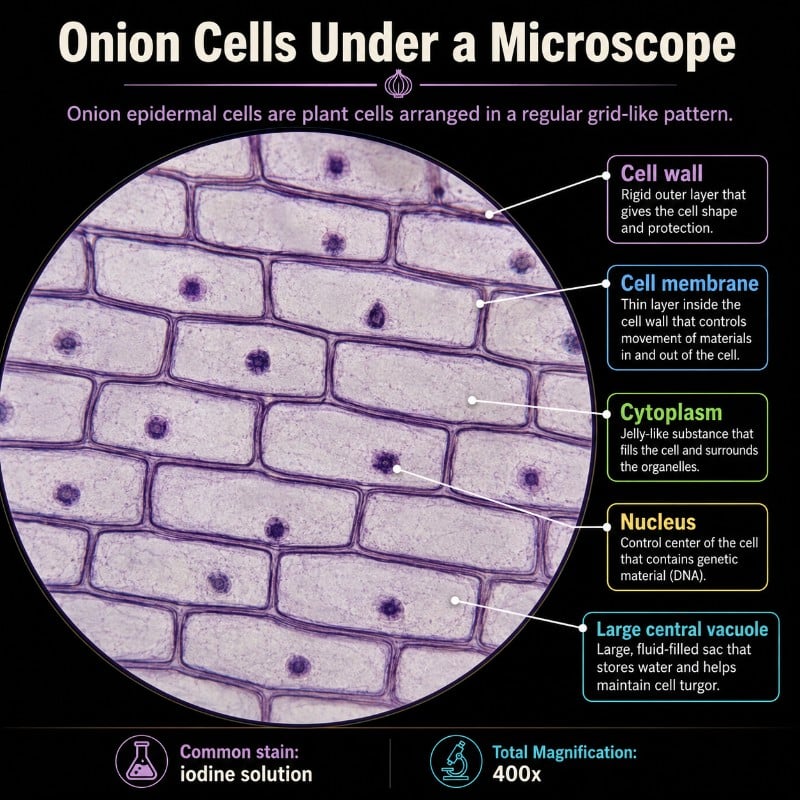
Using a compound microscope with iodine staining, you can see the cell wall (the prominent rectangular boundary), the cytoplasm (a thin amber-brown lining inside the wall), the nucleus (a small darker oval at the cell periphery), and the large central vacuole (the clear central region). The cell membrane is present but not distinguishable at student magnifications — it only becomes visible during a plasmolysis experiment.
Why do onion cells not have chloroplasts?
Onion bulb tissue grows underground and has no photosynthetic function. Chloroplasts only develop in cells exposed to light that carry out photosynthesis. The onion bulb is a storage organ, not a photosynthetic one — its epidermal cells are white or cream before mounting, which is the visible sign of having no chloroplasts.
What magnification is best for viewing onion cells?
400x total magnification (10x eyepiece × 40x objective) is the standard working magnification. At 400x the nucleus is clearly resolved, cell-wall thickness is apparent, and cytoplasmic detail is visible. Always start at 40x to locate the tissue, then step up to 100x and 400x.
Why are onion cells rectangular in shape?
The rectangular shape is determined by the rigid cellulose cell wall. The wall holds a fixed geometry; turgor pressure from the vacuole presses each cell against its neighbours; and the middle lamella (pectin) cements adjacent walls together, locking the tissue into an organised brick-wall grid. Remove the wall and the cells round up into spheres.
Why do we stain onion cells with iodine?
White onion epidermal cells are nearly colourless and transparent — the nucleus and cytoplasm are almost invisible without stain. Lugol’s iodine (IKI) stains the cytoplasm and nucleus amber-brown, providing enough contrast to clearly see these structures. Iodine also stains starch blue-black, but onion epidermis contains little starch, so the main function here is general contrast. Red onion is the exception: its purple anthocyanin vacuoles provide natural contrast and iodine is optional.
Can you see the nucleus in an onion cell?
Yes. With iodine staining and 400x magnification, the nucleus is clearly visible as a small, oval, darker-stained body at the cell edge — pushed there by the large central vacuole. At 100x it may appear as a faint dot. Without staining it is very difficult to distinguish in white onion cells.
Is the onion skin you peel for the prac one cell thick?
Yes. The inner epidermis peeled from the concave face of an onion scale leaf is a single layer of cells. This is precisely what makes it ideal for light microscopy: no sectioning required, the cells sit flat, and transmitted light passes through the entire cell in one plane.
Why are red onion cells purple under the microscope?
Red onion epidermal cells contain anthocyanin, a water-soluble pigment stored specifically in the central vacuole. The purple-to-pink colour is visible at 40x without any staining — the anthocyanin provides enough contrast to see cell boundaries and the vacuole directly. The exact hue can vary with cell pH.
What happens to onion cells in salt water?
In concentrated salt (or sugar) solution, the cell loses water by osmosis. The protoplast — the living contents including the cytoplasm, cell membrane, and vacuole — shrinks and pulls away from the cell wall. This is called plasmolysis. The gap that forms between the retracted protoplast and the cell wall is the clearest way to observe the cell membrane under a school microscope. Using red onion makes it visually obvious because the purple vacuole shrinks visibly.
Why use red onion for the plasmolysis experiment?
Red onion is preferred for plasmolysis because the anthocyanin pigment in the vacuole acts as a built-in tracer. As the protoplast contracts, the purple mass visibly pulls away from the transparent cell wall — you can see exactly where the membrane is. In white onion, the same thing happens but the retracted protoplast is colourless, making the separation much harder to distinguish.
Conclusion
Onion epidermal cells give you a clear, unambiguous view of the core features that define plant cells — the cellulose cell wall, the large central vacuole, and the nucleus pushed to the periphery — all in a single-layer specimen that needs no sectioning and minimal preparation. White onion with iodine staining is the standard route to seeing all structures with good contrast; red onion in plain water is the better choice for the plasmolysis extension and for demonstrating the cell membrane in action. Work through both preparations and the two species together answer almost every question the standard school prac raises about plant cell structure.
More Specimens to Explore at Home
Once you’ve got the hang of onion cells, these are some of the most rewarding next specimens to try:
- Amoeba — how this shapeless pond organism moves and feeds. our Amoeba deep dive
- Paramecium — the complete guide to this classic ciliate specimen. the complete Paramecium guide
- Euglena — a specimen with both plant- and animal-like traits. a closer look at Euglena
- Yogurt — the live bacteria cultures you can view straight from the fridge. what Yogurt bacteria actually looks like up close
- Human Tears — a step-by-step guide to viewing your own tear crystals. the full guide to Human Tears under a microscope
- Spider Web — what silk structure really looks like up close. our Spider Web deep dive
- Paper — the fiber web hidden in an ordinary sheet. a closer look at Paper fibers
- Flea — a full guide to observing this common pest specimen. the complete Flea guide
- Lice — what to look for when examining a lice specimen. what Lice actually look like under the microscope
Originally posted 2026-05-13 15:50:08.