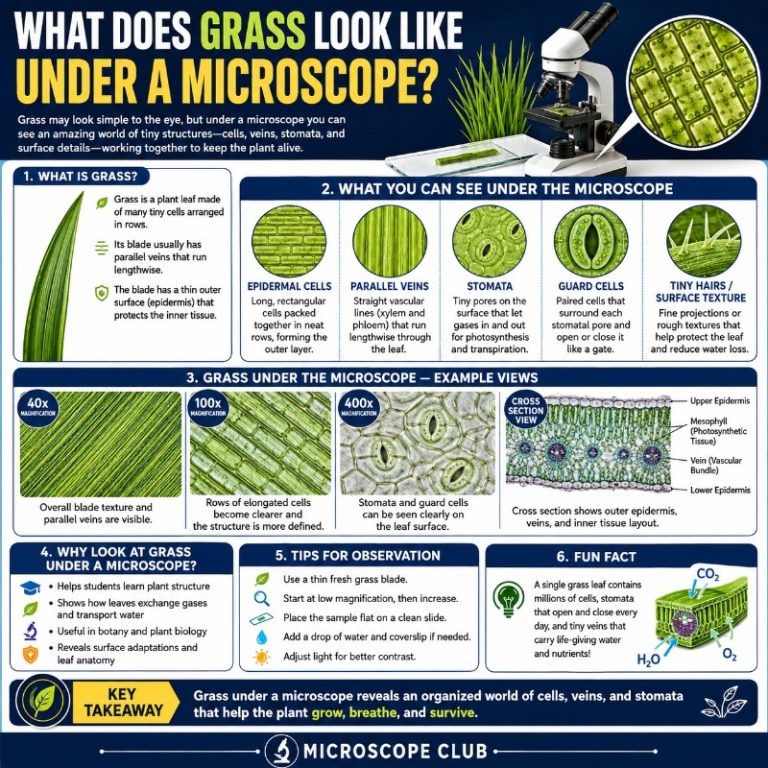
Grass under the microscope reveals a world of geometric precision that most people walk over every day without suspecting. Mount a fresh blade of lawn grass, bring it into focus at 40×, and the first thing that snaps into view is a neat row of oval vascular bundles running the length of the leaf — the same structures that went viral as “smiley faces.” Zoom to 400× and guard cells flanking each stoma snap into focus as paired green sausage shapes, each packed with chloroplasts. It is a surprisingly satisfying specimen for a beginner, and you can prep a usable slide in under five minutes.
What You See at Each Magnification Level
The biggest frustration beginners hit is not knowing what power to use. Here is the map:
| Total magnification | What resolves |
|---|---|
| 40× (4× objective) | The whole cross-section fits the field of view. You can see the overall shape — flat in lawn grass, deeply folded in marram — and the rows of vascular bundles running through the mesophyll. |
| 100× (10× objective) | Individual cell boundaries become clear. The vascular bundles read as the famous “smiley faces.” The outer epidermis and its cuticle layer are visible as a thin bright band. |
| 400× (40× objective) | Guard cells flanking each stomatal pore become distinct. Chloroplasts resolve as discrete green discs inside the mesophyll and guard cells. This is the power where the leaf really opens up. |
One expectation to correct early: the neon-colored “smiley face” images you have seen online use fluorescence staining (Calcofluor White for cellulose, auramine O for lignin). A standard brightfield slide will show grey-green tissue, not those colors — but the shapes are all there.
How to Prepare a Grass Cross-Section Slide
Freehand transverse sectioning sounds intimidating; it is actually the technique most school labs teach because it requires nothing beyond a razor blade and a steady hand. The key is volume: cut many thin slices and use the best one.
- Take a fresh grass blade. Dry or wilted grass sections poorly. Cut a 3–4 cm length and lay it flat.
- Support the blade. Sandwich it between two thin slices of carrot or foam — this gives your razor a backing and keeps the section from curling. You can also simply hold the blade taut between thumb and forefinger if the grass is wide enough.
- Slice as thin as you can. With a sharp single-edge razor, make 8–10 rapid transverse cuts. Aim for translucent slices — roughly 20–50 µm. Thin always beats thick. Discard any opaque chunk immediately.
- Float in water. Sweep the slices into a drop of water on your slide using a fine brush or the tip of the razor. Pick the thinnest slice.
- Stain (optional but recommended). Add a drop of toluidine blue solution, wait 3–5 minutes, then rinse gently and blot the excess. Toluidine blue is polychromatic: cellulose walls stain pink-purple, lignified walls (sclerenchyma, xylem) stain blue-green, making vascular bundles pop. Iodine works too — it is less selective but easier to source. (GTAC staining protocol)
- Mount and cover. Add a drop of water or glycerol, then lower a coverslip at an angle from one edge to avoid air bubbles. Blot any excess liquid from the sides.
- Start at 40×, then climb. Locate the section at lowest power, center it, then step up to 100× and 400×.
Common failure modes:
- Section looks like a black blob — too thick. Cut again; there is no fixing a thick section.
- Everything dried out — grass desiccates fast under a microscope lamp. Re-wet the slide with a drop of water at the edge of the coverslip, or work quickly.
- Cells are distorted or torn — razor was dull, or you sawed rather than sliced. One clean stroke per cut.
If sectioning feels like too much for a first attempt, the stomata shortcut is easier: peel a thin strip of lower epidermis from the grass blade (sticky tape pressed on then pulled off works), mount it flat, and you will see guard cells at 100× without any sectioning at all. (SAPS stomatal density method)
For a more detailed overview of mounting techniques in general, see our guide to how to prepare a microscope slide.

Grass Cell Types: What Each Structure Does
A cross-section of a typical lawn or cereal grass leaf contains a predictable set of tissues. Learning to name them makes the slide go from abstract shapes to a legible system:
- Epidermis + cuticle — the outermost single cell layer, coated with a waxy cuticle. It appears as a flat, tight-fitting band with no airspaces. Its job is protection and waterproofing.
- Mesophyll — the green interior tissue packed with chloroplasts. In grasses (unlike dicot leaves) it does not split into distinct palisade and spongy layers; it is more uniform. This is where photosynthesis happens.
- Vascular bundles — strands of xylem (water + mineral transport upward) and phloem (sugar transport out of the leaf) bundled together and wrapped in a bundle sheath. These are the “smiley faces” when seen in cross-section.
- Bundle sheath — a ring of cells surrounding each vascular bundle. In wheat and oat (C3 grasses) these cells are thin-walled and inconspicuous. Do not expect a dramatic wreath of chloroplasts — that Kranz anatomy belongs to C4 grasses like maize or sugarcane, which have a very different metabolic pathway.
- Stomata + guard cells — pores in the epidermis, each flanked by a pair of bean-shaped guard cells. Guard cells contain chloroplasts and change shape to open or close the pore, regulating gas exchange and water loss.
- Sclerenchyma / lignified cells — thick-walled support cells that appear darker (especially when stained). They give the leaf its rigidity and tear-resistance.
Types of Grass Under the Microscope
Marram Grass Leaf Observation

Marram grass (Ammophila arenaria) is the dune-stabilising grass of British and European coasts — and one of the most structurally dramatic specimens you can put under a microscope. What makes it exceptional is how every feature you see in the cross-section is an adaptation against water loss.
Things you will need:

- Marram grass blade (fresh or herbarium)
- Single-edge razor blade
- Slides and coverslips
- Compound bright-field microscope
- Tweezers or fine brush
When you first get the cross-section in focus at 40×, the most striking feature is the overall shape: instead of a flat blade, the leaf is deeply grooved and folded inward. Those folds face inward — toward the adaxial (upper) surface — creating a sheltered corridor. The stomata are sunk into the furrows of that inner surface, not exposed to open air. That sunken position keeps the air next to the pore humid, slowing evaporation. If you have seen a flat lawn-grass section before, the folded marram cross-section feels almost architectural by comparison.
Moving to 100×, three things stand out. First, the outer cuticle is noticeably thick — the waxy surface is a visible band compared to a typical cereal grass. Second, the hinge cells (bulliform cells) along the inner ridges are large, thin-walled, and almost empty-looking. These are the mechanism: when the plant is water-stressed, those cells lose turgor and the leaf rolls tighter, trapping humid air inside. When water is plentiful, they re-inflate and the leaf relaxes. It is a passive, hydraulic response you can deduce just by looking at the cell shapes. Third, the round vascular bundles inside each fold are clearly defined — each one a neat cross-section of xylem and phloem.
At 400×, the guard cells in the furrows become visible. Because they are recessed and partially protected by neighboring cells, they look partially obscured — you often only see part of the stomatal complex, which itself is the point: less exposure to moving air means less water lost through open pores.
Xerophytic (Desert-Climate) Grasses
Desert and semi-arid grasses follow the same logic as marram but take it further. The cross-section of a xerophytic grass blade reveals a more needle-like profile — narrow and thick-walled. The leaf’s two sides develop differently: the adaxial (upper) surface holds the photosynthetically active mesophyll tissue; the abaxial (lower) outer surface is dominated by sclerenchyma (thick, lignified support cells), which acts as a physical shield against abrasion and herbivores.
During dry periods, desert grasses roll inward so the soft adaxial surface faces the hollow center. The outer, convex abaxial side faces the environment, protecting the stomata and mesophyll inside. When rain arrives, the hinge cells on the adaxial surface absorb water, expand, and the leaf unrolls — opening the mesophyll to absorb moisture. It behaves like a bimetallic strip, responding differentially to water availability on each surface. Watching a prepared section from a grass collected in both wet and dry states side-by-side is one of the cleaner demonstrations of plant water mechanics you can do at a school microscope.
Oat and Wheat Grass Under the Microscope

Wheat and oat are the most accessible cereal grasses to section, and they are good for beginners because the blade is wide and relatively flat — easier to section than the tightly rolled marram leaf. At 100× total magnification, the vascular bundles appear in a single row across the cross-section, each one clearly circular in profile with a central open vessel (metaxylem) and surrounding tissue. This is where the “smiley face” pattern becomes legible.
One expectation to manage: wheat and oat are C3 grasses. Their bundle sheaths are made of thin-walled, mostly colorless cells. You will not see the thick, chloroplast-packed Kranz ring that makes C4 grasses like maize or sugarcane look so distinctive. If you stain with toluidine blue, the phloem and xylem within each bundle will differentiate — but the bundle sheath itself remains subtle. This is normal; do not assume your section is wrong because the sheath lacks color.
At 400×, green chloroplasts become visible as discrete discs inside the mesophyll cells. Keeping the preparation from drying out under the lamp becomes the main challenge at this point — if the image suddenly goes blurry and the cells start to shrink, the coverslip is drying. Add a drop of water at the edge and it will rehydrate in a few seconds. Compare the cell structure here with an onion cell cross-section — onion cells have no chloroplasts, giving you a clean structural contrast.
The “Smiley Faces” in Grass: What You Are Really Seeing

Light micrograph of a cross-section through a closed Marram grass leaf, Ammophila arenaria. The deeply grooved leaf is thrown into folds (as seen here), and it uncurls when mature so that the folds do not face the center. The folds conserve water and withstand salt, and prevent excessive evaporation. Round vascular bundles are visible inside each fold, serving to transport food and water through the leaf. Spines on the surface discourage animals from eating the leaf. Marram grass is important in coastal ecology since it is one of the commonest grass species in Britain to stabilize dunes. Magnification x22 at 35mm size.
In 2021, a meme spread across social media showing a fluorescence micrograph of a grass cross-section with the caption: “This is what a blade of grass looks like under a microscope. Next time you go out for a walk, know that the grass is happy to see you!” The image went viral — and the structures in it are entirely real. What the original post omitted was the explanation of what those structures actually are.
The image was created by Maria Morrow, Assistant Professor of Botany at the College of the Redwoods (Eureka, CA), and author of A Photographic Atlas for Botany (LibreTexts). Snopes investigated the viral claim and rated it essentially true — the shapes are genuine anatomical structures, the “happy to see you” framing is human imagination projected onto botany.
The anatomy of each “smiley face,” named correctly:
- Eyes = the two large metaxylem vessels — the water-conducting tubes that carry minerals up from the roots.
- Mouth = the phloem — a cluster of sieve tubes and companion cells that transport sugars produced by photosynthesis out of the leaf.
- Neck and cheeks = lignified sclerenchyma cells — thick-walled structural cells that give the bundle rigidity.
- Band along the bottom = the epidermal cells covered by a cuticle.
The reason this pattern appears at all comes down to the fact that grass is a monocot. All monocots — grasses, lilies, palms — develop from a seed with a single leaf. Their leaf vascular bundles are round in cross-section and scattered in a row (rather than arranged in a ring as in dicots). When you look down through the microscope at one from above, the circular bundle profile creates the face shape. It is not exclusive to grass; you would see the same basic pattern in any monocot leaf cross-section. It is just that grass is the easiest to section thin enough to make it visible.
The vivid neon colors in Morrow’s micrograph come from fluorescence staining: Calcofluor White stains cellulose blue, auramine O stains lignin yellow, and chlorophyll autofluoresces red. A standard brightfield student microscope will not produce those colors, but you will see the same geometry — grey-green circles arranged in a row. If you want the “smiley face” to be clearly visible, stain with toluidine blue and look at 100× total magnification.
Monocot vs Dicot Leaf: What Makes Grass Look Different
Knowing that grass is a monocot explains most of what you observe in the cross-section. A comparison helps set the right expectation before you mount your slide:
| Feature | Grass (monocot) | Dicot leaf (e.g., rose, sunflower) |
|---|---|---|
| Venation | Parallel veins running the length of the blade | Netted / branched veins |
| Vascular bundle arrangement | Scattered in a row; circular in cross-section | Ring pattern in stem; in leaf: branched network |
| Mesophyll | Relatively uniform; no distinct palisade/spongy split | Distinct palisade layer (tall cells) + spongy layer (airspaced) |
| Bundle sheath | Present; thin-walled in C3 (wheat/oat); thick, chloroplast-rich in C4 (maize) | Less prominent; no Kranz anatomy |
| Stomata | Both surfaces (amphistomatous in many species); sunken in xerophytes | Mostly lower surface (hypostomatous) |
| Epidermis | Long cells + short silica/cork cells in rows | More uniform rectangular cells |
If you want to see the contrast directly, mount a grass cross-section and a thin section from a common garden-plant leaf on the same day. The structural difference is immediately obvious even at 40×. For ideas on what else you can observe at 40×, or to explore which type of microscope works best for plant tissue work, check those guides.
Frequently Asked Questions
Do you need to stain grass to see it under a microscope?
No — unstained sections are visible at 100× and above, especially with reduced condenser aperture (close the iris diaphragm slightly to increase contrast). Staining with toluidine blue or iodine makes vascular bundles and cell walls pop and is worth the extra step, but it is not required to get a usable image.
Can a basic school microscope show grass cells?
Yes. A compound microscope with 40×, 100×, and 400× objectives — the standard school kit — is all you need. You can see vascular bundles and epidermal cell arrangement at 100×, and chloroplasts and stomatal guard cells at 400×. You do not need oil immersion or a research-grade instrument.
Why does my section look like a black blob?
The section is too thick. Light cannot pass through it. Discard it and cut again — aim for translucent slices that you can almost see through when held up to light. The thinner the better, even if it falls apart a little.
Are the grass “smiley faces” real?
The structures are entirely real vascular bundles — xylem and phloem — that appear in every grass leaf cross-section. Whether they look like smiley faces is a matter of imagination. The face-like appearance results from the circular vascular bundle profile typical of monocot leaves, viewed in transverse section.
What magnification shows chloroplasts in grass?
Chloroplasts become discrete visible discs at 400× total magnification (40× objective + 10× eyepiece). At 100× you can see green areas but not individual organelles. At 40× you are identifying tissue regions only.
What are the smiley faces in grass actually called?
They are vascular bundles: cross-sections of the xylem and phloem strands that run the length of every grass leaf. The “eyes” are metaxylem vessels; the “mouth” is the phloem cluster. They are present in all monocot plants, not just grass.
Conclusion
Grass under the microscope rewards even a basic preparation: the vascular bundles, stomatal guard cells, and monocot tissue plan are all accessible at 100–400× total magnification with a school compound microscope. The most common beginner mistake is cutting sections too thick — aim for translucent, cut many, and use the best. The geometry you uncover — circular bundles, guard cells, the folded xerophyte architecture of marram — is the same functional anatomy that allows grass to cover most of the terrestrial world.
Ready for more? Compare your grass section with other everyday specimens under the microscope, or try the epidermal-peel shortcut for an even faster route to seeing stomata in action. Each new slide builds pattern recognition that makes the next one easier to read.
Originally posted 2022-02-22 06:11:38.