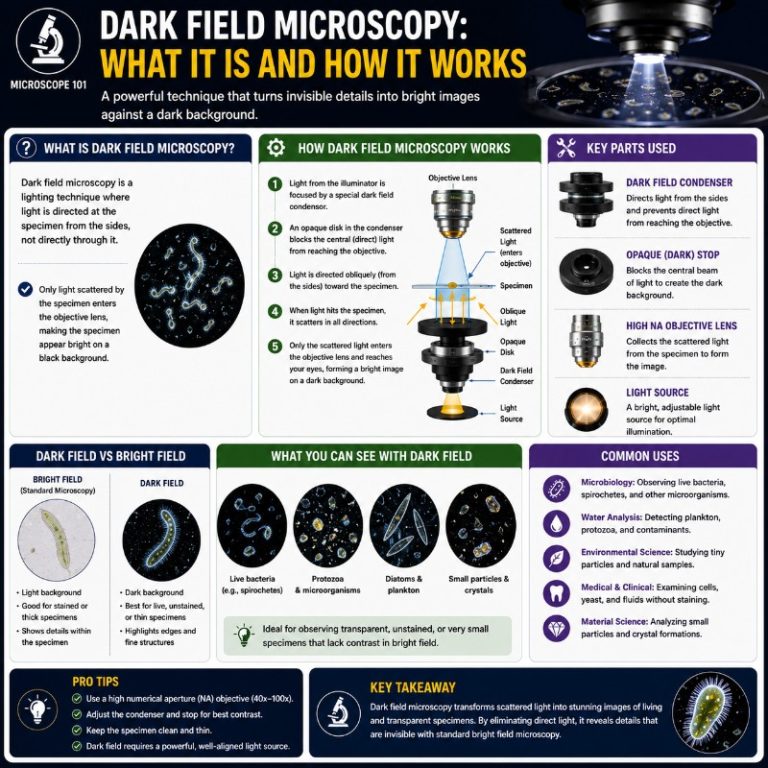
Dark field microscopy illuminates a specimen with a hollow cone of oblique light so that only the light scattered or diffracted by the specimen reaches the objective — leaving everything else in pitch-black. That simple optical trick turns colourless, unstained, and nearly transparent specimens into bright glowing structures you simply cannot see under conventional bright field illumination.
What dark field microscopy is and why the background goes black
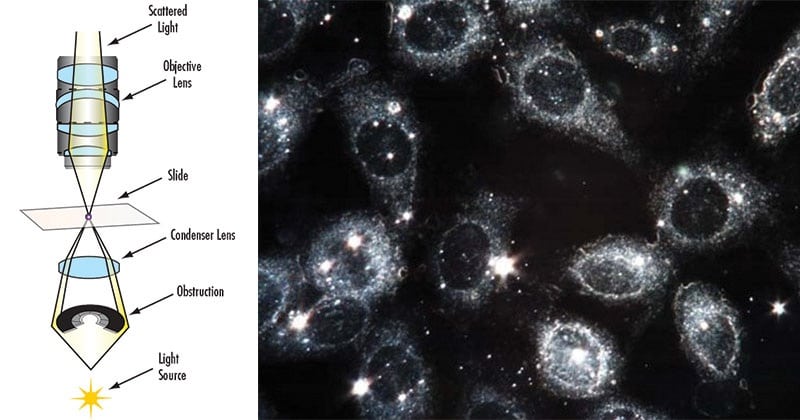
Dark field microscopy (also called dark ground microscopy) works by ensuring the direct illuminating light cone never enters the objective lens. A central patch stop — a small opaque disk placed in or below the condenser — blocks the axial light and forces only an outer ring of oblique illumination through the specimen. Because the objective’s acceptance angle (its numerical aperture, or NA) is set lower than the condenser’s NA, the direct light falls entirely outside the objective and never reaches the detector. Only light that the specimen scatters or diffracts angles back into the lens and forms the image.
The result is a high-contrast image of the specimen glowing against a black background — with no staining, no fixing, and no killing of live material required.

How dark field differs from bright field — and why it matters
In bright field microscopy, the condenser delivers light straight through the specimen and into the objective. Contrast depends on the specimen absorbing some of that light — which works well for naturally pigmented or artificially stained samples, but fails completely for live, unstained, and low-contrast specimens. You are essentially asking the specimen to be its own filter.
Dark field flips this relationship. The condenser still sends light through the specimen, but the direct beam is blocked before it reaches the lens. Now the specimen does not need to absorb light — it only needs to scatter or diffract it. A single bacterium, a colloidal nanoparticle, or the edge of a diatom frustule scatters just enough light to appear brilliantly white against black.


The numerical aperture rule — why dark field fails at high magnification
The single most important concept in dark field microscopy — and the one most beginners skip — is the numerical aperture relationship: the objective NA must always be lower than the condenser NA. This is not a preference; it is the physical mechanism that makes dark field work at all.
If the objective NA equals or exceeds the condenser NA, the direct illuminating cone falls inside the objective’s acceptance angle, floods the detector with bright light, and washes the image out entirely. You will see a glowing white field rather than a dark one, no matter how carefully you centred the stop.
In practice this means:

- Dry dark field condenser (NA 0.7–0.9): use with objectives up to NA ~0.65–0.75. Works well for 4×, 10×, and most 20× objectives. Starts failing above 40× with standard objectives.
- Oil-immersion dark field condenser (NA ~1.2–1.4): required once you move above ~40× or use objectives with NA above ~0.75. Immersion oil applied between the condenser top lens and the slide is mandatory; air gaps defeat the geometry.
- High-NA objectives with a built-in iris diaphragm: some dedicated dark field objectives carry an adjustable funnel stop that lets you dial their NA down below the condenser’s — this is the correct way to run dark field at 60× or 100×. The iris is inside the objective, not a “direct illumination block” as sometimes described in older texts.
Dry vs oil-immersion dark field condensers — which to use
A dry dark field condenser is the right first purchase for most users. It threads into the condenser slot of a standard compound microscope and works without immersion oil at low-to-medium magnifications. The OMAX A191 and similar units cost a few hundred dollars on Amazon and handle most biological applications at 4×–40×.
Once you need 60× or 100× oil objectives — or once you need to visualise very fine detail in bacteria at high NA — you need an oil-immersion condenser. These run from around US$1,500 to over US$3,000 for Olympus or Zeiss units, and require immersion oil matched to the condenser’s NA on both its top surface and sometimes its bottom surface. The DIY approach (a patch stop made from card and foil) works well for dry objectives but cannot reach the NA needed for oil-immersion work.
What dark field microscopy is used for
Dark field is the go-to technique whenever the specimen is small, transparent, and alive — or when staining would kill the organism or destroy the property you need to observe.
Biological sciences
The classic dark field subject is a live bacterium. Under bright field the organism is nearly invisible without Gram staining; under dark field it appears as a bright moving rod or spiral against black, and you can watch its flagellar motility in real time. The technique is equally powerful for:
- Diatoms and algae — their silica frustules scatter beautifully, revealing surface ornamentation invisible under bright field
- Protozoa, yeast, and other organisms in water and soil infusions (Nikon MicroscopyU)
- Blood cell morphology — red cell shape and clumping, white cell granularity (legitimate motility and morphology work — not “live blood analysis” health claims)
- Yeast specimens at the 40× level, where budding and vacuoles become visible without stain
- Internal cell structures including chloroplasts and mitochondria in optically transparent cells
Worked application: identifying spirochetes in clinical specimens
Dark field microscopy is the classical method for detecting Treponema pallidum, the spirochete responsible for syphilis. Serous fluid is taken from a primary lesion (genital or skin — never oral specimens, as commensal spirochetes create false positives), wet-mounted on a clean slide, and examined within 20 minutes before motility is lost.
Under dark field, T. pallidum appears as a tight, motile corkscrew 6–20 µm long — its characteristic rotation and forward-backward flexion distinguish it immediately from debris. Sensitivity is approximately 80% for primary lesions. The examination must be performed by a trained observer, and a negative result does not rule out infection.
This use case is why dark field condensers are standard equipment in STI clinics in many countries — the organism cannot be cultured routinely, and dark field allows direct visualisation without serological testing delay.

Materials science and gemology
Dark field excels at surface examination. Inclusions, fractures, and grain boundaries in metals scatter oblique light clearly, showing up as bright lines against black where bright field would show only a reflective blur. Gemologists use it to map inclusions in diamonds and coloured stones. Colloidal nanoparticles — gold nanoparticles in particular — are a standard dark field subject in nanotechnology research because their intense plasmonic scattering gives a distinct colour signature at sizes well below the diffraction limit.
Dark field vs phase contrast vs DIC vs fluorescence — comparison table
| Technique | How contrast is produced | Best specimens | Resolution | Cost / complexity | When to choose |
|---|---|---|---|---|---|
| Dark field | Only scattered / diffracted light reaches the objective; background stays black | Small, sparse, unstained live cells; nanoparticles; spirochetes; surface defects | Moderate — objective NA is intentionally capped | Low–moderate (DIY patch stop to ~US$3,000 oil condenser) | Live unstained specimens; high contrast needed on simple, small objects |
| Phase contrast | Phase ring converts phase differences to amplitude (brightness) differences | Thin transparent cells and tissues; cultured cells; bacteria in monolayer | Higher than dark field (no NA restriction on objective) | Moderate (dedicated objectives + condenser annuli; ~US$500–$2,000 add-on) | Cell culture monitoring; specimens too thick or complex for dark field |
| DIC (Nomarski) | Polarised light + Nomarski prisms create pseudo-3D relief | Thick specimens; cell surface topography; embryos; unstained tissue sections | Near-full objective NA — highest optical resolution of the four | High (polarisers + two Wollaston/Nomarski prisms + objectives; ~US$2,000+) | 3D surface detail; thick or birefringent specimens; publications requiring relief images |
| Fluorescence | Fluorescent labels emit light at specific wavelengths; only emission reaches detector | Labelled proteins, DNA, organelles; anything where location matters more than morphology | Resolution depends on optics; super-resolution variants exceed diffraction limit | High (dedicated lamp or laser, filter cubes, fluorescent dyes/antibodies; US$3,000–$50,000+) | Specific molecule localisation; cell biology and molecular imaging requiring multiplexing |
The honest summary: dark field wins on simplicity and cost when your specimen is small, sparse, and unstained. Phase contrast microscopy resolves more detail on thicker, more complex specimens. DIC gives the best optical resolution and surface relief. Fluorescence is in its own category — when you need to label specific molecules, there is no substitute (iBiology).
Advantages of dark field microscopy
The core advantage is contrast without chemistry. You do not need to fix, stain, or kill the specimen to see it — which means you can watch live organisms move, divide, and react to stimuli. Dark field is particularly powerful for detecting fine surface details on smooth objects (crystal faces, metal fractures, gem inclusions) that bright field either obscures in glare or renders invisible against a bright background. Setup is straightforward on any compound microscope once you understand the NA relationship.
Disadvantages of dark field microscopy
The NA ceiling is the main technical constraint. Because the objective NA must stay below the condenser NA, you cannot use the highest-NA objectives without an oil-immersion condenser and a funnel-stop objective — which pushes cost up significantly. Dense or complex specimens (thick tissue sections, crowded bacterial cultures) become confusing under dark field: the bright scattering from crowded objects overlaps, edges become indistinct halos, and what looked like a single organism may be an artifact of multiple scatterers at the same focus plane. The bright illumination required can also cause photodamage or photobleaching in light-sensitive live specimens over extended observation periods.
Dark field in transmission electron microscopy (TEM)
The same principle — block the direct beam, collect only diffracted signal — applies in the transmission electron microscope. Three distinct techniques exist, each suited to different materials characterisation problems.
Conventional dark field TEM (DF-TEM)
The objective aperture is shifted off-axis to select a single diffracted beam from the specimen. Regions of the crystal oriented to satisfy that diffraction condition appear bright; everything else is dark. This lights up dislocations, stacking faults, grain boundaries, and precipitates with remarkable clarity, because defects distort the local lattice and therefore change which regions diffract into your selected beam.
Weak-beam dark field (WBDF)
A refinement of DF-TEM that selects a weakly excited diffracted beam. Dislocations appear as very narrow, sharp bright lines (2–3 nm wide rather than 10–30 nm wide in conventional DF), enabling precise measurement of dislocation density and partial dislocation separation. The technique requires more careful tilting and longer exposure times but is the standard method for quantifying crystal defect geometry.
HAADF-STEM (High-Angle Annular Dark Field)
In scanning transmission electron microscopy (STEM), a ring detector placed at high angles collects electrons scattered by Rutherford scattering. Because Rutherford scattering intensity scales approximately as Z² (atomic number squared), heavier atoms scatter more electrons to high angles and appear brighter. This gives HAADF-STEM its defining feature: Z-contrast imaging. A platinum catalyst nanoparticle on a carbon support lights up unmistakably; a heavy dopant atom in a semiconductor lattice is visible as a single bright spot. HAADF-STEM is now the standard for atomic-resolution compositional mapping in materials science.
How to convert a compound microscope to dark field
A standard compound light microscope converts to dark field with a patch stop cut from black card or foil — the only genuine cost is a few minutes of time. The NA constraint is what most DIY guides miss, and it is the reason most DIY attempts produce a dim, glowing field rather than a black one.
Step-by-step: DIY dark field conversion
- Select a low-NA objective. Use your 4×, 10×, or 20× objective. Confirm its NA is printed on the barrel — it must be below 0.65 for a dry patch stop to work cleanly. Do not attempt this with a 40× (NA 0.65+) or 100× oil objective; those require an oil-immersion condenser.
- Size the occulting disk. The disk needs to block the central axial cone but leave an outer ring. A practical starting size: measure the condenser’s filter slot diameter, then cut a disk roughly 50–70% of that diameter from matte-black card or thick foil. A 22 mm diameter disk works for many standard condensers at 10×.
- Mount the disk centred in the filter holder below the condenser. This is the most critical step. Use a drop of clear tape or a filter mount to hold it in place. Even a 1 mm offset will leave one side of the field brighter than the other.
- Open the field diaphragm fully and raise lamp intensity to maximum. Dark field requires more light than bright field — not less.
- Place your specimen on the stage, focus normally, then centre the stop. Move the disk until the background goes fully and evenly black. If you see a bright ring on one side, slide the disk toward it. A well-centred stop produces uniform black with the specimen glowing clearly.
- Troubleshoot dirty-slide glare. If the background is grey rather than black, clean the slide and coverslip with lens tissue and 70% ethanol. Dust and oil on glass scatter light into the objective and defeat the technique. Mount your specimen as thin as possible — a thick mount scatters too much light to produce a clean background.
No products found.
Converting a dissecting microscope to dark field
Place a flat matte-black card over the specimen stage opening to eliminate background reflection. Position the specimen on top — either directly on this black surface or on a small transparent stand above it. Turn off the built-in transmitted light source entirely. Illuminate with an external high-intensity light source aimed at a low oblique angle to the specimen surface, so the light reflects off surface features toward the lens rather than passing through. Dust, surface relief, and fine texture show up as bright features against black.
For help preparing clean slides that give clean dark field images, see our guide on preparing microscope slides. For context on the full range of techniques available, see our overview of types of microscopes.
Frequently asked questions
Why does the background appear black in dark field microscopy?
The central patch stop blocks the direct illuminating beam so it cannot enter the objective. The objective NA is set lower than the condenser NA, which means the direct cone’s angle falls outside the objective’s acceptance angle entirely. No direct light reaches the detector — only the oblique light scattered or diffracted by the specimen does. The background has no scatterers, so it stays black.
What magnification can you use with dark field microscopy?
With a DIY dry patch stop: up to 40× if the objective NA is below ~0.65. Above that, a dedicated dry dark field condenser handles up to NA ~0.75 (typically 40×). For 60× and 100× oil objectives you need an oil-immersion dark field condenser, a matching funnel-stop objective, and immersion oil on the condenser top lens.
What is the difference between dark field and phase contrast microscopy?
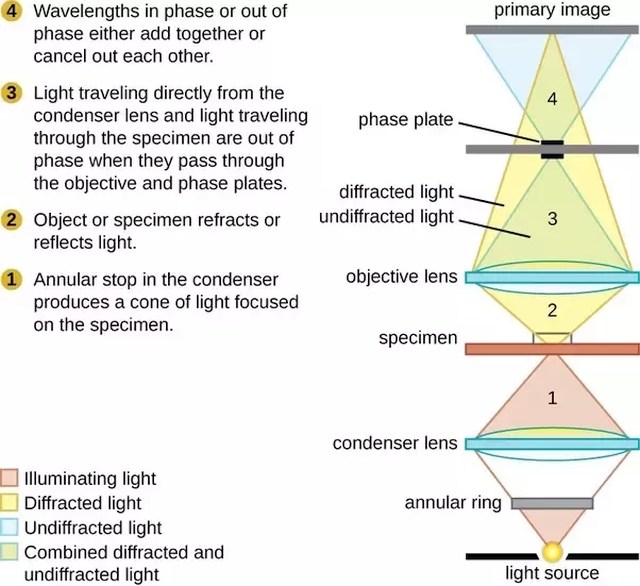
Dark field produces high contrast on small, sparse objects by blocking direct light — but caps resolution because the objective NA must stay low. Phase contrast converts phase differences (thickness, refractive index) into amplitude differences using a phase ring, which works equally well on thicker and denser specimens without restricting the objective NA. Phase contrast resolves more detail; dark field gives higher contrast on small, simple objects and is simpler to set up.
What is dark field microscopy used for in blood?
Legitimate uses include red cell morphology (shape and clumping patterns), white cell granularity, and platelet examination — all without staining. The technique is also the standard for detecting motile spirochetes in clinical specimens. “Live blood analysis” as a diagnostic system for disease or nutritional status is not supported by clinical evidence and should not be conflated with legitimate dark field haematology work.
How much does a dark field microscope cost?
A DIY patch stop costs virtually nothing (card, foil, tape). A basic dry dark field condenser for a student compound microscope runs a few hundred dollars. Professional dry condensers (e.g. Olympus U-DCD) run around US$900. Oil-immersion condensers for high-NA work cost US$1,500–$3,000. The microscope itself is not unique to dark field — any compound microscope with a substage condenser slot can be fitted.
Conclusion
Dark field microscopy’s power comes from a geometrically elegant idea: exclude the direct light entirely, and only the specimen’s own scattering is visible. The technique works across biological, materials, and clinical applications precisely because it imposes no chemistry on the specimen — live, unstained organisms are just as visible as stained slides. The key constraint to understand before you use or build a dark field setup is the NA relationship: objective NA must be lower than condenser NA, always. Master that rule, centre your patch stop correctly, and use a clean slide, and you will see structures that bright field cannot show you at any magnification. For live specimens where phase contrast is unavailable, or for surface examination where DIC is overkill, dark field is often the fastest, cheapest, and most revealing option on the bench.
Originally posted 2020-04-30 07:55:11.
Last update on 2026-09-13 / Affiliate links / Images from Amazon Product Advertising API