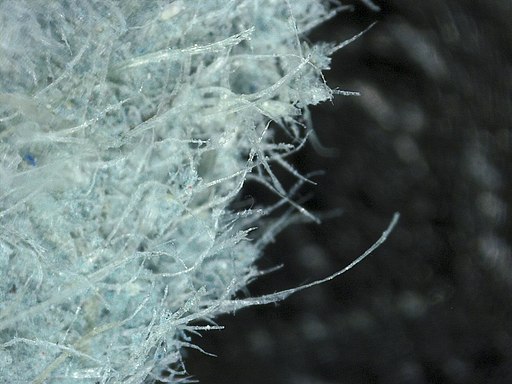
Under a microscope, paper transforms from a flat, featureless sheet into a dense, non-woven mat of translucent cellulose fibers — overlapping ribbon-like strands that look nothing like the smooth surface you write on every day. Placing paper under a microscope is one of the most accessible experiments for student microscopists and hobbyists alike: the sample costs nothing, no staining is required, and what you see at 40x will genuinely surprise you. This guide walks through sample preparation, what you’ll observe at each magnification, how different paper grades compare, and why polarized light turns those fibers into a glowing, multicolored display.
How to Prepare a Paper Sample for the Microscope
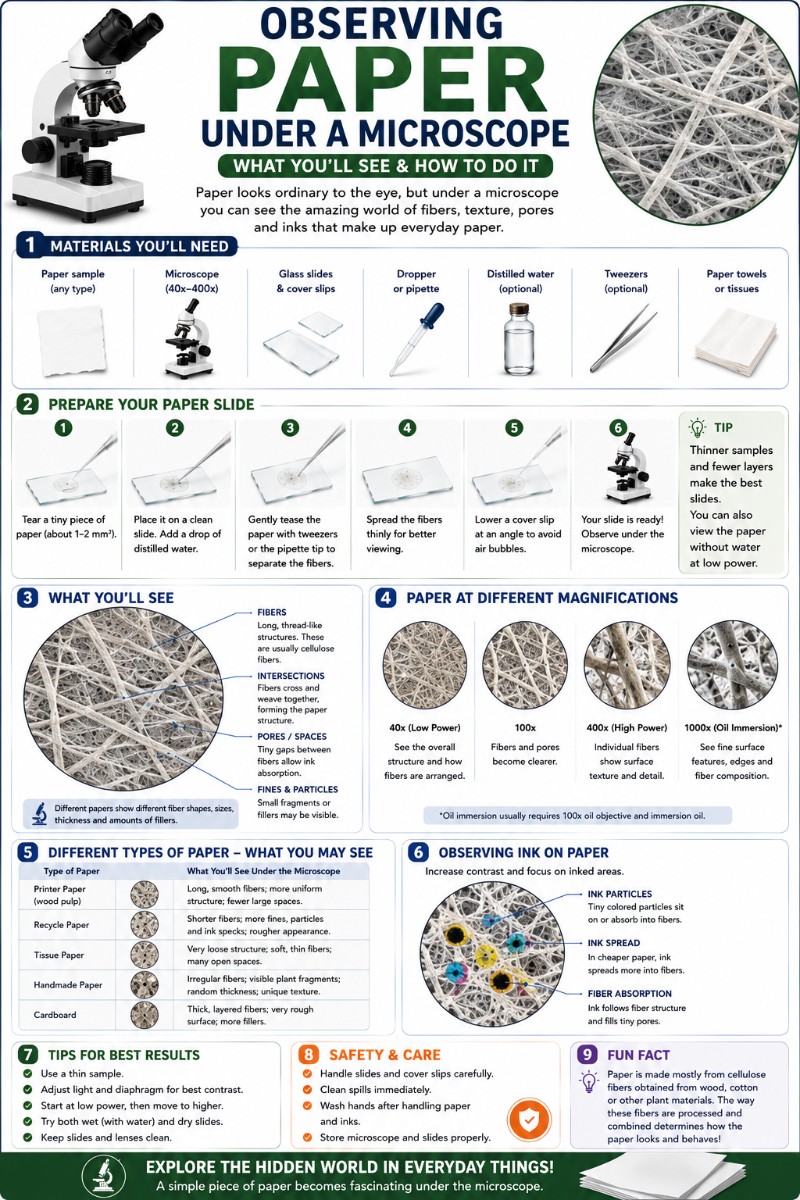
Getting a useful view of paper fibers comes down to one thing: thin edges. A whole sheet is far too thick for transmitted light to pass through, and even a small square cut with scissors gives a hard, compressed edge with little fiber detail. The trick is to tear the paper rather than cut it.

Tearing paper across its grain creates a feathered, ragged edge where individual fibers splay outward. That frayed border is where all the interesting structure is. Tear a small strip — about 1 cm wide — and place just the torn edge on your slide. For preparing microscope slides with fibrous materials, thinner is always better.
Glossy or coated paper adds a complication: the mineral coating on the surface reflects light and obscures the fibers underneath. For glossy stock, view the back side or look at the torn edge where the coating breaks away and raw fiber is exposed.
Wet Mount vs Dry Mount for Paper
Paper can be viewed dry or wet, and each has trade-offs:
- Dry mount: Place the torn fragment directly on the slide with no cover slip, or press lightly with a cover slip. Fibers stay in their natural arrangement. Best for getting an overview at 40x. The paper may buckle slightly under the cover slip, which is fine.
- Wet mount: Add a drop of water before laying the cover slip. Water spreads the fibers apart, making individual strands easier to see at 100x and 400x. The downside is that wet paper can curl and is harder to handle. To make a wet mount slide with paper, use just one small drop and let it wick in for 30 seconds before adding the cover slip.
For a first look, start dry. If you want to isolate individual fibers for higher magnification, soak a tiny fragment in water for a few minutes, then tease it apart with a needle or toothpick before mounting.

Best Magnification to Start At
Start at 40x total magnification (4x objective) to get the full landscape — the weave-like tangle of the fiber mat. Then step up to 100x (10x objective) for the sweet spot where fiber shapes, lengths, and lumen lines become clear. Use 400x (40x objective) for fine surface details. Understanding how your 4x, 10x, and 40x objective lenses change what you see will help you work through the progression systematically.
What Paper Looks Like at Each Magnification
Each step up in magnification reveals a completely different level of structure:
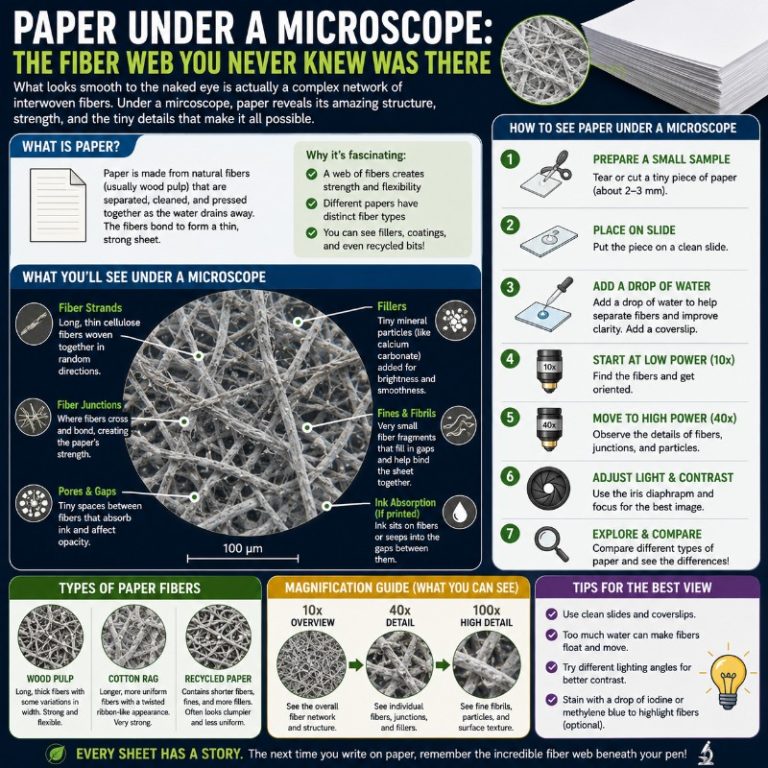
At 40x: The first thing you notice is that paper doesn’t look woven at all — it’s a chaotic, random tangle, like a pile of pick-up sticks seen from above. Fibers run in every direction, overlapping and crossing. You can see irregular flecks and clumps between the fibers; these are mineral fillers and fines (very short fiber fragments). The paper appears semi-translucent in the thinner areas near the torn edge. Different paper grades are immediately distinguishable: newsprint looks rough and debris-heavy, while printer paper is cleaner and more uniform.

At 100x: Individual fibers resolve clearly. Each one appears as a flattened, slightly translucent tube or ribbon — many are collapsed, so the hollow center (the lumen) shows up as a faint darker line running lengthwise. Fibers vary in width, length, and how kinked or straight they are depending on the paper type. This is the most useful magnification for paper study; you can distinguish fiber types, see surface texture on the fiber walls, and spot filler particles nestled between strands. This level of detail is why 100x is the sweet spot for this sample.
At 400x: The fiber wall comes into close view. On softwood-derived fibers you may spot bordered pits — small, circular or oval features on the tracheid walls that once connected adjacent wood cells. Surface fibrillation becomes visible: a fuzzy fringe of micro-fibrils along the fiber’s edges, which is a sign of the mechanical beating process during paper making. Filler particles (tiny, blocky, bright white under reflected light) are clearly separate from the organic fibers at this magnification. The depth of field becomes very shallow here, so only one plane of the fiber mat will be in focus at a time — this is normal and not a sign that your microscope needs adjustment.
Oil-immersion at 1000x is not useful for paper. The fiber mat is simply too thick and three-dimensional for the extremely shallow depth of field at that magnification to reveal useful structure. Don’t attempt it — you’ll see an out-of-focus blur and waste your immersion oil.

The Science: Why Paper Fibers Look Like That
Paper is made from cellulose, a structural polysaccharide built from long chains of β-1,4-linked glucose molecules. Cellulose is the primary component of plant cell walls, and paper making is essentially the process of breaking plant material down to its cellulose fibers, suspending them in water, and letting them form a mat as the water drains away. What you’re looking at under the microscope is that mat — the dried, compressed result of millions of fibers randomly settling against each other.
This matters for what you see: because paper is non-woven (unlike cloth, which has a deliberate over-under weave pattern), the fiber orientation is truly random. A compound light microscope reveals this immediately. Textile threads under the microscope show a regular, repeating geometry; paper fibers do not. The felted, random structure is what gives paper its isotropic properties — roughly equal strength in all directions.
The ribbon or flattened-tube appearance of individual fibers comes from how plant cells are built. Wood cells are hollow tubes (tracheids in softwood; fibers and vessel elements in hardwood). During the pulping process, the middle lamella holding cells together is broken down, the cells separate and are beaten mechanically or chemically, and the tubes collapse partially or fully, forming the flat, ribbon-like shapes visible at 100x. The darker central line you see is the remnant of that hollow lumen.
Many papers also contain mineral fillers — kaolin clay, calcium carbonate, and titanium dioxide — added to improve brightness, opacity, and print quality. Under the microscope these appear as bright, irregular particles or platelet-shaped crystals packed between fibers. Coated papers (glossy magazine stock, photo paper) have a thick mineral layer applied to the surface that is nearly opaque under transmitted light — which is why viewing the torn edge is essential for these grades.
Wood-Pulp vs Cotton/Rag Paper Under the Microscope
The single most visually striking comparison you can make is between ordinary wood-pulp paper and cotton or rag paper. They’re immediately distinguishable under the microscope, even at 40x.
Wood-pulp fibers (used in most printing, copy, newsprint, and cardboard) are derived from softwood or hardwood trees. Softwood fibers (pine, spruce) are relatively long — 2 to 4 millimeters — and appear as straight or gently curved tubes. Hardwood fibers (birch, eucalyptus) are shorter, around 1 millimeter, and often mixed with larger vessel elements, which look like short, wide pipes with perforated end walls. Newsprint (groundwood/mechanical pulp) has the roughest fibers: shorter, more broken, with visible debris and shives (fiber bundles). Chemical pulp (kraft paper, most white printing paper) has cleaner, longer, more intact fibers.
Cotton/rag fibers (used in fine stationery, archival paper, and currency) are visually completely different. Cotton linter fibers are long — up to 25–30 mm in their raw state — and have a characteristic spiral twist along their length. Under 100x, each fiber looks like a flattened ribbon with a gentle corkscrew twist and a clearly visible central lumen. There are no vessel elements or ray cells. The result is a cleaner, more homogeneous mat with noticeably longer, more regular fibers. Identifying this twist is the definitive field mark for cotton fiber — no wood species produces it.
The table below summarizes what to look for across common paper grades:
| Paper Grade | Fiber Type | Key Visual Identifiers at 100x |
|---|---|---|
| Newsprint | Mechanical/groundwood (softwood) | Short, broken fibers; lots of debris; dark flecks; rough mat |
| Printer/copy paper | Chemical kraft (mixed soft/hardwood) | Clean, long fibers; visible lumen lines; moderate filler |
| Cardboard | Recycled/kraft (mixed) | Varied fiber lengths; visible ink fragments; denser mat |
| Glossy/coated | Chemical pulp + mineral coating | Fibers hidden by coating; view torn edge for fiber access |
| Tissue/paper towel | Chemical pulp (softwood-heavy) | Long, loosely bonded fibers; very open mat; low filler |
| Cotton/rag stationery | Cotton linters | Long fibers with spiral twist; visible lumen; no vessel elements |
For a deeper look at how fiber identification works across different materials, the TAPPI technical resources (the paper industry’s primary standards body) include method descriptions for pulp fiber analysis that go well beyond what’s possible with a basic light microscope.
An advanced technique for confirming pulp type is Herzberg staining. This zinc-chloride-iodide solution colors chemical wood pulp blue or violet, mechanical/groundwood pulp yellow-brown, and cotton/rag fibers wine-red. It’s the classic forensic tool for paper authentication. For most hobbyists it’s overkill — the morphological differences above are usually sufficient — but it’s worth knowing about. A drop of ordinary iodine solution is a rough substitute and can add enough contrast to make fibers easier to see.
Comparing paper fibers to other biological and non-biological structures reinforces how varied fibrous materials look. Check out human hair under a microscope for a contrast: hair is a single large fiber with a defined cortex and cuticle scales — structurally completely different from the irregular cellulose ribbons in paper, even though both appear “fibrous” to the naked eye.
Seeing Paper Fibers Under Polarized Light
If your microscope has a polarizing filter set — or if you have two polarizing filters you can improvise with — paper is one of the best samples to demonstrate birefringence.
Cellulose is a crystalline polymer. When polarized light passes through a cellulose fiber, the ordered molecular structure splits the light into two rays traveling at slightly different speeds (ordinary and extraordinary rays). Between two crossed polarizers, this phase difference causes the fibers to appear bright and often colored against a completely dark background — while the mineral fillers and amorphous regions stay dark. The result is visually spectacular: a black field punctuated by glowing, multicolored fiber strands in blue, orange, and white, each color corresponding to the fiber’s thickness and orientation relative to the polarizers.
Rotating the stage (or the analyzer filter) causes the fiber colors to cycle through as the angle changes — an effect called extinction at 45° intervals. This isn’t just a pretty effect: the brightness and color depend on the degree of cellulose crystallinity and fiber orientation, which is why polarized light microscopy is used in pulp research to study fiber beating and drying effects. The birefringence of cellulose is well-documented in the scientific literature and is one of the diagnostic tools for fiber identification.
If you don’t have a polarizing kit, you can still see a reduced version of this effect with improvised polarizers cut from LCD screen panels. Two pieces of the polarizing film placed one above and one below the sample, rotated 90° to each other, will cross-polarize adequately for hobby use. This is one of the most genuinely surprising effects you can demonstrate with an everyday material. Consider comparing paper to other birefringent everyday objects such as everyday materials like salt and sugar crystals under the microscope — crystals also show vivid polarization colors.

Common Mistakes and Practical Tips
- Sample too thick: The most common error. Use only the very edge of a torn fragment, not a whole square of paper. If your view is completely dark or opaque, the sample is too thick for transmitted light.
- Glossy paper glare: Reflected light from a coated surface washes out the image. View the torn edge, the uncoated back, or switch to dark field illumination if available. You can also learn more about dark field microscopy as a contrast-enhancing technique for tricky samples.
- Dried-out wet mount: A wet mount of paper dries faster than biological specimens because paper wicks water into the fiber mat. If the sample dries while you’re looking, re-wet the edge of the cover slip with a drop of water and let it wick back in.
- Expecting a woven pattern: Paper looks random and chaotic, not orderly. If it looks like a grid or textile, you’re probably looking at the wrong sample — or your fabric lab coat sleeve got on the slide by mistake.
- Over-magnifying: 400x is about the useful limit for paper. Pushing to 1000x produces a blurry, unusable image because of the fiber mat’s thickness. Understanding magnification vs resolution explains why more is not always better.
- Cutting instead of tearing: A scissor cut gives a hard, compressed edge with fibers fused together. Always tear for the feathered, splayed edge that shows individual fibers.
Frequently Asked Questions
Can polarized light help tell wood-pulp paper from cotton paper?
Yes, but morphology alone is usually more reliable. Both wood-pulp and cotton fibers are birefringent and glow under crossed polarizers, but their brightness and color differ because cotton fibers have higher crystallinity. The spiral twist of cotton fibers — visible at 100x in standard bright-field illumination — is the clearest distinguishing feature. Polarized light adds a visual spectacle and makes the twist easier to track as you rotate the stage, but you don’t need it for identification: the twist itself is diagnostic.
Can you see paper fibers with a cheap or USB microscope?
Yes — and paper is actually one of the best samples for entry-level or USB digital microscopes. At 40x–100x, the fiber mat is easily visible with any light source, even built-in LED rings. You won’t get the fine detail of bordered pits or surface fibrillation without a quality 40x objective, but the overall fiber structure, the non-woven arrangement, and differences between paper grades are all clearly visible with a budget microscope. Paper is a great first sample precisely because it requires no preparation skill.
Why does recycled paper look different under a microscope?
Recycled paper contains fibers that have been through the pulping process multiple times. Each cycle shortens and weakens the fibers, so recycled-content paper tends to show shorter, more damaged, and more variable fiber lengths than virgin kraft paper. You may also see residual ink particles (small, dark specks), filler particles from multiple paper grades mixed together, and a generally less uniform fiber mat. High-recycled-content cardboard is especially distinctive — the fiber debris and mixed-grade content make it look noticeably rougher than virgin-fiber papers.
Why does paper shed fibers and create dust?
Paper shed — the fine dust you see in printer trays or when flipping through books — comes from loosely bonded “fines”: very short fiber fragments and filler particles that weren’t fully integrated into the fiber mat during paper making. Mechanical pulp papers (newsprint) shed more than chemical pulp papers because the shorter, more broken fibers bond less strongly. Under the microscope, these fines appear as tiny specks and short fragments between the main fiber strands. High-filler papers also shed more because the mineral particles aren’t fibrous and have fewer bonding points.
Does paper look different under a stereomicroscope vs a compound microscope?
A stereomicroscope (typically 10x–45x) shows the surface texture of paper in three dimensions with reflected light — you’ll see the mat structure, surface roughness differences between paper grades, and the coating on glossy papers. A compound microscope uses transmitted light and higher magnification, revealing the internal fiber structure: lumen lines, fiber types, filler particles, and fibrillation. Both views are useful and complement each other. If you have access to both, check out this guide to compound vs stereo microscopes to understand which suits your workflow — then start with the stereo scope for the surface overview and switch to the compound for fiber-level detail.
What is Herzberg stain and do I need it to identify paper fibers?
Herzberg stain is a zinc-chloride-iodide solution used professionally to color different pulp types: chemical wood pulp turns blue or violet, mechanical/groundwood pulp turns yellow-brown, and cotton or rag fiber turns wine-red. It’s the definitive stain for pulp identification in forensic document examination and archival analysis. For hobbyist microscopy, you almost never need it — the morphological differences (fiber length, presence of spiral twists in cotton, vessel elements in hardwood, and debris levels in mechanical pulp) are usually enough to tell paper grades apart. A drop of ordinary iodine can add basic contrast without specialized reagents.
Conclusion
Paper under a microscope is one of the most rewarding everyday-object experiments in amateur microscopy. What looks like a featureless flat sheet resolves into a complex, layered world of cellulose ribbons, mineral fillers, and structural variation that directly reflects how and from what each sheet was made. The torn-edge technique, the 40x–100x magnification progression, and the polarized-light birefringence effect are all reproducible in any classroom or home lab with a basic compound microscope and a sheet of office paper. The comparison between newsprint, printer paper, tissue, and cotton stationery demonstrates real materials science with no equipment beyond what most student microscopists already own.
Have you tried this at home or in the classroom? We’d love to hear what you found — especially if you tried polarized light or compared different paper grades side by side. Drop your observations or questions in the comments below.