
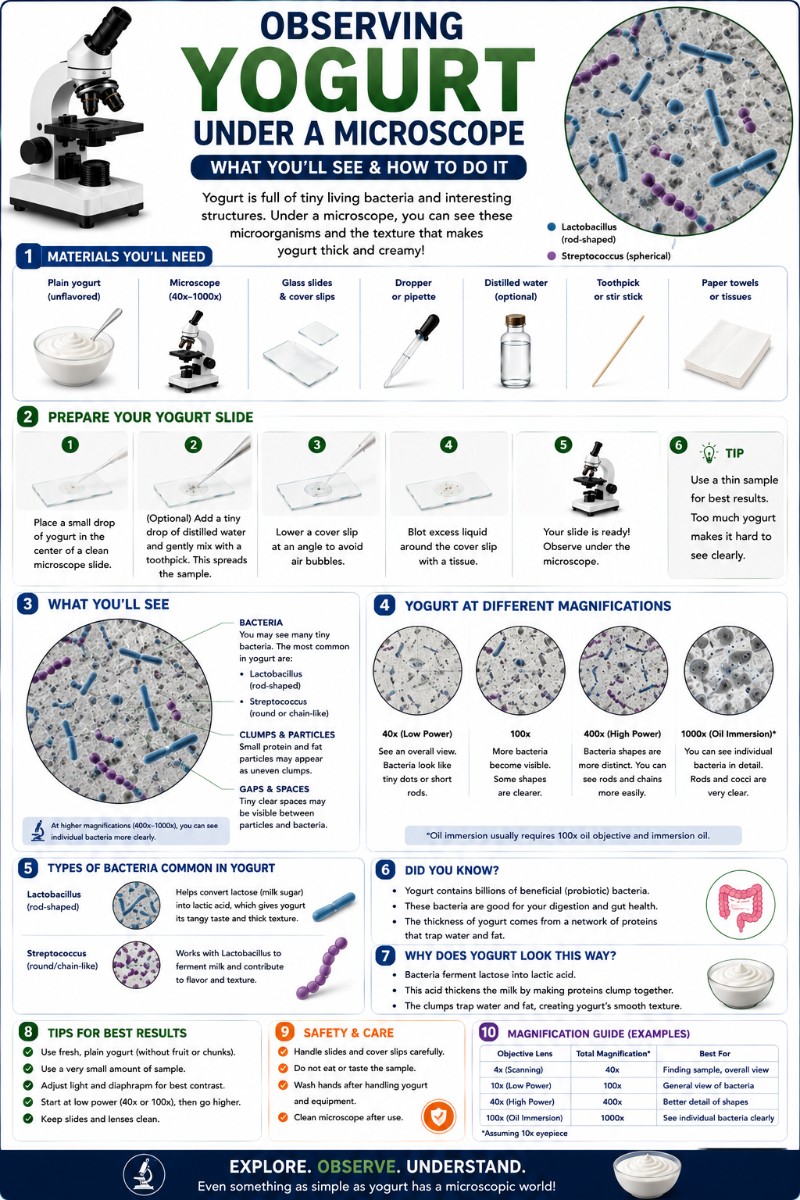
Observing yogurt under a microscope reveals two types of live bacteria — rod-shaped Lactobacillus and bead-like chains of Streptococcus — but you need about 1000x magnification with oil immersion and a simple stain to see them clearly. At 400x they appear as faint dark specks, enough to confirm they’re there; at 1000x you can distinguish rods from cocci and appreciate the arrangement that defines each species. This guide shows you exactly how to prepare the slide, what magnification to use at each step, and what you’ll realistically see — no textbook diagrams, just what actually comes through the eyepiece.
What You’ll Need
You don’t need a professional lab setup. Here’s the short list:
- Compound microscope with a 40x objective (400x total) and ideally a 100x oil-immersion objective (1000x total)
- Immersion oil — required for the 100x objective
- Plain live-culture yogurt — label must say “contains live and active cultures”; avoid heat-treated or shelf-stable varieties
- Glass microscope slides and coverslips
- Methylene blue stain — the easiest simple stain for home use; available from lab supply and online science vendors
- Toothpick or dropper for transferring a tiny amount of yogurt
- Water for diluting the smear
- Lab tissue or blotting paper for drying steps

If you’ve never prepared microscope slides before, review that process first — a thin, even smear is the single most important factor for a usable yogurt preparation.
How to Prepare a Yogurt Slide (Step by Step)
The preparation is a standard bacterial smear — the same technique microbiologists use for any culture. Follow these steps carefully; most failed yogurt slides come down to a smear that’s too thick.
- Dilute a tiny amount of yogurt. Place one small drop of water on a clean slide. Dip a toothpick into the yogurt and transfer just a trace — far less than you think you need. Mix into the water drop until the mixture looks almost clear.
- Spread the smear. Use another slide held at an angle to spread the mixture into a thin, even film roughly the size of a thumbnail. The thinner the better — a thick smear will look like a murky fog under the scope.
- Air dry completely. Leave the slide flat at room temperature for 5–10 minutes until the smear is fully dry. Do not use the slide wet at this stage.
- Heat-fix. Quickly pass the slide (smear side up) through a gas flame or alcohol lamp flame two or three times. This kills the bacteria, adheres them to the glass, and prevents them from washing off during staining. Alternatively, if you have no flame, let it air-fix for 30+ minutes — though heat-fixing gives more consistent adhesion.
- Flood with methylene blue. Apply enough stain to cover the smear and leave it for 60 seconds.
- Rinse gently. Tilt the slide and let a slow stream of water wash off the excess stain. Stop when the rinse water runs pale blue, not clear — over-rinsing removes too much color.
- Blot dry. Gently blot (do not rub) with lab tissue. Let the slide finish air-drying before adding a coverslip or applying oil.

Why Staining Matters
Unstained bacteria are nearly transparent in brightfield microscopy. Yogurt bacteria measure 0.5–9 micrometers — just above the resolution limit of light microscopy at around 0.2 µm — which means they’re visible in principle but have almost no contrast against the background without a stain. Methylene blue gives them the contrast that makes their shapes readable. A quick wet mount (a smear between slide and coverslip without staining) is possible if you want a fast peek, but you’ll struggle to spot the bacteria against the background, and the fluid will evaporate quickly. Staining takes five extra minutes and makes the difference between a frustrating blur and a clear image. If you want to go further, both species are Gram-positive, meaning a Gram stain will color them purple/violet — useful if you’re doing this for a biology class that requires Gram classification.
How to View and Focus the Bacteria
Start at the lowest objective (typically 4x or 10x) and find the stained smear — it’ll appear as a faint blue-tinted region. Center it, then move to the 40x objective for 400x total. At this magnification you should see a blue-stained field with tiny dark dots and faint rod shapes. This is where you confirm the bacteria are present and the smear thickness is workable. Adjust the iris diaphragm for contrast — close it down slightly from fully open. Bacteria under 1 µm wide disappear into background glare when the diaphragm is wide open.
For a satisfying view of shape and arrangement, add a drop of immersion oil directly to the smear (no coverslip needed for a fixed smear) and swing in the 100x oil-immersion objective for 1000x total. Focus carefully — the depth of field at 1000x is razor thin, a fraction of a micrometer. You’ll see individual rod shapes and strings of round cocci clearly distinct from each other. You can learn how to calculate total magnification if you need to confirm your setup.

What Bacteria Are in Yogurt?
Real yogurt — as defined by the FDA — must contain two specific starter cultures. They work together symbiotically to ferment milk into yogurt, and they’re the organisms you’ll see on your slide.
Lactobacillus delbrueckii subsp. bulgaricus (sometimes listed by the older name L. bulgaricus) is a Gram-positive rod. It produces lactic acid from lactose at high temperatures and releases proteolytic enzymes that break down milk proteins, releasing amino acids that feed its partner species.
Streptococcus thermophilus is a Gram-positive coccus that grows first when the starter is added to warm milk. It lowers the oxygen level and produces formic acid and CO₂, which stimulates L. bulgaricus to grow faster. Together they drop the milk’s pH to around 4.5, which causes casein proteins to coagulate — giving yogurt its thick texture and tangy flavor.

Both species are present in large numbers in live-culture yogurt: commercial products commonly contain a billion or more cells per gram. That density is part of why the slide works — you don’t need to culture or concentrate anything.
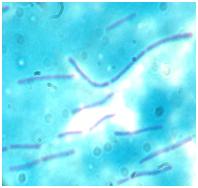
What Yogurt Bacteria Look Like: Rods vs. Cocci
Knowing the two shapes ahead of time makes identification immediate when you look through the eyepiece.
| Species | Shape | Arrangement | Size | Visible at 400x? |
|---|---|---|---|---|
| L. delbrueckii subsp. bulgaricus | Rod (bacillus) | Singles, pairs, short chains | 0.5–0.8 µm wide × 2–9 µm long | Faint rods visible; shape clear at 1000x |
| Streptococcus thermophilus | Sphere (coccus) | Pairs and chains (“string of beads”) | ~0.7–0.9 µm diameter | Specks only; chains clear at 1000x |
At 400x, both species appear as tiny dark dots and short dashes in the blue-stained field. You can confirm the bacteria are present and get a rough sense of rod vs. round shapes, but the cocci especially are close to the limit of what 400x can resolve clearly.
At 1000x with oil immersion, the picture sharpens significantly. The rods of L. bulgaricus are clearly elongated — often in pairs end-to-end or in short chains. The cocci of S. thermophilus appear as distinct round spheres in pairs or longer chains, like a necklace of beads. This is the view worth working toward.
One important expectation to set: because these are prokaryotes, there are no membrane-bound organelles, no nucleus — nothing to see internally. You’re looking at cell outlines and shapes only. And because both species are non-motile, don’t expect them to swim or move purposefully. Any drifting you see in a wet mount is Brownian motion or fluid currents, not bacterial locomotion. For contrast, try observing yeast under the microscope — yeast are much larger eukaryotic cells (~3–10 µm) with visible internal structure and budding that’s unmistakable once you’ve seen it.
To understand more about what bacteria look like under a microscope in general — including the full range of shapes beyond rods and cocci — that linked guide covers the complete taxonomy of bacterial morphology.
Live-Culture vs. Pasteurized Yogurt Under the Microscope
Not all yogurt sold in stores contains living bacteria. Some products are heat-treated after fermentation to extend shelf life — these will have cell debris but no viable cultures. Comparing live-culture and heat-treated yogurt side by side is an excellent experiment with a real visual payoff.
In a stained smear from live-culture yogurt, you’ll see a dense field of intact, well-defined rods and cocci — high cell density with clear cell walls.
In a smear from heat-treated (pasteurized-after-culturing) yogurt, you may see fewer cells, more irregular or fragmented shapes, and sometimes a less uniform staining pattern. The total numbers are often lower because heat ruptures cells or causes clumping.
There’s an important caveat: a standard light microscope with methylene blue cannot reliably tell you whether an individual cell is alive or dead. Cell shape and staining tell you about structure, not viability. To truly confirm live bacteria, microbiologists use culture-based enumeration methods or fluorescent live/dead stains — neither of which is feasible at home. What you can say from the light microscope view is that live-culture yogurt shows a denser, more structurally intact bacterial population than the heat-treated equivalent. Check the label for “contains live and active cultures” before you prepare your slide — the Britannica overview of yogurt covers the history and science behind this fermentation standard. For reference on microscopy technique, Nikon’s MicroscopyU is an excellent resource for understanding how brightfield contrast and oil immersion work together at high magnification.

Frequently Asked Questions
Can a school or home microscope actually see yogurt bacteria?
Yes — but with conditions. You need a compound microscope capable of at least 400x magnification, and ideally a 100x oil-immersion objective for 1000x. A basic school scope with a 40x objective will show faint specks that confirm presence; you need oil immersion for clear shape recognition. Toy microscopes and pocket scopes topping out at 100x–200x will not resolve these bacteria at all — at those magnifications, the cells are too small to appear as anything other than background noise.
Why can’t I see anything in my yogurt slide?
The most common cause is a smear that’s too thick — it looks opaque blue rather than a thin translucent film. Make a new slide using a tiny trace of yogurt diluted in water and spread to an almost-clear film. The second most common issue is skipping the stain: unstained bacteria in brightfield have almost no contrast and are virtually invisible against the background. Check also that your condenser is raised and the iris diaphragm is partially closed for maximum contrast.
Are the bacteria in yogurt alive, and will they move?
In a fresh tub of live-culture yogurt, the bacteria are alive (viable). However, once you make a stained smear, the heat-fixing step kills them — so what you’re viewing is fixed, dead cells. Even in an unstained wet mount, neither L. bulgaricus nor S. thermophilus are motile species; they don’t swim. Any movement you observe is passive — Brownian motion or fluid drift from the coverslip settling, not bacterial locomotion.
Do I need to use a specific brand of yogurt?
Brand doesn’t matter much — what matters is the label. Choose any plain yogurt that says “contains live and active cultures” and is not marked as heat-treated, shelf-stable, or UHT. Plain (unflavored, no fruit) works best because additives and fruit particles can clutter the slide. Greek-style plain yogurt works fine; the higher protein content doesn’t affect the bacteria.
Can I use a Gram stain instead of methylene blue?
Yes. Both L. bulgaricus and S. thermophilus are Gram-positive, so they’ll stain purple/violet with crystal violet and retain it after the decolorizing step. A Gram stain takes more reagents and careful timing than a simple methylene blue stain, but it’s a worthwhile exercise if you’re learning microbiology technique. The resulting purple rods and cocci are striking under oil immersion.
How long will a prepared yogurt slide last?
A fixed, stained smear without a coverslip can be stored for days to weeks in a dust-free slide box — the cells are fixed to the glass. If you add a coverslip with mounting medium (such as Permount), the slide can last months. A wet mount, by contrast, dries out within minutes to an hour and is for immediate viewing only. For a class demonstration you want to revisit, fix and stain the slide and store it properly.
Why does my slide look so crowded — can I see individual cells?
Yogurt has a very high bacterial density, often billions of cells per gram. Even heavily diluted, your smear may show overlapping cells. If it’s too crowded to distinguish individual rods and cocci, make a new slide with a more dilute mixture — try diluting one small drop of yogurt in a full dropper of water before spreading. At the right dilution, individual rods and chains of cocci become clearly separable under oil immersion.
Conclusion
Observing yogurt under a microscope is one of the most accessible bacterial experiments you can do at home or in a classroom. With a thin stained smear, oil immersion at 1000x, and the right expectations — faint specks at 400x, clear rods and cocci chains at 1000x — you get a genuine view of the live cultures that turn milk into yogurt. The visual contrast between Lactobacillus rods and Streptococcus chains makes this a particularly satisfying identification exercise, and the live-vs-pasteurized comparison adds a real experiment with a meaningful result.
Have you tried preparing a yogurt slide yourself? Tell us what you saw — which species did you identify first, and what magnification gave you the clearest view? Share your experience in the comments below.