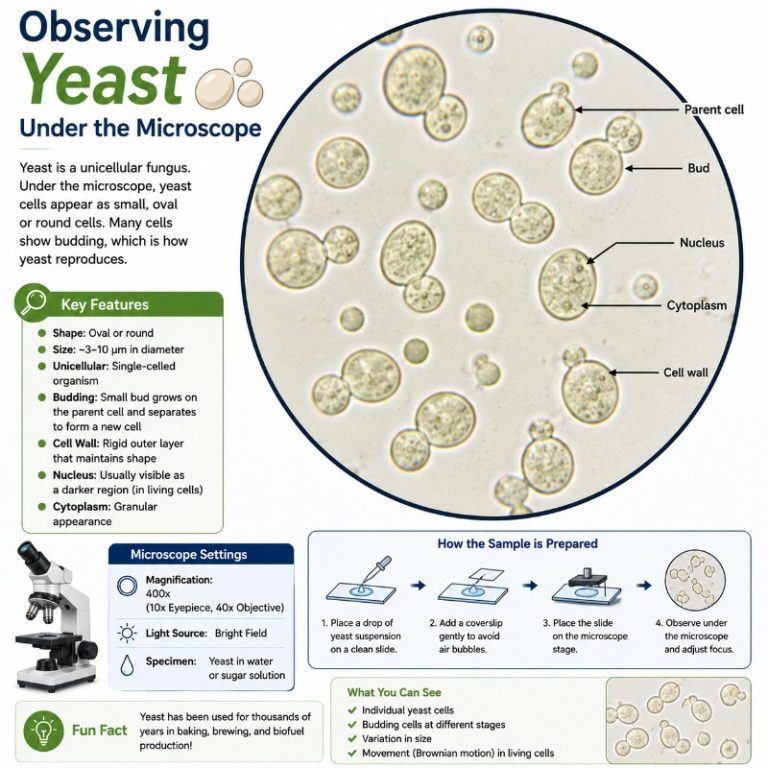
Yeast under a microscope reveals a world far more dynamic than the plain beige powder from a baking packet suggests. At 400x magnification you can watch living cells bud off daughter cells in real time — and a single drop of methylene blue tells you in seconds which cells are alive and which are dead. Here is exactly what to expect when you put yeast on a slide for the first time, and how to get a result worth looking at.
What yeast cells look like through a microscope
Saccharomyces cerevisiae — baker’s or brewer’s yeast — appears as small oval to spherical bodies roughly 5 to 10 micrometers in diameter. That is about the same width as a red blood cell. Through a bright-field eyepiece at 400x you see clusters of translucent, slightly glassy spheres sitting against a light grey background. Without stain they are nearly colourless, which is why beginners often wonder whether they are looking at the right thing: the cells are there, but they do not leap out the way bacteria do in a textbook diagram.
The cell wall is the clearest feature at this magnification — a distinct, slightly thickened outer ring that holds the cell’s shape. Inside, the cytoplasm looks granular and slightly dark compared to the surrounding liquid. Nuclei and vacuoles are present but require either oil-immersion at 1000x or a fluorescent microscope to resolve clearly.
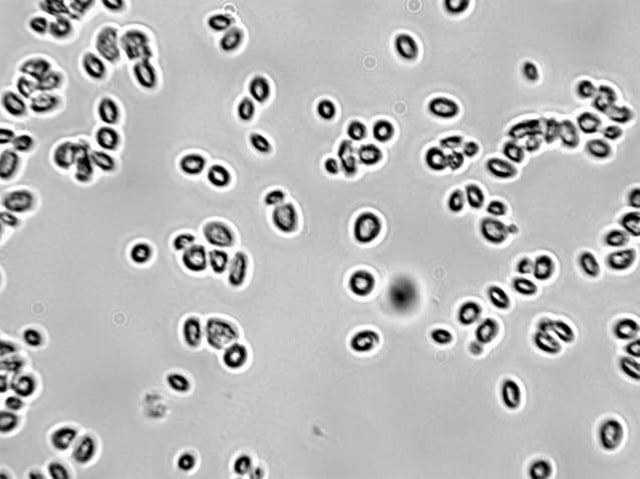
This is Saccharomyces cerevisiae (brewer’s yeast) at 400x magnification. At this level you can clearly resolve individual cell boundaries and spot budding pairs without needing oil immersion.
What is yeast?
Yeast are single-celled eukaryotic fungi belonging to the subkingdom Dikarya. Around 1,500 species have been formally described across two phyla — sac fungi (Ascomycota) and higher fungi (Basidiomycota) — though researchers estimate only about 1% of true yeast diversity has been catalogued so far.
These unicellular fungi cannot photosynthesise. Instead they survive by metabolising organic substances — chiefly sugars — which is why you find them on fruit skins, flower nectar, and plant leaves wherever sugar is accessible. In industrial contexts, humans exploit this appetite to drive fermentation: yeast consumes sugar and excretes carbon dioxide and ethanol as by-products.
Some yeast species are opportunistic pathogens. Candida albicans, for example, can shift between yeast, pseudohyphal, and hyphal growth forms depending on conditions, and causes infections in immunocompromised individuals. This article covers microscopy observation only — it is not a substitute for medical diagnosis or treatment; consult a healthcare provider for any clinical concerns.

Types of yeast and their uses
Useful cultivated yeasts include baker’s yeast, brewer’s yeast, distiller’s yeast, wine yeast, and nutritional yeast — all strains of S. cerevisiae or closely related species. Each is selected for properties relevant to its role: high CO₂ production for bread, alcohol tolerance for spirits, or flavour compounds for wine.
The fermentation process
Fermentation is what you are watching when you see small gas bubbles rising from a yeast solution under the scope. Yeast cells consume the available sugar and produce carbon dioxide and ethanol. In bread, the CO₂ is trapped in the gluten matrix and makes the dough rise; the ethanol evaporates during baking. In beer and wine, both CO₂ and ethanol are retained — the CO₂ gives carbonation, the ethanol gives alcohol content.

These magnified images show food matter undergoing active fermentation. Notice that yeast cells are not the only microorganisms present — bacteria and mould spores appear alongside them. On a fresh slide of activated yeast solution you can observe the same CO₂ gas bubbles rising through the liquid as fermentation progresses.

Where yeast lives naturally
Yeast habitats share one feature: available sugar or soluble organic nutrients. Common natural sites include fruit skins (the pale waxy bloom on a grape is partly wild yeast), flower nectar, tree bark, and leaf surfaces. Some species colonise soil and deep-sea sediments. As opportunistic organisms rather than obligate parasites, yeast do not need a living host — they feed on organic matter wherever they find it.
How yeast reproduces — and what you can see
Budding is the primary reproductive strategy of most yeast, and it is the most satisfying thing to observe under the microscope. The parent cell grows a small outgrowth — a bud — off its side wall. As the bud enlarges, you can see it sitting attached to the mother cell like an asymmetric extension. The pair looks, honestly, like a biological Mickey Mouse: one large circle with a smaller circle budding off the side. When the bud reaches a viable size, it pinches off, leaving behind a small ring-shaped scar on the mother cell wall called a bud scar. Each mother cell can produce a limited number of buds over its lifetime, and counting bud scars at high magnification is one way researchers estimate cell age.

This side-by-side image shows yeast cells (round/oval singles), pseudohyphae (chains of elongated budding cells that stay attached to each other), and true hyphae (continuous filaments with no constrictions). Candida can display all three forms depending on growth conditions — if you see branching filaments in a yeast preparation, that is a clue about the species or the environmental stress it is under.
Budding
Budding in S. cerevisiae proceeds by mitotic cell division: the parent cell replicates its genome, then begins the outgrowth. The bud grows asymmetrically from the mother cell wall in a process driven by polarised cytoskeletal activity. S. cerevisiae belongs to phylum Ascomycota, class Saccharomycetes, order Saccharomycetales — the classic budding yeast lineage.
Binary fission
Fission yeast (Schizosaccharomyces pombe is the textbook example) divides differently: mitosis replicates and segregates the genome, then a new plasma membrane and cell wall form across the middle of the cell, splitting it into two equal daughters. The result under the scope looks like a cell pinching cleanly in half rather than growing a bud to one side.
Sexual reproduction and spores
Under stressful conditions — nutrient starvation, extreme temperature — yeast can undergo sexual reproduction and form spores called ascospores (in Ascomycota). These appear as small, highly refractile bodies inside the parent cell. They are not commonly observed in routine slides from baker’s yeast unless conditions are deliberately manipulated.
What magnification do you need to see yeast?
Total microscope magnification equals objective magnification multiplied by eyepiece magnification. On a standard compound microscope with a 10x eyepiece: a 40x objective gives 400x total, a 100x oil-immersion objective gives 1000x total.
400x is enough to see budding clearly. You do not need oil immersion to watch yeast reproduce or to perform the methylene blue live/dead test. Reserve 1000x oil immersion for when you want to resolve individual organelles (nucleus, vacuoles) or observe fine detail like bud scars.
For numerical aperture: a typical 40x objective has an NA around 0.65; a 100x oil-immersion objective typically reaches 1.25–1.4 NA. Higher NA delivers better resolution and light-gathering. The theoretical maximum with standard immersion oil is about 1.51, but most consumer oil objectives top out at 1.25–1.4.
How to prepare a yeast slide
The fastest, most informative preparation uses active dry yeast, warm water, sugar, and methylene blue. This gives you living, actively budding cells alongside dead ones — all visible and distinguishable in one slide. If you are new to mounting specimens in general, see our guide on how to prepare a microscope slide for the core technique before you start.
Materials
- 1 packet (~7 g) active dry yeast
- 1 teaspoon white sugar
- ~1 cup (240 mL) warm water (about 40 °C — comfortably warm, not hot)
- Small bowl for mixing
- Mixing spoon
- Medicine dropper or pipette
- Glass slides and cover slips
- 0.1% methylene blue solution (the standard beginner stain — available from aquarium or biology supply stores; a few drops go a long way)
Step-by-step method (with methylene blue)
- Activate the yeast. Combine yeast, sugar, and warm water in the bowl. Stir until no dry lumps remain. Within about 10 minutes the surface should turn foamy as CO₂ is released — that foam signals active fermentation and means the yeast cells are actively dividing.
- Sample from below the foam. Dip the pipette beneath the foam layer and draw up a small amount of the liquid suspension. The foam itself is mostly bubbles; you want the cell-rich liquid below it.
- Check concentration before staining. Place one small drop on a clean slide and look at it with the 10x or 40x objective. If the field looks muddy and you cannot distinguish individual cells, the sample is too concentrated — add one drop of clean water to the pipette reservoir and try again. Over-concentration is the single most common reason beginners see only a blur.
- Add methylene blue. Place one small drop of 0.1% methylene blue solution next to (not on top of) the yeast drop, then tilt the slide slightly so the two drops merge. Let it sit for about 5 minutes at room temperature to allow the stain to penetrate dead cells.
- Apply the cover slip. Lower the cover slip at an angle — one edge down first, then gently lower the other — to minimise trapped air bubbles. Wick off any excess liquid that squeezes out using the edge of a tissue. Bubbles in the preparation are a common frustration; a slow, angled lowering almost always prevents them.
- View at 400x. Start with the 10x objective to find a clear region, then switch to the 40x. Live yeast cells appear colourless or very faintly tinged; dead cells stain a clear, definite blue. Look for pairs of cells where one is noticeably smaller — that is a mother and daughter bud.
Dead vs. live yeast: what methylene blue reveals
Methylene blue is a vital stain: its ability to distinguish living from dead cells is the reason it is the standard first choice for yeast microscopy, not just an optional extra. Live yeast cells maintain an active metabolism that reduces methylene blue to its colourless leuco form — so live cells exclude the dye and remain clear under the scope. Dead yeast cells cannot reduce the dye, so they absorb it and stain a distinct blue colour.
In a freshly activated yeast solution, most cells are live and therefore colourless. You may see a small number of blue-stained dead cells scattered through the field. If the majority of cells stain blue, the yeast is old, overheated, or was killed — not useful for fermentation experiments, but still interesting as a teaching example of the technique.
This live/dead ratio is the core assay that brewers and fermentation scientists use to assess yeast viability before pitching into a new batch. Peer-reviewed protocols use exactly this 0.1% methylene blue method for routine viability assessment — what you are doing at the kitchen bench is the same principle used in research and industry.
Microscopy techniques for yeast
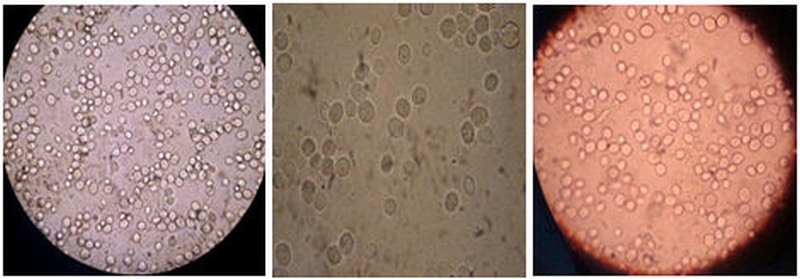
This compilation shows budding yeast cells of varying sizes and shapes — a reminder that even within the same species and slide, cells differ depending on age, cell cycle stage, and nutrient availability.
Bright-field microscopy
A standard bright-field microscope at 400x is the right starting tool. You can observe yeast cell morphology, budding, and fermentation gas bubbles. The main limitation is contrast: yeast cells are mostly transparent, so unstained cells are subtle. Methylene blue, or a brief iodine stain, lifts the contrast significantly for beginner slides.
Phase contrast microscopy is a significant upgrade for unstained yeast. Phase contrast converts the tiny refractive index differences between cell structures and the surrounding medium into visible contrast — you can see the cell wall, vacuoles, and even the nucleus of a live, unstained cell. Most teaching microscopes do not include phase contrast, but it is the preferred technique in yeast research for live imaging.
Dark-field microscopy produces a bright cell outline against a dark background, which makes spotting cell boundaries and small buds particularly easy. A useful technique if your compound microscope has a dark-field condenser attachment.
Fluorescence microscopy
Fluorescence microscopy opens up intracellular structures invisible to bright-field. Research-grade fluorescent dyes each target specific organelles: DAPI stains the nucleus (blue fluorescence), calcofluor white stains the cell wall and bud scars (UV-excited blue-white fluorescence), FM4-64 labels vacuolar membranes (red fluorescence). These dyes require a fluorescence microscope with appropriate filter sets — they are not beginner tools, but they are what researchers use to map the internal architecture of a living yeast cell in detail.
Yeast vs. pseudohyphae vs. hyphae: knowing what you are looking at
The yeast/pseudohyphae/hyphae distinction matters most when working with Candida species, which can grow in all three forms. In a standard S. cerevisiae preparation you will see only the yeast form (round/oval single cells or mother-bud pairs). Here is how to read the forms if you encounter them:
- Yeast form: Individual round or oval cells, 5–10 µm. Buds are clearly smaller and attached at a single point. After separation each cell is independent.
- Pseudohyphae: Chains of elongated budding cells that stay attached to each other after division rather than separating. The cells are constricted at each junction — like sausages linked together. Indicate environmental stress or specific genetic programmes.
- True hyphae: Continuous tube-like filaments with no constrictions at the septa. Cells inside are not distinguishable as separate units; the whole structure grows as one elongated unit. More rigid-looking than pseudohyphae under the scope.
If a preparation shows branching filamentous structures, the organism is likely growing in hyphal mode — characteristic of Candida albicans under certain conditions, and a morphological cue that the fungus may be shifting toward a more invasive growth state (a morphology point only — not a clinical observation from a home slide).
Troubleshooting a yeast slide
Field is cloudy or blurred, cannot see individual cells. The sample is too concentrated. Dilute it: add one drop of clean water to the drop on the slide before adding the cover slip, or start over with more dilute yeast suspension. This is by far the most common beginner problem.
Cannot see any cells at all. The sample is too dilute, or you are not at sufficient magnification. Switch to the 40x objective (400x total). If you still see nothing, pipette a slightly more concentrated drop — foam from the surface of the activated yeast suspension has more cells per millilitre than the liquid below.
Cannot see budding. Give it time. Start with freshly activated yeast (10 minutes after mixing with warm water and sugar), and look within the first 30 minutes. As yeast enters a highly active growth phase, budding pairs become easy to spot. If you activated the yeast several hours ago and the foam has subsided, the population may be in a slower phase — make a fresh mix.
Air bubbles under the cover slip. Lower the cover slip at an angle next time. Existing bubbles are annoying but navigable — move the slide to a region without bubbles rather than trying to press them out (pressing usually cracks the slip or shifts the cells).
All cells are staining blue with methylene blue. The yeast is mostly dead — possibly old, overheated, or killed during preparation. Water above about 50 °C kills yeast quickly. Make a fresh batch with water at body temperature or slightly above (35–40 °C).
Frequently Asked Questions
How big is a yeast cell?
Saccharomyces cerevisiae cells are 5 to 10 micrometres in diameter. Other species vary — some Candida cells are slightly smaller, and cells in the hyphal form are elongated to several times that length.
What magnification do you need to see yeast?
400x (40x objective × 10x eyepiece) is enough to observe budding and perform the methylene blue viability test. 1000x (100x oil-immersion objective) is needed for organelle-level detail such as nuclei and vacuoles.
Why use methylene blue for yeast?
Methylene blue is a vital stain: live yeast cells metabolically reduce it to a colourless compound, while dead cells absorb it and turn blue. It simultaneously stains the sample for visibility and tells you which cells are alive — two results from one reagent.
How long does it take to see budding after activating yeast?
Foam appears within about 10 minutes of mixing yeast with warm water and sugar. Budding cells are observable as soon as you sample the active suspension — you do not need to wait hours. Activity peaks in the first 30–60 minutes.
Can you see yeast without staining?
Yes, at 400x on a bright-field microscope you can see the outline of yeast cells and budding pairs without any stain. Contrast is low; a brief methylene blue stain makes the cells significantly easier to identify, especially for beginners.
Conclusion
Yeast under a microscope rewards curiosity with immediately visible biology: oval cells budding in real time, the clean colour distinction between live and dead cells that methylene blue delivers, and — if you use a Candida sample — the striking shift from single cells to tangled pseudohyphal chains. The core skill is getting a clear slide, and that comes down to one thing most beginners get wrong: over-concentrated samples. Dilute until you can see individual cells, use 400x as your starting magnification, and reach for methylene blue as your first stain. From there, everything else — bud scars, fermentation bubbles, viability ratios — becomes readable in a single preparation.
Overview
Originally posted 2020-04-25 06:58:39.