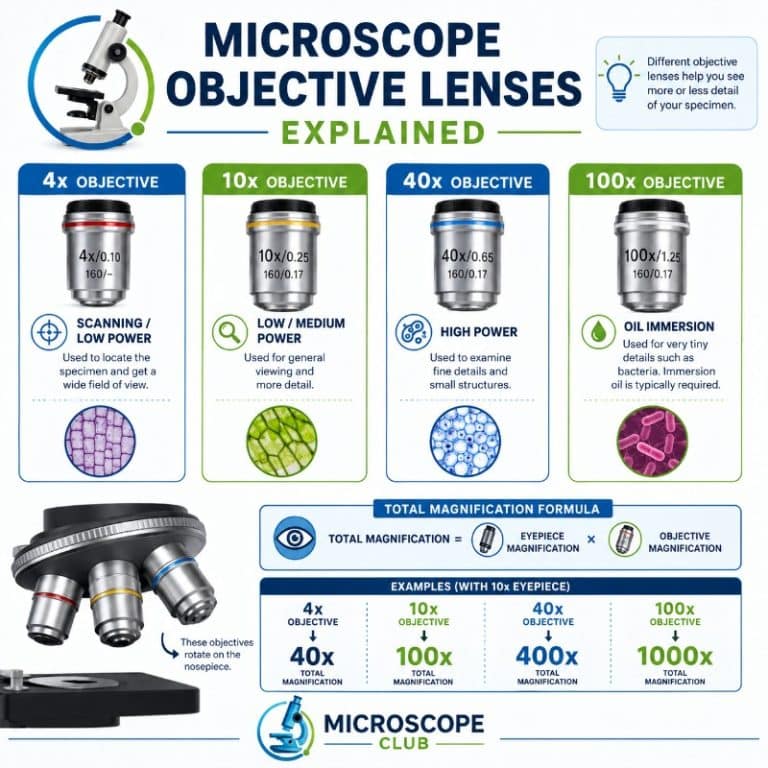
Every compound microscope ships with four objective lenses — 4x, 10x, 40x, and 100x — and understanding what those numbers mean (and what they don’t tell you) determines whether you use the instrument effectively or spend sessions chasing blurry images. Each number is the objective’s own magnifying power; multiply it by your eyepiece to get total magnification. This guide explains how each objective works, when to use it, and the optical trade-offs that change with every step up.
What Do the Numbers on Microscope Objective Lenses Mean?
Microscope objective lenses explained simply: the number stamped on each objective — 4x, 10x, 40x, or 100x — is that lens’s own magnifying power. To get total magnification, multiply it by your eyepiece (ocular) magnification, which is almost always 10x. So the 40x objective gives you 400x total, not 40x. That’s the single most common misconception beginners bring to the microscope. The colored bands on the lenses are an ISO color-coding system: red for 4x, yellow for 10x, light blue for 40x, and white for 100x — handy for quick identification when you’re rotating the rotating nosepiece (turret).
| Objective | Total Mag (10x eyepiece) | Numerical Aperture (NA) | Working Distance | Field of View (diameter) | Typical Use | Requires Oil? |
|---|---|---|---|---|---|---|
| 4x | 40x | ~0.10 | ~10–20 mm | ~4.5–5 mm | Scanning, orientation, whole mounts | No |
| 10x | 100x | ~0.25 | ~4–7 mm | ~1.8–2 mm | General cell and tissue viewing | No |
| 40x | 400x | ~0.65 | ~0.5–0.7 mm | ~0.45–0.5 mm | Individual cells, nuclei, protozoa detail | No (high-dry) |
| 100x | 1000x | ~1.25–1.30 | ~0.13–0.2 mm | ~0.18–0.2 mm | Bacteria, blood cell morphology, fine structure | Yes |
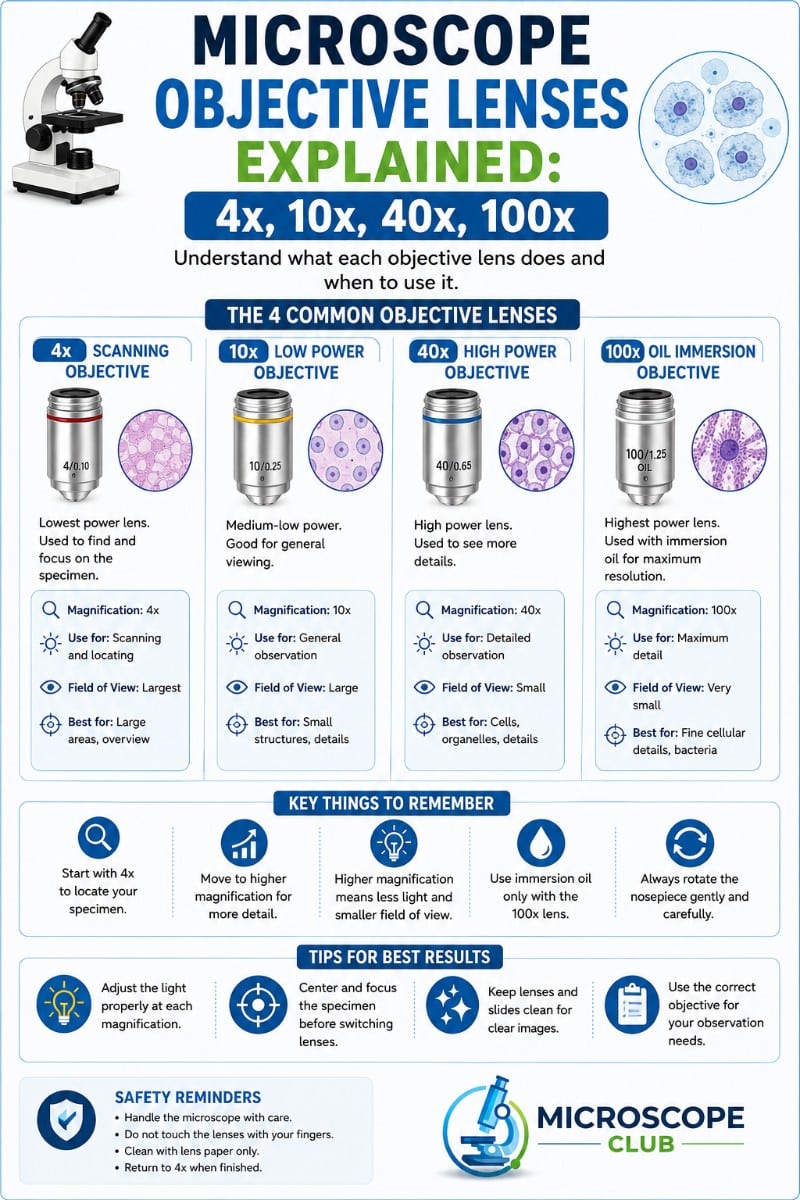
The Four Standard Objective Lenses
4x Scanning Objective
The 4x objective is your starting point — every time, no exceptions. At 40x total magnification, it gives you the widest field of view (roughly 4.5–5 mm across) and the longest working distance (up to 20 mm between the lens and the slide). That combination means you can see large portions of your specimen at once, orient yourself, and find the region of interest before committing to higher power. Whole-mount slides — cross-sections of tissue, large single-celled organisms like Paramecium, or root tip preparations — often look best right here. The image is bright, the depth of field is generous, and there’s virtually zero risk of crashing the lens. If you skip the 4x and go straight to 40x or 100x, you’re working blind in a narrow tunnel. Don’t do it.
10x Low-Power Objective
Step up to 10x and you’re at 100x total magnification. The field of view shrinks to about 1.8–2 mm, but you can now resolve individual cells in a tissue cross-section, see the general structure of plant or animal material, and watch larger protists swimming in real time. This is the workhorse for overview work: a student looking at an onion epidermal layer, an educator demonstrating mitosis stages, or a hobbyist identifying pond microorganisms usually finds the 10x gives enough detail without the positioning challenge that comes with higher power. Working distance is still forgiving at 4–7 mm — you’re unlikely to hit the slide.
40x High-Power (High-Dry) Objective
The 40x objective — called “high-dry” because it operates in air with no oil — is the everyday workhorse of student cell biology. At 400x total, you can resolve individual cell nuclei, see chloroplasts in plant cells, observe the arrangement of bacterial colonies, and examine protozoa in real detail. The numerical aperture of ~0.65 gives genuinely useful resolution, not just bigger blur. It’s the lens most biology courses spend 80% of their time on.
The catch: working distance collapses to 0.5–0.7 mm. That’s about the thickness of a credit card between the front lens and your specimen. Use fine focus only at this magnification — never coarse. If you’re focused on a specimen with the 10x and your microscope is parfocal (most quality scopes are, meaning they stay roughly in focus as you switch objectives), rotating to 40x and tweaking fine focus is all you need. Coarse-focusing into a slide at 40x is the most common way students crack slides and scratch objectives.
100x Oil Immersion Objective
The 100x objective delivers 1000x total magnification and the finest resolution a standard light microscope can achieve — but it is not a lens you grab casually. It requires immersion oil, it has a working distance of just 0.13–0.2 mm (you are essentially sitting the lens in a drop of oil resting on your coverslip), and it demands patience and clean technique.

This is where you go to see individual bacteria on a blood smear, distinguish neutrophil from eosinophil granules, or examine flagella on a flagellated microorganism. At NA ~1.25–1.30, it’s capable of resolving structures down to roughly 200 nm — the practical resolution limit of visible-light microscopy. Use it when the 40x doesn’t show enough, your specimen is prepared on a proper slide with a coverslip, and you have immersion oil on hand. We’ll cover the oil process in detail below. For a closer look at what you can resolve at this power, see our guide to observing blood cells under the microscope.
Magnification vs. Resolution — Why the Numbers Aren’t the Whole Story
This is where most introductory explanations fail students. Magnification makes things look bigger. Resolution determines whether you can actually distinguish two close-together structures as separate — and resolution is governed by numerical aperture (NA), not magnification.
NA is defined as n × sin(θ), where n is the refractive index of the medium between the lens and the specimen, and θ is the half-angle of the widest cone of light the objective can collect. The smallest resolvable distance is approximately d ≈ 0.61λ / NA, where λ is the wavelength of light. Using green light (~550 nm) and the 100x oil objective (NA ~1.25), that works out to roughly 270 nm — near the 200 nm practical floor for numerical aperture and resolution with visible light. For the physics behind this limit, Britannica’s microscope entry covers the Abbe diffraction limit in accessible detail.

The implication: if you magnify beyond what your NA supports, you get “empty magnification.” The image is larger but no new detail appears — you’re just enlarging blur. This is why a cheap 1000x toy microscope with a tiny, low-NA lens produces useless images at high power. The number on the barrel is meaningless without the NA to back it up. Learn to read both. Khan Academy’s introduction to microscopy covers this distinction well for those building foundational knowledge.
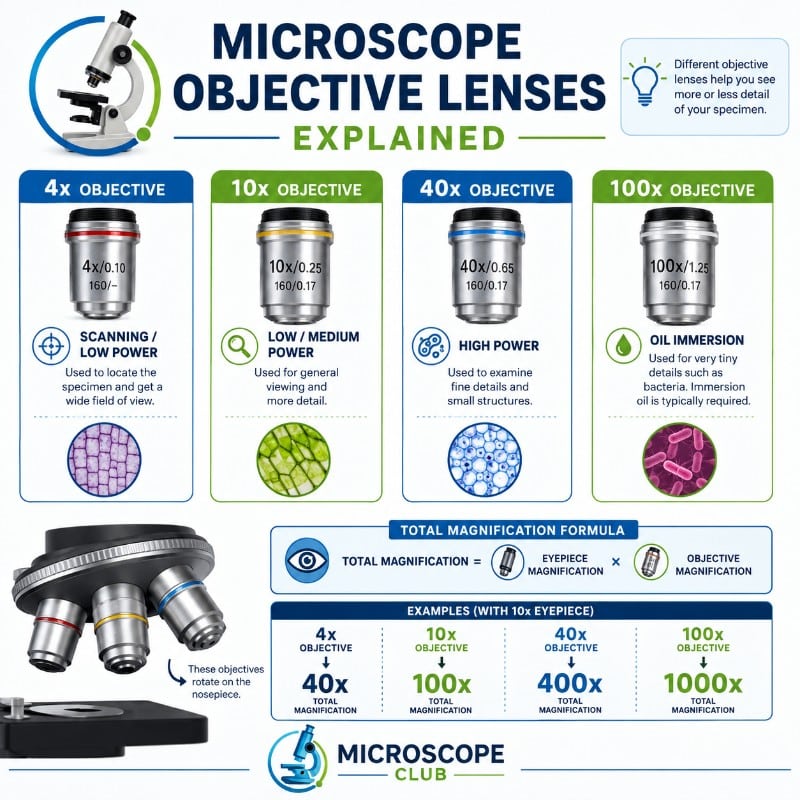
The Trade-Offs as You Go Higher
Every step up the magnification ladder comes with four simultaneous penalties. Understanding them prevents frustration:
- Field of view shrinks. Going from 4x to 100x reduces the visible diameter by roughly 25x — from ~5 mm to ~0.2 mm. You’re looking through an increasingly narrow keyhole. See more detail, see less of the slide. Approximate field of view diameter = eyepiece field number ÷ objective magnification.
- Working distance shrinks. From 20 mm at 4x to 0.15 mm at 100x. Higher objectives physically descend toward the slide. The risk of collision is real and increases with every step up.
- Depth of field shrinks. At 100x, only a razor-thin optical slice — a few micrometers — is in sharp focus at any moment. Structures above or below that plane go blurry instantly. This is why you’re constantly nudging the fine focus at high power. It’s not a flaw; it’s physics. See depth of field for a full explanation.
- Brightness drops. More magnification spreads the same light cone over a larger image area. To compensate, open the condenser iris diaphragm and increase illumination as you step up.
Why the 100x Lens Needs Immersion Oil
Air has a refractive index of 1.0. Glass (and most immersion oils) have a refractive index of ~1.515. When high-angle light rays exit the slide’s glass coverslip and enter air before reaching the objective, they refract (bend) sharply away from the lens axis and are lost — the objective can’t collect them. This limits the effective NA and destroys resolution.
Immersion oil fills the gap between the coverslip and the front element of the 100x objective. Because the oil matches the refractive index of glass, high-angle light passes through without bending, and the objective collects a much wider cone. That’s what pushes NA above 1.0 — physically impossible in air — and enables the fine resolving power of 1000x to be meaningful.
How to do it correctly:
- Focus your specimen with the 40x objective first.
- Rotate the nosepiece to the gap between the 40x and 100x (don’t swing directly to 100x yet).
- Place one small drop of immersion oil on the coverslip directly over the specimen.
- Carefully rotate the 100x into position. It should contact the oil drop.
- Use fine focus only to bring the image sharp.
- After use, clean the oil from the lens immediately with lens paper and a lens-cleaning solution. Never leave oil on the objective.
One more rule: the standard student 40x objective is a high-dry lens — do not put oil on it. Oil on a dry objective creates the same refraction problem in reverse and degrades the image. A few specialty 40x or 60x oil objectives exist, but they will be clearly labeled. If it doesn’t say “oil” or “oel,” assume it’s dry. If you want to practice your technique before committing to a prepared specimen, review how to prepare microscope slides correctly — a well-made slide makes oil immersion significantly less stressful.
How to Switch Objectives the Right Way
Objective changes follow a strict low-to-high sequence. Here’s the safe workflow for every session:
- Always start on 4x. Place and clip your slide, lower the stage (or raise the objective, depending on your scope’s design), then focus with the coarse knob.
- Center your specimen. Whatever you want to study, move it to the crosshair or center of the field before stepping up.
- Rotate to 10x. Gently click the nosepiece. Because objectives are parfocal, the image should be nearly in focus — touch the fine knob only.
- Rotate to 40x (if needed). Fine focus only. Do not touch coarse focus at 40x or above. Watch the objective as you rotate — on a parfocal scope it shouldn’t contact the slide, but verify by watching from the side, not through the eyepiece.
- Go to 100x only if required. Apply oil, rotate, fine focus. Never use coarse focus.
- Step back down before removing the slide. Return to 4x, lower the stage, then remove your slide.
The parts of a compound microscope page covers the full mechanical layout if you’re still orienting yourself to the instrument.
Common Beginner Mistakes
- Jumping straight to 100x. You’ll hunt for ten minutes, find nothing, and damage your lens. Start at 4x every time.
- Using coarse focus at 40x or 100x. This is the single fastest way to crack a slide and scratch an objective. At high power: fine focus only, always.
- Skipping immersion oil on the 100x. The image will be dim, low-contrast, and low-resolution. You’ll think the microscope is broken. It’s not — add the oil.
- Putting oil on the 40x. Standard 40x objectives are dry. Oil degrades their image. If you accidentally oiled the 40x, clean it immediately with lens paper.
- Expecting more detail than NA allows. If the 40x shows a blurry structure and the 100x shows the same blurry structure larger, you’ve hit the resolution limit for that specimen’s preparation or staining. More magnification won’t help.
- Leaving oil on the objective. Oil is slightly acidic and will etch lens coatings over time. Clean the 100x after every use.
- Dirty eyepiece or objective. A smudge on the eyepiece creates a blurry spot that follows you from slide to slide. A smudge on the objective creates one that doesn’t. Clean lenses with proper lens paper — never tissue, clothing, or cotton swabs.
Frequently Asked Questions
What does “parfocal” mean, and why does it matter when buying objectives?
Parfocal means that once one objective is in focus, switching to another objective on the same nosepiece keeps the specimen nearly in focus, so you only need a small turn of the fine-focus knob. This saves time and protects your slide and front lens from accidental crashes. Objectives are parfocal because they share a fixed parfocal distance (the seating-shoulder-to-focal-plane length), which is why mixing objectives of different parfocal lengths breaks the effect.
Are all 4x, 10x, 40x, and 100x objectives interchangeable between brands like Olympus, Nikon, and Zeiss?
Not reliably. The traditional RMS thread (20.32 mm diameter, 0.706 mm pitch) is shared by Olympus and Zeiss, but Nikon and Leica switched to wider, proprietary threads on their infinity objectives, so those generally only fit their own stands. Parfocal distance also differs — Olympus and Zeiss use 45 mm while Nikon’s CFI60 system uses 60 mm — and infinity objectives are tuned to a specific tube-lens focal length (roughly 200 mm Nikon, 180 mm Olympus, 165 mm Zeiss), so even a brand that physically threads on can give degraded images. Match objectives to the microscope’s own system unless the maker confirms compatibility.
What’s the difference between achromat, fluorite, and apochromat objectives?
These describe how well the lens corrects color (chromatic aberration). Achromats — the standard, most affordable objectives — bring two wavelengths (red and blue) to a common focus, so faint color fringing can remain. Fluorites (semi-apochromats) improve on this with higher numerical apertures and better contrast, while apochromats correct three or more wavelengths for near color-perfect images and are the choice for color photomicrography. Add a “Plan” prefix (e.g., Plan Apochromat) and the lens is also corrected for a flat field, keeping the edges sharp, not just the center.
How should you clean a microscope objective, especially after using immersion oil?
Wipe the front lens gently with dedicated lens tissue — never paper towel or your shirt, which scratch the coatings — using a circular motion from the center outward. After using the 100x oil-immersion lens, remove the oil immediately while it is fresh: blot it off, then lightly clean with a lens tissue dampened with the manufacturer’s lens cleaner or a small amount of fresh solvent. Dried oil hardens, attracts dust, and can seep into the lens assembly, so it should never be left on overnight.
Conclusion
The four objective lenses on a compound microscope — 4x, 10x, 40x, and 100x — aren’t just steps on a magnification dial. Each one represents a different balance of field of view, working distance, depth of field, and resolving power. The 4x gets you oriented, the 10x shows tissue architecture, the 40x handles the bulk of cell biology work, and the 100x oil immersion objective reveals the finest structures visible light can resolve. Understanding numerical aperture alongside magnification is what separates someone who uses a microscope from someone who understands one. Start low, step up systematically, use oil when required, and keep those lenses clean.
Have you ever accidentally put oil on a dry 40x objective — or jumped straight to 1000x and wondered why the image looked terrible? Tell us what happened in the comments below. Beginner mistakes are how everyone learns, and your experience might save the next reader an hour of frustration.