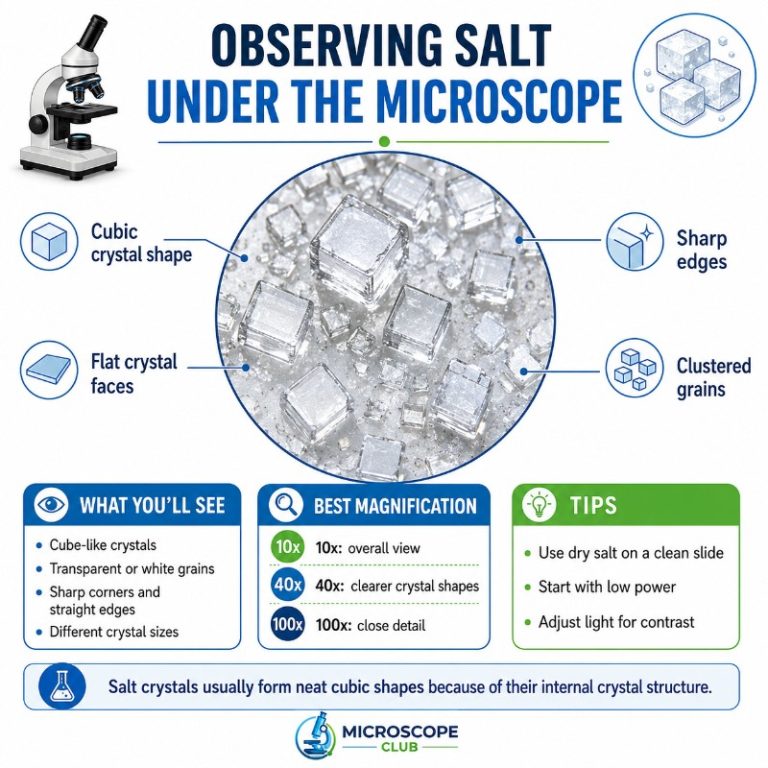
Salt under the microscope reveals something most people don’t expect: a perfectly geometric crystal, its flat faces and right-angle edges so precise they look machined rather than grown. The first time you focus on a recrystallized grain at 40x, the cubic shape is unmistakable — no soft curves, no randomness, just clean right angles repeating in every direction. That geometry isn’t a coincidence. It’s a direct window into atomic structure, and it makes salt one of the most rewarding specimens you can put on a compound light microscope.
Why salt forms perfect cubes: the NaCl crystal lattice
Sodium chloride crystallizes in a face-centred cubic (FCC) lattice — the fundamental arrangement that defines every property you observe on the slide. Each sodium ion (Na⁺) is surrounded by six chloride ions (Cl⁻), and each chloride ion is surrounded by six sodium ions, creating an interlocking three-dimensional checkerboard. The sodium ion (ionic radius ~102 pm) is noticeably smaller than the chloride ion (~181 pm, which expanded when it gained an extra electron); that size difference locks the two into the most stable packing geometry possible — the cube.
When a salt crystal cleaves, it always breaks along planes parallel to the cube faces, never at an angle. That’s why a crushed grain still looks cubic at the edges. The microscope doesn’t create the geometry — it just magnifies what the lattice already built at the atomic scale.
How to prepare a salt sample for microscopy
There are two practical approaches, and choosing between them depends on what you want to see. A dry mount is fast and shows true grain shape; a recrystallized wet mount takes a few days but produces thinner, more transparent crystals that photograph far better and let you see internal structure clearly.
What you’ll need
- At least two or three different types of salt (table salt, sea salt, and Himalayan pink make for a great comparison)
- Warm water for dissolving (recrystallized method)
- One beaker or jar for each salt type
- Measuring spoon, a stirring rod, and tweezers
- Microscope slides and coverslips for each type of salt
Dry mount (fast, true grain shape)
- Place a small pinch of salt — three or four grains — directly onto a clean slide.
- Lower a coverslip gently at an angle to avoid trapping large air bubbles.
- Place the slide on the stage and start at your lowest objective lens.
The trade-off: commercial table salt grains are thick enough to block light at higher magnifications, and coarse grains can scratch the objective lens if you lower it too aggressively. Work with the coarse focus slowly, and never force the lens toward the slide.
Recrystallized wet mount (better contrast and detail)
- Label each beaker by salt type.
- Pour equal amounts of warm water into each beaker — about 50 ml — and stir in a tablespoon of salt until most dissolves.
- Place the beakers in a low-humidity area and leave them undisturbed. Slow evaporation (2–7 days depending on ambient humidity and temperature) produces larger, cleaner single crystals that are far more photogenic than fast-dried ones. A warm, breezy spot speeds things up but creates smaller, more jumbled crystals.
- Once fully evaporated, gently scrape the thin crust of recrystallized salt off the bottom.
- Place a few crystals on a microscope slide, add a drop of water if needed to flatten them, and cover with a coverslip.
- Carefully place the slide on the stage and learn how to prepare microscope slides for best results before you begin.

The image above shows raw, unprepared salt alongside raw sugar at the same magnification — both straight from the condiments rack. The smaller, rounder particles are sugar; the larger grains with the angular, edgy faces are salt. Even at this scale, the cubic tendency of salt is clear compared to sugar’s irregular rounded structure. Can you tell which is which?
What salt actually looks like at each magnification
Here’s what to look for as you move through the objective lenses — written from the slide, not from a textbook.

40–100x: The cubic geometry is the first thing that strikes you. Grains appear as transparent-to-milky blocks with flat faces and straight edges that meet at crisp right angles — almost machine-cut. Many cubes will be slightly stacked or stepped, because cubic faces interlock naturally as the crystal grew. Look for hopper pits: hollow, stepped depressions in the center of a cube face, caused by faster growth at the edges than at the face center. They’re common in table salt and one of the most distinctive features you’ll notice at this range. Raw grains straight from the shaker are often too thick and opaque to see through cleanly; the recrystallized sample is dramatically more transparent.
400x: The cubic geometry becomes even more pronounced. You can see layered stacking, smooth cleavage planes where the crystal broke cleanly, and surface fractures that reveal the lattice’s preferred breaking directions. Light catches the flat faces and produces prismatic glints as you adjust the fine focus. At this magnification, thick raw grains may transmit too little light to show internal detail — a recrystallized thin crystal is essentially glass-clear and far more rewarding.
The common beginner mistake: lowering the high-power objective lens onto a thick, coarse grain and scratching the lens. Start at low power, identify a thin, flat specimen, move it to the center of view, then step up magnification. Never rush the coarse focus.


This series shows salt patterns in dried drops of NaCl solution, viewed at low (28x) and high (98x) magnification. Notice how the drying front creates branching and dendritic patterns at the edges while compact cubic crystals form toward the center — a direct result of localized evaporation rates across the drop.
Troubleshooting common problems
- Crystals too opaque to see through: Switch to a recrystallized sample or use the polarized-light method described below. Thick grains block transmitted light and will never show internal structure regardless of magnification.
- Lens-scratch risk: Always use a coverslip. Never lower a high-power objective onto an uncovered salt grain. Work down slowly and stop the moment anything comes into focus.
- Coverslip contamination / salt residue: Salt dissolves in moisture over time. If you plan to observe the same slide later, seal the coverslip edges with clear nail varnish. An unsealed slide will degrade within hours in humid conditions.
- Over-saturated solution clumping: If your recrystallized layer is a thick, opaque crust rather than individual crystals, you used too much salt. Start with half a teaspoon per 50 ml and let it evaporate more slowly.
Comparing salt types under the microscope
The most striking demonstration is to prepare slides of different salt types side by side and view them at the same magnification. The differences are immediately visible.
| Salt type | Crystal shape at 40–100x | Color / clarity | Distinguishing feature |
|---|---|---|---|
| Table salt | Clean small cubes | Clear / white | Crisp right-angle edges; hopper pits visible at 100x |
| Sea salt | Irregular coarse cubes / flakes | Off-white, slightly cloudy | Trace-mineral inclusions create visible cloudiness inside the crystal |
| Himalayan pink salt | Blocky, tinted grains | Pink to orange tint | Iron-oxide coloration throughout; still ~98% NaCl — the pink is cosmetic, not structural |
| Kosher salt | Flat flakes / hollow pyramids | White | Flat flake habit with hollow pyramid shapes; dissolves faster than cube-cut table salt |
Sea salt and Himalayan crystals both show a cubic tendency at the atomic level — they’re all NaCl — but the impurities and processing method affect the macro-grain shape you see under the lens. Himalayan pink salt is prized for its color and trace minerals, but it is not chemically purer than refined table salt; studies show it is approximately 98% NaCl, with the remaining 2% being trace minerals in nutritionally negligible amounts.

Side-by-side high-magnification spectral images of Himalayan salt (left) and Celtic sea salt (right). The Himalayan sample shows its characteristic pink-orange tint from iron oxide inclusions; the Celtic sea salt appears greyish and moist, with a more irregular grain structure due to its higher moisture content and mineral load.
The polarized-light diagnostic test
If you have access to a polarizing microscope, salt gives you one of the most instructive demonstrations in optical mineralogy — not because of what you see, but because of what you don’t.
Salt (NaCl) crystallizes in the cubic system, which makes it optically isotropic — it has a single refractive index of 1.544 in every direction. Under crossed polarizers, isotropic crystals transmit no light and appear completely dark / black. There are no interference colors, no birefringence, nothing. The crystal effectively vanishes.
Now do the same with sugar on an adjacent slide. Sugar crystals are anisotropic and birefringent — they light up with vivid interference colors (purples, blues, oranges) as you rotate the stage. The contrast between the two slides is striking and immediately diagnostic: a crystal that stays dark under crossed polars is cubic and isotropic; one that bursts into color is anisotropic.
This turns an abstract optics concept into a hands-on identification test. If you ever have an unknown white powder that you suspect is either salt or sugar, crossed polarizers will tell you in seconds — no chemistry required.
What is salt? The chemistry behind the crystal
In everyday speech, “salt” means the white granules you shake onto food. In chemistry, “salt” is a broader class: any ionic compound formed from a cation and an anion when an acid and a base react. Some salts in this chemical sense are toxic; many are not. Table salt — sodium chloride, NaCl — is the edible one, and it is essential to life in appropriate amounts. The confusion between the chemical class and kitchen salt causes a lot of unnecessary alarm.
Salt (NaCl) has a high melting point (801°C), is highly soluble in water and polar solvents, conducts electricity when dissolved (as it dissociates into free Na⁺ and Cl⁻ ions), and appears transparent to white in bulk. It is odorless and has the characteristic savory taste you know.
Common table salt
Table salt is an ionic compound of sodium and chloride arranged in a face-centred cubic lattice, chemical formula NaCl. The cubic crystal habit you see under the microscope is a direct consequence of this lattice: each Cl⁻ ion is surrounded by six Na⁺ ions and each Na⁺ is surrounded by six Cl⁻, and this 6-fold coordination repeats in all three dimensions as a cube.
There are different forms of common table salt. Rock salt (halite) is its natural mineral form. Sea salt is produced by evaporating seawater and contains trace amounts of potassium sulphate, calcium chloride, and other minerals, which are responsible for the slight cloudiness visible under the microscope. Iodized table salt is refined and processed to add iodine, and it is the most chemically pure form of NaCl you’re likely to buy.
Where salt comes from
Table salt comes from sodium chloride deposits that exist throughout the Earth’s crust — remnants of ancient evaporated seas. The ocean has a salinity of approximately 3.5% (35 g of dissolved salt per liter), though the real range runs from about 3.1% in the Arctic to 3.8% in enclosed seas like the Red Sea.
Refined table salt typically starts as mined rock salt from underground deposits, which is then dissolved, purified through a process of controlled precipitation, and re-evaporated to produce pure, fine-grained crystals. Salt can also be harvested directly from evaporated seawater (sea salt) or from brine springs.
Only a minority of global salt production goes toward food. The majority — roughly 60% — goes to the chemical industry, primarily the chlor-alkali process, which uses salt to produce chlorine and caustic soda (sodium hydroxide), both essential industrial feedstocks. The bulk of the salt you see mined never touches a plate.
The many uses of salt
Beyond flavoring food, salt is used extensively for food preservation (curing, pickling, fermentation), road de-icing, water conditioning, agriculture (sometimes to suppress unwanted plant growth), and as a feedstock for plastics and paper production.
Historically, salt’s scarcity and value shaped civilizations: it was used as currency in ancient Rome (the origin of the word “salary”), as a trade commodity across Egypt, Greece, India, and China, and as a ceremonial and religious offering in numerous cultures. The Silk Road salt trade and the British salt tax that Gandhi famously defied with his 1930 Salt March are just two examples of how central this mineral was to political and economic history.
Types of kitchen salt and how they look under magnification
While edible salt is all essentially sodium chloride, the processing method, mineral content, and grain shape vary considerably. Here is a collated microscope photograph of some common types, including table salt and two kosher salts:

Notice how each one is distinctively different — the table salt shows small cubic grains, while the two kosher salts have their characteristic flat flake or hollow-pyramid habit. There are generally twelve main types of kitchen salt, all with varying shapes, sizes, colors, and to a certain extent, taste.
Common kitchen salts
- Table salt — harvested from underground salt deposits, treated with anti-caking agents, fortified with iodine, and refined to a white powdery texture. Under the microscope: small, clean cubes, optically clear.
- Kosher salt — a white, flaky, coarse-grained salt used for koshering meat. Dissolves quickly. Under the microscope: flat flakes or hollow pyramidal crystals, larger and more irregular than table salt.
- Himalayan pink salt — mined from the Khewra Salt Mine in Pakistan, prized for its color and trace minerals. Under the microscope: blocky, pinkish-orange crystals — the tint is from iron oxide impurities dispersed within ~98% NaCl.
- Sea salt — produced by evaporating seawater. Under the microscope: irregular coarse cubes with a slightly cloudy interior from trapped mineral inclusions. More complex flavor than refined table salt.
Special types of salt
- Kala namak — translated as black salt, kala namak is a Himalayan salt variant with bigger, reddish-black crystals produced through firing, cooling, and aging with ingredients including harad seeds. Its sulfurous compounds give it a distinctive eggy aroma.
- Smoked salt — produced by smoking salt crystals for weeks. Under the microscope: brown-tinted crystals similar in shape to the base salt used. Imparts a smoky-savory flavor.
- Pickling salt — a highly refined salt, free from iodine and anti-caking agents. Essential for pickling where additive-free salt prevents discoloration and off-flavors.
Variations of sea salt
- Fleur de sel — the most prized and expensive sea salt, fleur de sel is hand-harvested from the surface of salt ponds in Brittany, France. Under the microscope: thin, blue-grey papery crystals with high mineral content. A finishing salt.
- Celtic sea salt — a grey, moist, mineral-rich sea salt harvested by traditional methods. Under the microscope: irregular, grayish, slightly damp-looking chunks with visible mineral inclusions.
- Flake salt — made by boiling seawater and skimming the crystals that form. Produces large, flat, irregularly shaped flakes with a light crunch — a finishing salt for texture as much as flavor.
- Black Hawaiian salt — activated charcoal gives this volcanic-island salt its dramatic black color. Under the microscope: dark crystal masses with the charcoal evenly distributed.
- Red Hawaiian salt — iron-rich volcanic clay gives this salt an earthy red-orange color, similar in mechanism to Himalayan pink salt but with a different mineral signature.
Beyond these, regional and specialty salts include truffle salt, Cyprus black lava salt, pink Andean salt, Persian blue diamond salt, Korean sogeum salt, and the Mexican sal de gusano.
FAQ
Common questions that come up when exploring salt under the microscope:
Can I see salt under a light microscope, or do I need an electron microscope?
A standard compound light microscope at 40–400x magnification shows cubic grain shape, hopper pits, cleavage planes, and crystal stacking clearly — you do not need an electron microscope to study salt’s structure. High-powered electron microscopes can resolve the atomic lattice itself, showing individual sodium and chloride ions and their relative sizes, but this is deep research territory rather than classroom microscopy. For practical identification and crystal comparison, a light microscope is completely sufficient.
Why does Himalayan salt look different from table salt under magnification?
Both are predominantly NaCl with the same cubic lattice, so at the atomic level they are essentially identical. The visual difference under the microscope comes from two things: grain processing (table salt is ground fine and uniform; Himalayan salt is more coarsely and irregularly milled) and impurity distribution (the iron oxide that gives Himalayan salt its pink-orange color is dispersed as tiny inclusions within the NaCl crystal matrix, creating a tinted, slightly cloudy appearance). The cubic geometry is present in both — it’s just harder to see in the raw Himalayan grain because the inclusions scatter light.
Will salt scratch my microscope lens?
It can if you’re careless. Salt grains are hard enough to scratch glass objective lenses if you lower a high-power objective directly onto an uncovered, coarse grain. Always use a coverslip, always start at low magnification, and lower the objective slowly using the coarse focus while watching from the side — not through the eyepiece — until you’re close, then switch to fine focus. Compare salt and sand under the microscope: sand is significantly harder and more dangerous, but the same habits protect you from both.
Conclusion
Salt under the microscope is one of the simplest and most instructive specimens you can study, precisely because what you see is a direct consequence of atomic structure. Every cube, every hopper pit, every cleavage plane is the NaCl face-centred cubic lattice made visible. The polarized-light test adds a second layer: a crystal that goes black under crossed polars is isotropic and cubic — a diagnostic that works in seconds and requires no chemistry. To go further, prepare recrystallized slides of table salt, sea salt, and Himalayan pink side by side, compare them against the table above, and work through the different types of microscopes available to you — from compound light to polarizing — to see how much more each reveals. The geometry was always there; the microscope just makes it impossible to ignore.
Originally posted 2020-05-13 11:05:54.