Diatoms under a microscope reveal some of the most intricate natural architecture you’ll ever see — single-celled algae encased in glass-like silica shells patterned with geometric precision. Living cells appear golden-brown, drifting as circular discs, elongated boats, and slender needles. No two species look alike, yet every individual of a species is virtually identical — an outcome of the same nanoscale biological molding process running in each cell.

How to Find and Prepare Diatoms to View
Diatoms are everywhere water touches a surface, which makes collecting them easy. Knowing where to look — and how to prepare your sample — determines how much detail you’ll actually see.
Collecting Your Own Sample

The brown-green biofilm coating submerged rocks, sticks, and aquatic plant stems in ponds, streams, and lakes is one of the best starting points. Scrape a small amount with a toothpick or brush into a drop of the same water. These benthic (bottom-dwelling) habitats are dominated by pennate diatoms, the elongated boat-shaped forms.
For planktonic, mostly circular (centric) species, collect open-water samples from a lake or slow stream — draw water directly into a jar, or squeeze a clump of aquatic moss into a container. The brown surface film on still aquarium water and calm ponds is also worth sampling — diatoms frequently concentrate there. If you’d rather skip the field work, diatomaceous earth is an excellent alternative. Sold in garden and hardware stores as an insecticide, it’s made of fossilized diatom frustules and is one of the easiest ready-to-view sources of cleaned shells. Prepared commercial diatom test slides with arranged species are also widely available from microscopy suppliers and are ideal for learning structural anatomy.
Before you go further, read our guide on finding tardigrades in the same samples — pond scrapings often contain both in the same field of view.
Wet Mount vs. Cleaned (Acid-Treated) Mounts
A wet mount slide with fresh pond scrapings shows living or recently living diatoms. You’ll see the golden-brown color from the chloroplast pigment fucoxanthin, and motile pennate species may glide slowly across the field — but the silica shells are packed with organic matter, which reduces contrast and hides the fine ornamentation.

The dramatic glass-shell photographs you see online are made from cleaned mounts. The organic material is dissolved by acid (typically sulfuric or hydrochloric) or by oxidizing agents, leaving only the transparent silica frustule. These cleaned shells are then mounted in a high-refractive-index medium such as Naphrax (a synthetic resin mounting medium with a refractive index of ~1.73), which maximizes the contrast of the fine pore patterns. You don’t need to do acid cleaning at home — diatomaceous earth and commercial prepared slides are pre-cleaned. For tips on making your own slides, see our guide on how to prepare your microscope slides.
What You See at Each Magnification
Diatoms range from roughly 2 µm to 200 µm, with most common species falling between 10 and 100 µm. Each step up in magnification unlocks a new level of structural detail. To understand how objective power translates to total magnification, see our explainer on how to calculate total magnification.
| Total Magnification | Objective | What You Can See |
|---|---|---|
| 40× | 4× | Confirm diatoms are present; golden-brown color, general shape |
| 100× | 10× | Distinguish centric (round) from pennate (elongated) forms; see valve outline clearly |
| 400× | 40× | Resolve striae as visible patterning on the surface; identify the raphe; genus-level ID |
| 1000× | 100× oil | Resolve individual areolae (pores); finest striae; essential for resolution test species |
Note that 1000× requires oil immersion and a high numerical aperture objective — the relationship between numerical aperture and resolving power is critical here. Simply cranking up magnification without a corresponding increase in NA produces empty magnification — bigger but blurrier. See our article on resolution vs. magnification for the full explanation.

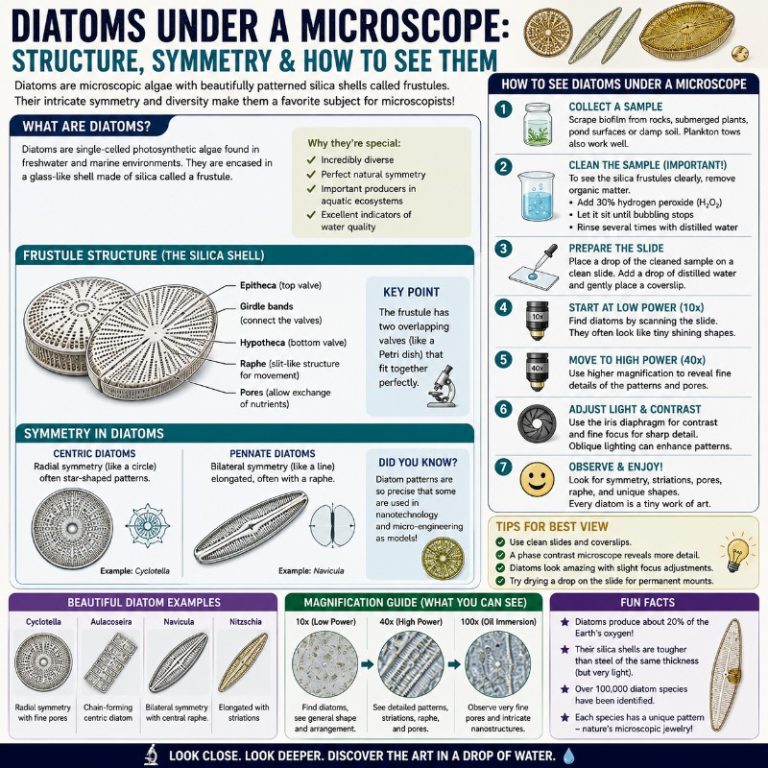
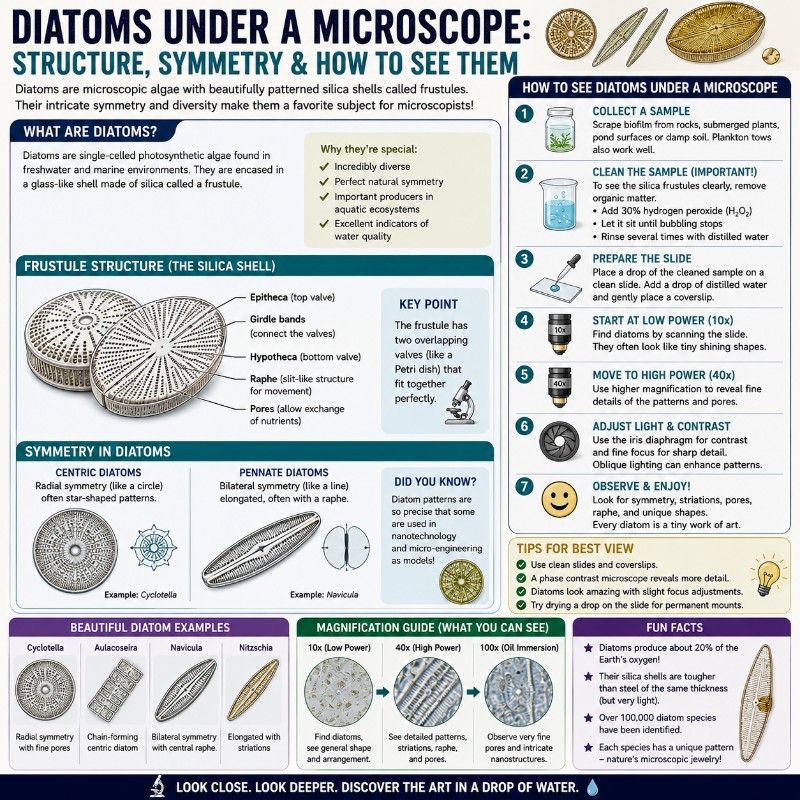
The Frustule — Anatomy of a Glass Shell
The cell wall of a diatom is called the frustule, and it’s made of biogenic silica — hydrated silicon dioxide (SiO₂·nH₂O), essentially the same material as opal or glass. This is why cleaned diatoms look like cut crystal under the microscope.
The frustule is structured like a petri dish: two overlapping halves called valves. The larger, slightly domed outer half is the epitheca; the smaller inner half that fits inside it is the hypotheca. The overlapping region where they join is girded by flexible bands called girdle bands (collectively the cingulum).

Depending on how a diatom settles on your slide, you’ll see one of two views:
- Valve view — face-on; you’re looking at the flat or slightly curved valve surface. This shows the full ornamentation — striae, pores, and raphe.
- Girdle view — side-on; the diatom looks like a rectangle or rectangle with rounded ends, showing the girdle bands and the overlap between the two valves.
The same species looks completely different in the two orientations — a common source of confusion for beginners.
The fine surface detail on the valve consists of:
- Striae — rows of tiny perforations running across the valve face.
- Areolae — the individual pores or chambers that make up each stria. In fine-striae species, these are resolved only at 1000× with oil.
- Raphe — a longitudinal slit or canal running along the valve of many pennate diatoms. It connects the cell’s cytoplasm to the outside and enables gliding motility. Centric diatoms lack a true raphe.
- Central nodule and polar nodules — thickened silica regions at the center and ends of the raphe, visible as slightly brighter or darker spots.
| Structure | What It Is | Magnification to Resolve |
|---|---|---|
| Frustule outline | Entire two-part cell wall | 100× |
| Valve vs. girdle view | Face-on vs. side-on orientation | 100–400× |
| Striae | Rows of pores across the valve | 400× |
| Raphe | Longitudinal slit (pennate only) | 400× |
| Areolae | Individual pores within each stria | 1000× oil |
| Girdle bands (cingulum) | Overlap bands joining the two valves | 400× |
For a broader look at what your objective lenses (4×, 10×, 40×, 100×) can actually do, see our dedicated guide.
Centric vs. Pennate Diatoms
All diatoms fall into two broad groups based on their symmetry, and you can tell them apart at 100× once you know what to look for.
| Feature | Centric Diatoms | Pennate Diatoms |
|---|---|---|
| Symmetry | Radial (circular, like a tin lid) | Bilateral (elongated, like a boat or needle) |
| Raphe | Absent | Usually present; enables gliding |
| Motility | Non-motile | Many species glide slowly |
| Typical habitat | Marine, open-water plankton | Freshwater, benthic (surface-dwelling) |
| Example genera | Coscinodiscus, Cyclotella, Aulacoseira | Navicula, Pinnularia, Nitzschia, Gomphonema |
When you’re observing pond water, you’ll most commonly encounter pennate forms attached to surfaces or gliding slowly across the slide. Open-water tows and marine samples tend to contain the radially symmetric centric forms, often in long chains (e.g., Aulacoseira) or as large individual discs (e.g., Coscinodiscus, which can reach 500 µm across — visible to the naked eye as a golden speck).
Diatoms share the same freshwater habitats as Spirogyra and other freshwater algae and colonial algae like Volvox — a single pond sample often reveals all three in the same drop.

Why Diatoms Look So Geometrically Perfect
The precision of diatom ornamentation isn’t accidental — it’s the result of a tightly controlled biological manufacturing process called biomineralization.
When a diatom needs to build a new valve (after cell division), it assembles the silica inside a dedicated intracellular compartment called the silica deposition vesicle (SDV). The SDV is lined with specialized proteins called silaffins and long-chain polyamines that act as molecular templates, directing where silica precipitates and where pores form. The result is a species-specific pattern that is genetically determined and reproduced with nanometer-scale consistency — which is why every cell of Pinnularia viridis, for example, has the same stria spacing and the same raphe morphology.
This also explains a peculiar quirk of diatom reproduction: when a cell divides, each daughter cell keeps one parental valve and builds a new, slightly smaller valve inside it. Over many generations, the average cell size in a population gradually shrinks. Size is restored through a sexual stage that produces a large, non-silicified cell called an auxospore, which then builds a full-sized frustule from scratch.
The Britannica entry on diatoms covers the broader biology and evolutionary history of the group if you want deeper context. For a closer look at the ecological importance of diatom silicification in the ocean, NOAA’s Ocean Facts page on diatoms is a useful starting point.
Best Lighting for Diatoms — Brightfield, Darkfield, Phase Contrast & Polarized
The same diatom slide will look dramatically different depending on which illumination technique you use. Each mode reveals different features, and using more than one on the same sample is standard practice among microscopists.
Brightfield is the default. For living diatoms it shows the golden-brown color clearly, which is diagnostic — diatoms are never green under proper brightfield because the green of chlorophyll is masked by the orange-brown pigment fucoxanthin. Fine striae, however, have low contrast in brightfield and may be invisible until you reach 400–1000×. Read our overview of the brightfield microscope for setup tips.
Darkfield is the most dramatic mode for cleaned frustules. The silica shell glows white or pale gold against a black background, and the ornamentation pops with high contrast even at lower magnifications. This is the lighting mode that produces the “glowing jewel” look. See our article on darkfield microscopy for how to set it up, and our guide to the microscope condenser if you need to configure yours first.
Phase contrast works best for living, unstained diatoms. It converts the tiny optical path-length differences across the thin, transparent shell into visible contrast, making striae and internal cell structures much easier to see without staining or cleaning the sample.
DIC (differential interference contrast) gives a pseudo-3D relief appearance that highlights surface sculpturing beautifully — if your microscope has DIC prisms, diatoms are one of the best subjects to try them on.
Polarized light can reveal subtle interference colors in silica, though diatoms are only weakly birefringent (meaning light passing through the silica splits into two slightly offset rays with different speeds). The effect is less dramatic than with crystals like snowflakes, but paired with darkfield it can add color to the shell outline.
For a hands-on walkthrough of these techniques applied to biological samples, Microbehunter.com is an excellent community resource run by experienced amateur microscopists. The UC Berkeley Museum of Paleontology’s Bacillariophyta page also has solid background on diatom classification and fossil record.
Frequently Asked Questions
Are diatoms plants or algae?
Diatoms are algae — specifically microalgae classified in the group Bacillariophyta. They are eukaryotic protists (they have a nucleus and chloroplasts) but they are not plants. They’re more closely related to brown algae and water molds than to land plants. The distinction matters under the microscope: unlike true plants, diatoms never appear bright green because their chloroplasts contain the brown pigment fucoxanthin.
Are diatoms alive?
Yes — living diatoms are fully active unicellular organisms. They photosynthesize, reproduce, and (in pennate species with a raphe) move independently. What you typically see in the dramatic high-contrast microscopy photos online are dead, acid-cleaned frustules, not living cells. A fresh pond scraping will contain both living diatoms and empty shells from recently dead individuals.
Why are diatoms used to test microscope resolution?
Certain diatom species have striae spaced so finely — down to about 0.25 µm in Amphipleura pellucida — that resolving them requires a high-quality objective at or near its theoretical resolution limit. Historically, species like Pleurosigma angulatum and Amphipleura pellucida were arranged on test slides specifically to grade the quality of objective lenses. If your 100× oil-immersion objective can resolve the finest diatom striae, it is performing close to its maximum rated numerical aperture. This makes diatoms a practical, biological benchmark for optical performance.
Can you see diatoms with a regular light microscope?
Yes. A standard compound light microscope with a 10× eyepiece is all you need. At 100× total magnification you can distinguish centric from pennate forms and see the overall valve outline. At 400× you’ll resolve striae and the raphe. The 1000× oil-immersion setting — available on most student and lab microscopes — unlocks individual pore detail. No electron microscope is needed for most diatom work, though SEM produces the spectacular nanostructure images found in scientific papers.
What is diatomaceous earth?
Diatomaceous earth (also called diatomite) is a soft, crumbly sedimentary rock made of the accumulated fossilized frustules of ancient diatoms. Vast deposits exist worldwide, laid down over millions of years on lake and ocean floors. It’s mined and used commercially as a mild abrasive, filtration medium, and insecticide (the sharp silica particles damage the exoskeletons of insects). For microscopists, food-grade or garden-grade diatomaceous earth is an inexpensive, ready-to-use source of cleaned diatom shells — just suspend a pinch in water, make a wet mount, and you’ll have hundreds of frustules to examine.
Why do my diatoms look golden-brown instead of green?
This is normal — golden-brown is the correct color for living diatoms. Their chloroplasts contain a pigment called fucoxanthin that masks the green of chlorophyll, giving the cells a yellow-brown to deep amber appearance. Students accustomed to seeing bright green algae like Spirogyra sometimes assume they’ve found the wrong organism. If your sample is golden-brown and appears as geometric shapes under the microscope, you almost certainly have diatoms.
Conclusion
Diatoms pack remarkable structural complexity into a single cell. The frustule’s two-part glass architecture, the precise arrangement of striae and areolae, the presence or absence of a raphe, and the radial-versus-bilateral symmetry of centric and pennate forms are all features you can read directly from the microscope image — once you know the vocabulary. Pair the right magnification with the right lighting (darkfield for cleaned shells, phase contrast for living cells), and what looked like a blurry brown smear at 40× becomes a gallery of glass sculptures at 1000×.
Have you tried viewing diatoms from your own pond or stream? We’d love to hear what species or forms you spotted — drop a comment below and tell us what magnification and lighting setup you used. If you hit a tricky identification or have a photo to share, ask in the comments and other readers often chime in.