
Tardigrades — also called water bears — are microscopic eight-legged animals that hide inside dry moss and lichen, waiting to be rehydrated. With a basic microscope and a handful of dry moss, you can find them yourself; the method is simpler than most people expect, and the steps below cover everything you need to get one lumbering into your field of view.
The Complete Method at a Glance
To find tardigrades under a microscope, collect a small clump of dry moss or lichen, soak it in rainwater or distilled water for several hours to overnight, squeeze out the water, let it settle for 15–30 minutes, then pipette from the bottom sediment onto a slide and scan at 40–100×. That’s the whole method — the details below tell you where to look, how long to wait, and exactly what you’re looking at when one lumbers into view.
What Are Tardigrades (Water Bears)?
Tardigrades are microscopic eight-legged animals belonging to the phylum Tardigrada. They are commonly called water bears or moss piglets — names that capture both their habitat and their distinctive slow, rolling gait. They’re not insects or worms; they belong to the Ecdysozoa (a supergroup that also includes arthropods and nematodes), and they’ve been around for over 500 million years. Britannica’s tardigrade entry covers their taxonomy and evolutionary history in depth.
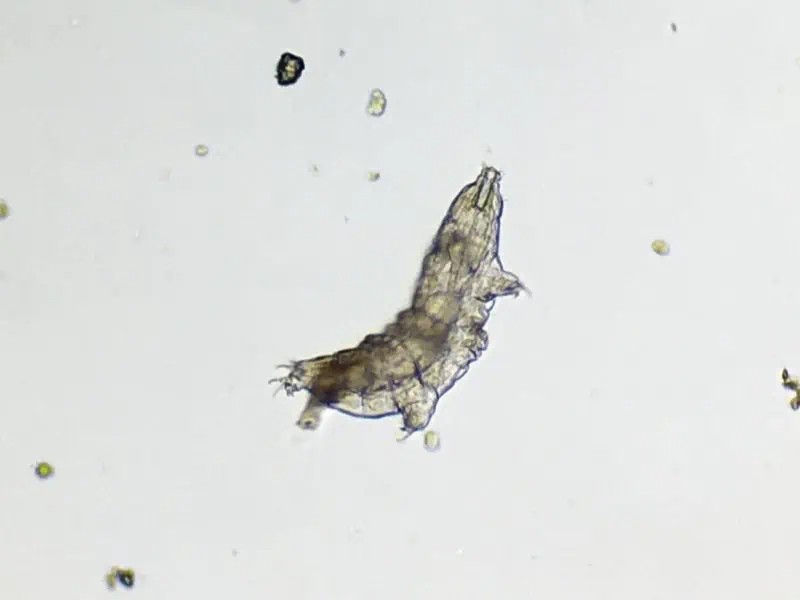
A typical tardigrade is 0.1–0.5 mm long — roughly the thickness of two human hairs side by side. The largest species reach about 1.2 mm, while the smallest are a mere 0.05 mm. At the upper end of that range, larger specimens are just barely visible to the naked eye as a tiny moving speck, but you need a microscope to resolve any detail. Their body has four segments, each carrying a pair of short, stubby legs that end in claws. The rear pair of legs points backward and grips rather than walks — a detail that helps with identification. At the front, a ring of sharp stylets (the buccal-pharyngeal apparatus, the feeding structure that pierces plant cells to suck out their contents) makes them effective micro-predators. Some species are predatory, eating rotifers, nematodes, and even other tardigrades.
The movement is the feature that makes tardigrades unmistakable once you’ve seen one: a slow, deliberate, lumbering crawl. It looks nothing like the fast glide of rotifers or the frantic thrashing of nematodes.
Why They’re So Hard to Kill — Cryptobiosis and the Tun State
Tardigrades are famous for surviving conditions that would destroy almost any other animal. When their habitat dries out, they enter a form of suspended animation called anhydrobiosis (a type of cryptobiosis), contracting into a desiccated, barrel-shaped “tun.” Metabolism drops to near-zero. In this state they can survive extreme temperatures, intense radiation, high pressure, and even the vacuum of space — a 2007 experiment aboard the European Space Agency’s FOTON-M3 satellite showed that tardigrades could survive low-Earth-orbit vacuum and solar UV radiation, making them the first animals confirmed to endure open space.
For the hobbyist microscopist, the practical takeaway is this: the dry, crusty-looking moss you find on a sun-baked brick wall or roof gutter is not dead substrate. It’s a hotel full of sleeping water bears. You just need to wake them up.

What You’ll Need
- Microscope: A dissecting (stereo) microscope at 20–40× is ideal for scanning and picking specimens. A compound light microscope is needed for anatomical detail. Either works for confirming you have tardigrades; both together is the best setup.
- Slides: Standard glass slides work, but a depression (well) slide is better — it keeps the animal from being crushed. A temporary wet mount with the coverslip raised on a few fibers from the moss works well too.
- Pipette or dropper: For transferring the sediment from your collection dish to the slide.
- Shallow dish or Petri dish: For soaking the sample.
- Rainwater or distilled water: Tap water chlorine can kill tardigrades. Collect rainwater or use bottled distilled water.
- A paper bag or small container: For collecting moss or lichen in the field without contaminating the sample.
- Optional: A pocket microscope for field collecting can help you pre-screen samples on the spot.
Where to Find Tardigrades
Every article on this subject says “look in moss,” and that’s correct — but it’s incomplete advice. Tardigrades inhabit the thin water film around mosses, lichens, and liverworts on every continent, including Antarctica. The key insight is that substrates that experience repeated wet–dry cycles tend to host the highest concentrations, because desiccation-tolerant tardigrade species concentrate there. Lush, perpetually wet moss growing in a shaded stream bank is actually less productive than the crispy, sun-exposed stuff on your roof.
Best Substrates, Ranked
| Rank | Substrate | Why it works | Where to find it |
|---|---|---|---|
| 1 | Lichen | Often the single most productive substrate; lichen’s complex surface traps water bears even in dry conditions | Tree bark, rock walls, gravestones, sidewalk edges |
| 2 | Rooftop / gutter moss | Repeatedly dried and rewetted; selects for desiccation-tolerant species | Roof shingles, metal gutters, shed roofs |
| 3 | Cushion moss on walls and bark | Classic habitat; reliable across seasons | Brick walls, tree trunks, garden rocks |
| 4 | Leaf litter / soil interface | Less concentrated but accessible; mix of species | Under fallen leaves, base of trees |
| 5 | Liverworts | Similar to moss; good secondary choice | Damp walls, forest floors, greenhouse pots |
Tip: Don’t overlook urban environments. The moss growing in sidewalk cracks or on a north-facing brick wall in your neighborhood is perfectly good collecting ground. You don’t need to hike into wilderness.
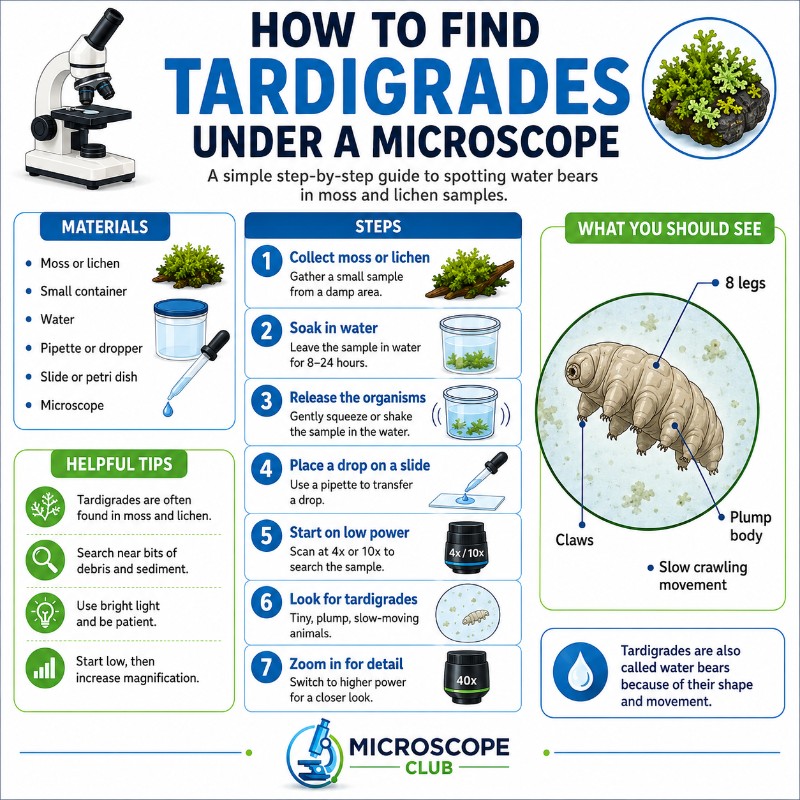

How to Collect and Prepare Your Sample (Step by Step)
- Collect a small handful of dry moss or lichen — about the size of a golf ball is plenty. Scrape it loose with a spoon or pocketknife and drop it into a paper bag or small container. Note your collection location in case you want to return to the same spot.
- Place the sample in a shallow dish and cover it with rainwater or distilled water. The sample should be fully submerged.
- Soak for several hours to overnight. A few hours may be enough for recently dried moss; deeply desiccated specimens benefit from a full 12–24 hours of soaking. If you’re impatient, you can start checking after 1–2 hours, but don’t give up early — see the rehydration timing section below.
- Squeeze and agitate the moss in the water. Knead it firmly with your fingers or a spoon; you can also shake the dish vigorously. This dislodges the tardigrades and other organisms from the substrate into the water.
- Let the water settle for 15–30 minutes. Tardigrades, along with detritus and other organisms, sink to the bottom of the dish.
- Pipette from the very bottom of the dish — this is where your tardigrades are. Transfer a few drops to a depression slide or a standard slide with a supported coverslip.
- Scan at low power (40–100×). Move the slide systematically across your field of view. Look for slow-moving, plump, eight-legged animals lumbering across the field.
The Rehydration Window — How Long to Wait
This is the piece most guides skip over, and it’s the most common reason beginners conclude “there’s nothing here.”
Tardigrades emerging from the tun state reanimate gradually. Under favorable conditions, the first movement typically appears within 10–30 minutes of adding water. Sluggish or deeply desiccated specimens may take several hours, and some need up to 24 hours before they’re fully mobile. If you check after 10 minutes and see nothing moving, put the dish aside and check again in a couple of hours. The slow ones are often in the best condition for observation — they’re not stressed and will feed and walk around for much longer than a freshly disturbed animal.
What Magnification to Use
A common misconception is that you need a powerful or expensive microscope. You don’t. 40–100× is the sweet spot for finding and watching tardigrades. Here’s what you’ll see at each power:
| Total Magnification | What you see | Best for |
|---|---|---|
| 20–40× (stereo scope) | Moving specks; enough to confirm a tardigrade is present and pick it out | Initial scan, live picking |
| 40× (4× objective, compound) | Clearly recognizable animal — body, leg pairs visible; easy to track | Locating and counting specimens |
| 100× (10× objective, compound) | Legs, claws, body segments, gut contents, movement in detail | Primary observation magnification |
| 400× (40× objective, compound) | Stylets, claw structure, eyespots (in species that have them), internal organs | Species identification, fine anatomy |
Lighting tip: Tardigrades are nearly transparent. Reduce your condenser light and partially close the iris diaphragm for contrast — this creates edge contrast that makes the animal’s body and legs pop against the background. Bright, fully open illumination washes them out. Understanding field of view and depth of field also helps when scanning a thick sediment layer. For even more contrast with transparent specimens, dark-field microscopy can make tardigrades glow brilliantly against a black background.
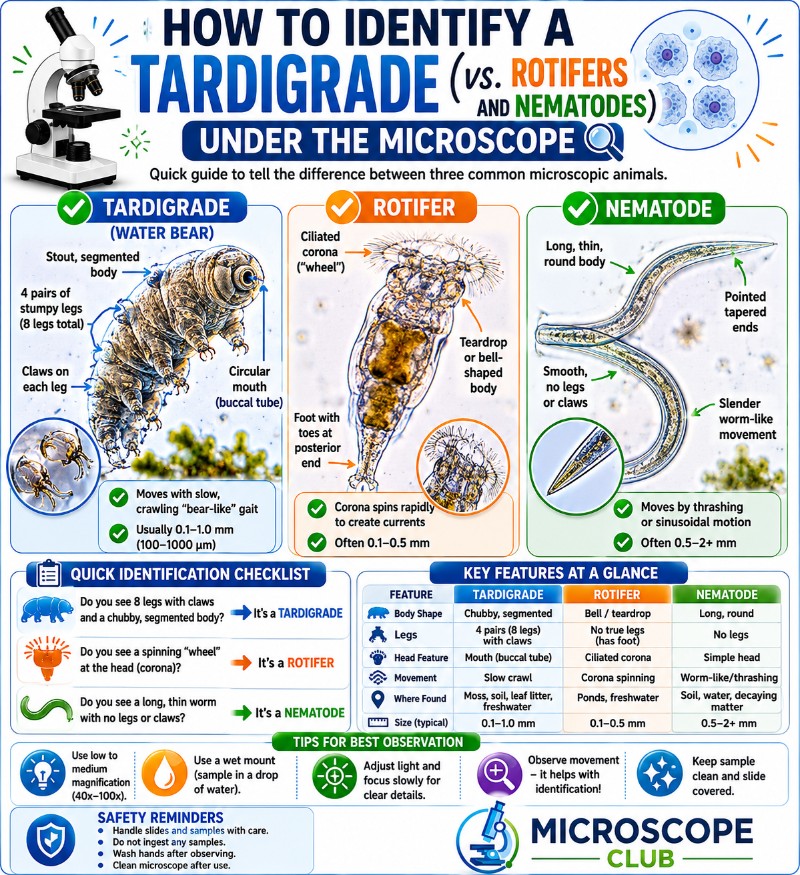
How to Identify a Tardigrade (vs. Rotifers and Nematodes)
When you look at your sediment sample, you’ll almost certainly see other organisms alongside any tardigrades — and beginners often misidentify rotifers or nematodes as water bears. Use the table and decision rule below to tell them apart immediately.
| Feature | Tardigrade (water bear) | Rotifer | Nematode (roundworm) |
|---|---|---|---|
| Legs | 8 stubby legs with claws | None (ciliated “corona” at head) | None |
| Movement | Slow, lumbering bear-like crawl | Fast; spinning cilia create a whirlpool; often anchored and telescoping | Rapid, whip-like S-shaped thrashing |
| Body shape | Plump, segmented, four leg-pairs | Vase or trumpet-shaped, often with a foot for anchoring | Long, smooth, tapered worm |
| Size | 0.1–0.5 mm | 0.1–0.5 mm | 0.1 mm to several mm |
| Dead giveaway | Visible claws + slow gait | Beating “wheel” cilia at the mouth | No legs, constant fast wriggling |
The identification triad for a confirmed tardigrade: eight legs with claws + slow lumbering gait + 0.1–0.5 mm body size. If all three match, you have a water bear. For a deeper look at nematodes and other worms under the microscope, see our dedicated guide. Your sample may also contain pond and moss-water algae like Spirogyra and other freshwater micro-life such as Volvox — a rich ecosystem in a single squeeze of moss.
Tardigrades are not the only remarkable organisms in a moss sample. You may spot microorganisms in the same sample including bacteria, amoebae, and ciliates, making a simple moss squeeze into a full ecosystem study.
How to Keep Tardigrades Alive for Observation
Once you’ve found a tardigrade, you’ll want to watch it for more than a few seconds. Here’s how to keep your specimens alive and mobile:
- Use the original soak water. It already contains the chemistry the animals are accustomed to. Tap water chlorine can kill them — if you must add water, use rainwater or distilled water.
- Use a depression slide or raise your coverslip on supports (a few fibers from the moss, or small pieces of broken coverslip). A flat coverslip pressed directly onto the water will crush the animal and immobilize it.
- Manage lamp heat. The microscope light heats the slide, evaporating water and stressing the animal. Observe in bursts of a few minutes, then switch the lamp off. Top up the water at the edge of the coverslip with a pipette if the sample begins to dry.
- Store the collection dish in a cool, shaded location between sessions. Kept moist and out of direct sunlight, tardigrades can survive in the dish for days, giving you multiple observation sessions from a single collection.
For classroom use, a good beginner microscope for kids at 100× is entirely sufficient for students to find and observe tardigrades on their own. The collection and preparation steps are safe and straightforward for upper elementary and middle school students.
Frequently Asked Questions
What is cryptobiosis, and how does it let tardigrades survive being dried out?
Cryptobiosis is a near-complete shutdown of metabolism that lets a tardigrade ride out conditions it couldn’t otherwise survive. When its surroundings dry up, a tardigrade enters anhydrobiosis: it pulls in its legs, contracts into a barrel-shaped “tun,” and loses more than 95% of its body water while producing protectants such as trehalose and protective proteins. In this state metabolism drops to almost zero, and the animal can stay dormant for years before reviving when water returns. This is why dry, crusty moss is full of living water bears just waiting to be rehydrated.
How do you keep tardigrades alive and active long enough to watch them?
Use the original soak water rather than fresh tap water — chlorine can kill them — and observe on a depression slide or prop the coverslip up on a few moss fibers so the animal isn’t crushed flat. Watch in short bursts and switch the lamp off between them, because the light heats and evaporates the water; top up at the coverslip edge with a pipette if it starts to dry. Stored cool, shaded, and moist, a collection dish can yield several observation sessions over a few days.
I found lots of moving creatures but no tardigrades — what else lives in a moss sample?
A single moss squeeze is a whole ecosystem, so plenty of activity without a water bear is normal. You’ll commonly see rotifers (fast, with spinning “wheel” cilia at the mouth), nematodes (smooth legless worms that thrash in an S-shape), plus algae, ciliates, amoebae, and bacteria. None of that means you did anything wrong — keep scanning the bottom sediment and give slow specimens several hours, since tardigrades are often outnumbered and reanimate gradually.
How much do I need to spend on a microscope to get started?
Not much. Entry-level stereo (dissecting) microscopes start around $60–$80 and reach the 20–50× range that’s perfect for spotting and picking tardigrades out of a dish. A basic compound microscope, which gets you to 100–400× for legs, claws, and internal detail, typically runs from about $100–$300. You don’t need a research-grade instrument — a modest compound scope reaching 100× is plenty to find and enjoy water bears.
Conclusion
Finding tardigrades is genuinely achievable on your first or second try — the whole process takes a container of dry moss, some rainwater, and a basic microscope. The keys that most guides miss are the substrate selection (go for dry, crusty lichen and rooftop moss over lush ground moss), the rehydration timing (wait hours, not minutes), and the sampling from the sediment at the bottom of the dish rather than the surface water. Get those three things right and a water bear will eventually lurch into your field of view, doing its unmistakable slow crawl across the slide.
Have you found tardigrades in your own neighborhood? We’d love to know what substrate worked best for you, how long rehydration took, or whether you spotted any rotifers or nematodes sharing the sample — share your experience in the comments below.