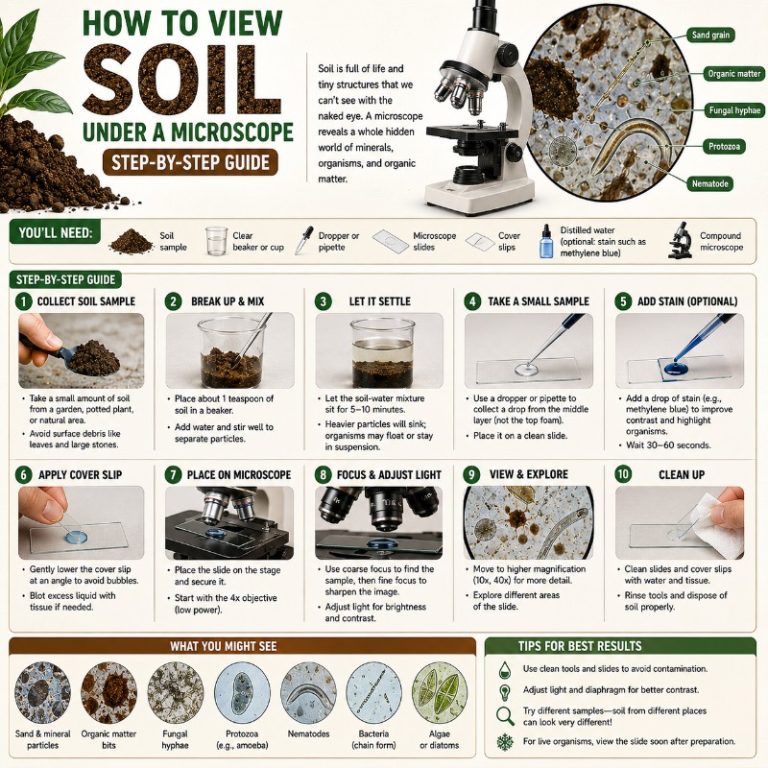
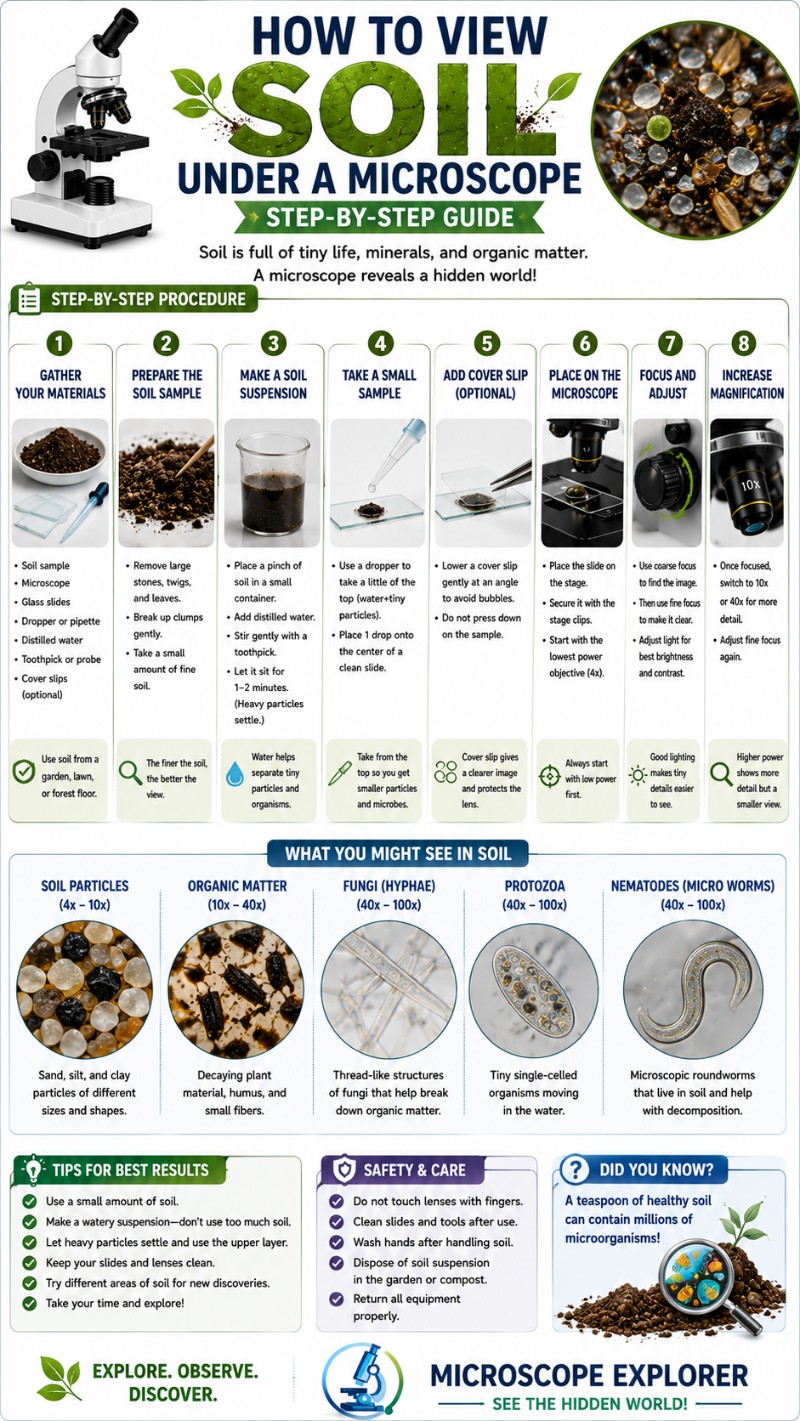
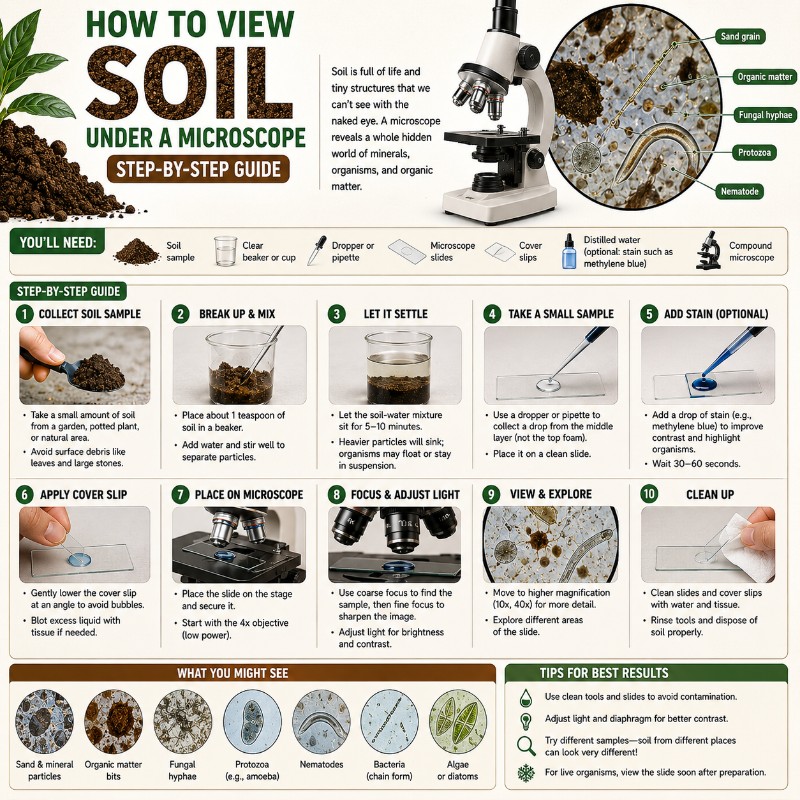
Learning how to view soil under a microscope comes down to five steps: collect a fresh sample from the top 2–4 inches of ground, disperse a small amount in distilled water, pipette a drop of the cloudy liquid onto a slide, add a coverslip, and scan from low to high magnification. Done right, you’ll find a living world — fungal hyphae threading through mineral grains, protozoa chasing bacteria, and nematodes thrashing across the field of view. This guide covers every step in detail, with exact preparation methods, magnification recommendations for each organism, and a primer on reading soil health by what you see.
Five Steps to Viewing Soil Under a Microscope
The five-step overview:
- Collect — fresh soil from 2–4 inches (5–10 cm) depth
- Disperse — 1 part soil in 5–10 parts distilled water; let settle 30–60 seconds
- Mount — pipette a drop of the cloudy supernatant onto a clean slide; lower coverslip at an angle
- Scan low-to-high — start at 40–100x, move to 200–400x for microbes
- Identify — mineral grains, organic debris, fungal hyphae, protozoa, nematodes
What You’ll Need
Microscope Type — Stereo vs. Compound
Two different microscopes serve two different purposes with soil, and using the wrong one is the most common beginner mistake.
- Stereo (dissecting) microscope — 10–40x magnification, reflected light, gives a three-dimensional view. Use this for whole soil crumbs, sand grains, mites, and springtails. If you want to see the texture of a soil aggregate up close, this is your tool. See our guide on compound vs. stereo microscope — which you need for a deeper comparison.
- Compound microscope — 40–1000x, transmitted light through a thin wet mount. Required for bacteria, fungal hyphae, protozoa, and nematodes. This is what the rest of this guide focuses on.
Supplies
- Glass microscope slides and coverslips (22×22 mm works well)
- Distilled or deionized water — tap water can contain chlorine that kills microorganisms
- A small jar or beaker for the dilution
- A dropper or pipette
- Forceps or a toothpick for handling
- Optional: methylene blue or crystal violet stain for bacterial contrast
Step 1 — Collect a Representative Soil Sample
Soil biology changes dramatically with depth and location. For the richest microbial community, sample the top 2–4 inches (5–10 cm) — the rhizosphere zone where root activity and organic matter decomposition are highest. Avoid the very surface, which can be too dry and UV-exposed.
A few collection tips that matter:
- Use clean tools. A metal trowel contaminated with garden chemicals can kill the organisms you’re looking for. Rinse with distilled water first.
- Sample moist soil. Dry or baked soil will have dramatically fewer living organisms. If the soil is dry, moisten it gently with distilled water 24 hours before sampling.
- Avoid roots and large debris — pick around them, but don’t obsess. Some root fragments in your sample are fine.
- Observe fresh samples within 1–2 hours if you’re looking for live motile organisms. Sealed in a container at room temperature, biology starts to shift fast.
Step 2 — Prepare the Sample
Direct Wet Mount
Place a tiny pinch of soil (smaller than a grain of rice) at the center of a clean slide. Add one small drop of distilled water. Lower a coverslip at a 45° angle onto the edge of the drop, then let it fall gently — this is the same technique detailed in our post on how to make a wet mount slide. The result is quick but messy: you’ll be looking through layers of mineral particles and organic debris.

Dispersion (Dilution) Mount — Best for Biology
This is the standard method used in soil food web assessment and gives you a much cleaner view of the living organisms. Here’s how it works:
- Add approximately 1 gram of fresh soil to 5–10 mL of distilled water in a small jar.
- Stir or shake for 15–30 seconds to break up aggregates and disperse organisms into the water column.
- Let the jar sit undisturbed for 30–60 seconds. Sand and coarse silt will sink to the bottom; the cloudy water above (the supernatant) stays suspended with bacteria, protozoa, fungal fragments, and fine particles.
- Pipette one drop of the cloudy supernatant onto a slide and mount a coverslip at 45° as above.
This method concentrates the biology into a cleaner field and is worth the extra two minutes every time. The Rodale Institute has used dilution-based soil biology methods extensively in its long-term farming systems research for the same reason.
Dry Mount for Texture and Minerals
Spread a small amount of air-dried soil directly on a slide — no water, no coverslip. Use this with a stereo microscope at 10–40x to examine sand grain shape, color, and size. This is also how you’d start if you want to assess what sand looks like under the microscope as part of a soil texture study.

Optional Staining for Bacteria
Bacterial cells are at the very limit of what a light microscope can resolve, and in bright-field they’re nearly invisible. A simple stain dramatically increases contrast:
- Make your wet mount, then touch a small drop of methylene blue or crystal violet to the edge of the coverslip. Capillary action wicks the stain under the slide.
- Important: staining kills and immobilizes organisms. Always observe motility first in the unstained slide, then stain if you want to confirm bacterial presence.
How to Avoid Air Bubbles
Bubbles are the #1 beginner artifact — they look like thick, dark-rimmed circles and can fool you into thinking you’ve found something. To prevent them: lower the coverslip from a 45° angle onto the edge of the water drop and let gravity bring it down slowly. Don’t overload the slide with too much water or soil. If bubbles appear, try pressing gently on the coverslip edges with a pencil eraser to push them out, or make a fresh slide. See our guide to preparing microscope slides for more on avoiding common mounting artifacts.
Step 3 — Choose the Right Magnification
Total magnification = objective power × eyepiece power (usually 10x). Start at the lowest power and work up — jumping straight to 400x in a cluttered soil slide is a recipe for frustration. Check our post on how to calculate total magnification if any of the math below is unfamiliar.
| Target | Size Range | Recommended Magnification |
|---|---|---|
| Sand grains, soil crumbs, mites, springtails | 0.05–2+ mm | 10–40x (stereo scope) |
| Nematodes, rotifers, tardigrades | 0.1–2 mm | 40–200x |
| Fungal hyphae, protozoa (ciliates, large amoebae) | 2–200 µm | 100–400x |
| Silt particles, flagellates, small amoebae | 2–50 µm | 200–400x |
| Bacteria (with stain or phase contrast) | 0.5–2 µm | 400x–1000x (oil immersion) |
The 1000x total magnification requires the 100x oil-immersion objective — you’ll need immersion oil and a compatible lens. For most soil biology hobbyists, 400x is sufficient to see nearly everything interesting. See our explainer on objective lenses explained (4x–100x) for more on oil immersion technique.
What You’ll See Under the Microscope
Mineral Particles — Sand, Silt, and the Clay Caveat
Sand grains (0.05–2.0 mm) are the most conspicuous: irregular, translucent-to-opaque chunks, often glassy quartz. Water-transported sand tends to be rounded; residual sand grains from in-place weathering are more angular. Silt particles (2–50 µm) need 100–400x to resolve individually — they look like fine, slightly cloudy particles without the crystal texture of sand.
Clay is a common misconception. Individual clay platelets are smaller than 2 µm (less than 0.002 mm), which puts them below the resolution limit of a light microscope — approximately 0.2 µm, set by the wavelength of visible light. You won’t see individual clay particles — you’ll see a murky, brownish haze or a coating on other particles. This is not a failure of your microscope; it’s a hard physical limit. For more on this, check out our post on magnification vs. resolution.
Organic Matter and Debris
Brown and golden fragments, root hair remnants, fungal debris, and decomposing plant tissue make up much of what you’ll see in most soil samples. Don’t be discouraged by the “mess” — the decomposition happening in this debris is exactly what fuels the organisms you’re looking for.
Bacteria
Set realistic expectations: bacteria in soil are 0.5–2 µm in size. At 400x in bright-field, they appear as shimmering, motile specks — barely resolved dots that dart or tumble. You are not going to see rod-shaped cells clearly without staining or phase contrast. What tells you bacteria are alive and present is movement. Staining with methylene blue at 1000x oil immersion will reveal shape (rods, cocci, filaments), but detailed cell structure requires a phase-contrast or oil-immersion setup. See our dedicated post on what bacteria look like under a microscope for staining technique details.
Fungal Hyphae
This is one of the most rewarding targets in soil microscopy. Fungal hyphae are 2–10 µm in diameter — easily visible at 100–400x as branching, translucent threads, sometimes with visible cross-walls (septa) along their length. You’ll often see them threaded through organic matter or around mineral grains. Don’t confuse them with actinobacteria filaments, which are much thinner (about 1 µm), or fine root hairs, which are larger and taper. For a deeper look at fungal morphology see our post on fungi and mold under the microscope.
Protozoa — The Moving Stars of Soil Biology
Protozoa are the most immediately impressive organisms you’ll find. Three types live in soil:
- Flagellates (5–20 µm): tiny, pear-shaped or elongated cells with one or two visible flagella (hair-like appendages); swim with a characteristic spinning motion. Best at 200–400x.
- Amoebae (10–50+ µm): shapeless blobs that move by extending pseudopods (false feet) and slowly engulfing bacteria. Fascinating at 100–200x; their movement is unhurried but unmistakable.
- Ciliates (20–200 µm): larger, covered with rows of cilia that beat rhythmically; they move fast. Easy to spot at 100–200x even before you know what you’re looking at.
The presence of protozoa is a key soil health signal — they graze on bacteria and release nutrients in plant-available form, a core mechanism in the soil food web framework developed by Dr. Elaine Ingham.
Nematodes
Nematodes are thread-like, transparent roundworms 0.1–2 mm long and 15–35 µm wide. They’re unmistakable at 40–200x — they thrash and coil in the water film with sharp, whip-like movements. Most soil nematodes are beneficial (bacterial-feeders or fungal-feeders), but plant-parasitic nematodes carry a stylet (hollow spear at the mouth) visible at 200–400x. Similar hunting techniques work for finding tardigrades (water bears), which sometimes share the same soil samples. To learn more about observing live microorganisms, check our guide to observing pond water under a microscope — the general principles carry over directly.
Larger Soil Fauna
Rotifers (40–500 µm) are easily visible at 40–100x as wheel-shaped organisms with spinning cilia at their head end — a remarkable sight. Tardigrades appear at 40–100x as stubby, eight-legged “water bears” that lumber through the debris. Mites and springtails are typically too large and active for a compound scope; use your stereo microscope at 10–40x for these. The Microscopy-UK community (Micscape) has an extensive archive of soil fauna images and technique guides that complement this guide well.
Reading Soil Health Under the Microscope
A microscope can’t replace a soil lab assay, but qualitative visual cues give you a real-time snapshot of biological activity. Here’s what to look for:
| Indicator | Healthy/Active Soil | Degraded/Over-tilled Soil |
|---|---|---|
| Fungal hyphae | Abundant, branching, colonizing organic matter | Rare or absent |
| Protozoa | Multiple types present, visibly active | Few or none |
| Nematodes | Present, diverse; no/few stylet-bearing types | Absent or dominated by plant-parasitic types |
| Organic debris | Colonized and partially decomposed | Bare, inert mineral grains dominate |
| Bacterial activity | Motile specks visible at 400x | Little to no movement |
The fungal-to-bacterial balance is particularly informative: forest soils tend to be fungal-dominated (more hyphae than bacterial biomass), while heavily tilled agricultural soils are bacterial-dominated or biologically depleted. This framework comes from the soil food web model described in the USDA NRCS soil health resources. Use these visual cues as a qualitative guide — not a lab-certified health score.
Troubleshooting Common Problems
- Nothing is moving. Your sample may be too old, too dry, or from biologically inactive soil. Try a fresh moist sample from a different spot. If you collected from compacted, bare soil, expect less biology.
- Too much debris — can’t see anything. Dilute more aggressively. Use a 1:10 or even 1:20 soil-to-water ratio and let the sediment settle longer (2–3 minutes) before pipetting.
- Air bubbles everywhere. Remake the slide. Lower the coverslip more slowly from a steeper angle. Use slightly less water.
- Can’t focus at 400x. Make sure your sample layer is thin enough — too much debris stacked up prevents focus. Also confirm your slide is on the stage right-side-up and the coverslip is down. If you’re using a 40x objective and things look blurry, check for a dirty objective lens. See our section on dark field microscopy if you want better contrast on unstained live organisms.
- Organisms dying quickly. Heat from the light source warms the slide fast. Use your microscope’s lowest acceptable light intensity and view quickly. A cooler LED light is better than a halogen for live specimens.
Frequently Asked Questions
When is the best time to collect a soil sample, and how should I store it if I can’t look at it right away?
Sample a day or two after rain or watering, when soil is moist and biological activity peaks — drought-stressed or baked soil shows far fewer active organisms. For live viewing, observe within an hour or two of collecting; if you must wait, seal the sample in a container and refrigerate it at about 4°C, which slows the community shift without drying it out. Avoid freezing or letting it dry, as both alter the soil fauna you’re trying to see.
How many soil samples should I collect if I want to compare different spots?
Take a separate sample from each location you want to compare — for example one from a garden bed, one from under a tree, and one from a potted plant — and keep them in labelled containers so they don’t mix. Sampling each spot at the same depth (the top 2–4 inches) and on the same day makes the comparison fair, since biology varies with depth, moisture, and time. Comparing two or three spots side by side is the clearest way to see how management affects soil life.
How do I safely clean immersion oil off my objective lens after viewing bacteria?
Wipe the oil off while it’s still wet using lens tissue, working in a spiral from the centre outward so debris moves to the edge. Use only the solvent recommended in the oil’s safety data sheet — never water, alcohol, or acetone on Cargille-type oils, as the oil won’t dissolve in them. Clean the 100x objective right after each session so residue doesn’t harden and attract grit.
Can I do soil microscopy with a cheap beginner microscope, and is staining really necessary?
Yes — a basic compound microscope reaching 400x will show fungal hyphae, protozoa, and nematodes, which are the most rewarding organisms for beginners and need no staining at all. Staining is optional and only matters for bacteria, which are too small to resolve clearly in bright-field; you can skip it entirely and still see a thriving soil community. The 1000x oil-immersion objective and stains are worth adding later only if you specifically want to study bacterial cell shape.
Conclusion
Viewing soil under a microscope is one of the most accessible and rewarding things you can do with a compound scope. With a fresh sample, a simple dispersion mount, and the magnification table above, you can go from a handful of backyard dirt to watching protozoa hunt bacteria within about 15 minutes. The key takeaways: use a dispersion mount for the clearest biology, scan from low to high magnification, set realistic expectations for bacteria (they’re tiny), and don’t try to see clay particles — physics won’t let you.
Have you tried this with your own soil? We’d love to know what you found — did you spot nematodes, protozoa, or something unusual? Share what you saw in the comments below, along with where you collected the sample. Backyard, forest, farmland, or potted plant — every soil tells a different story.