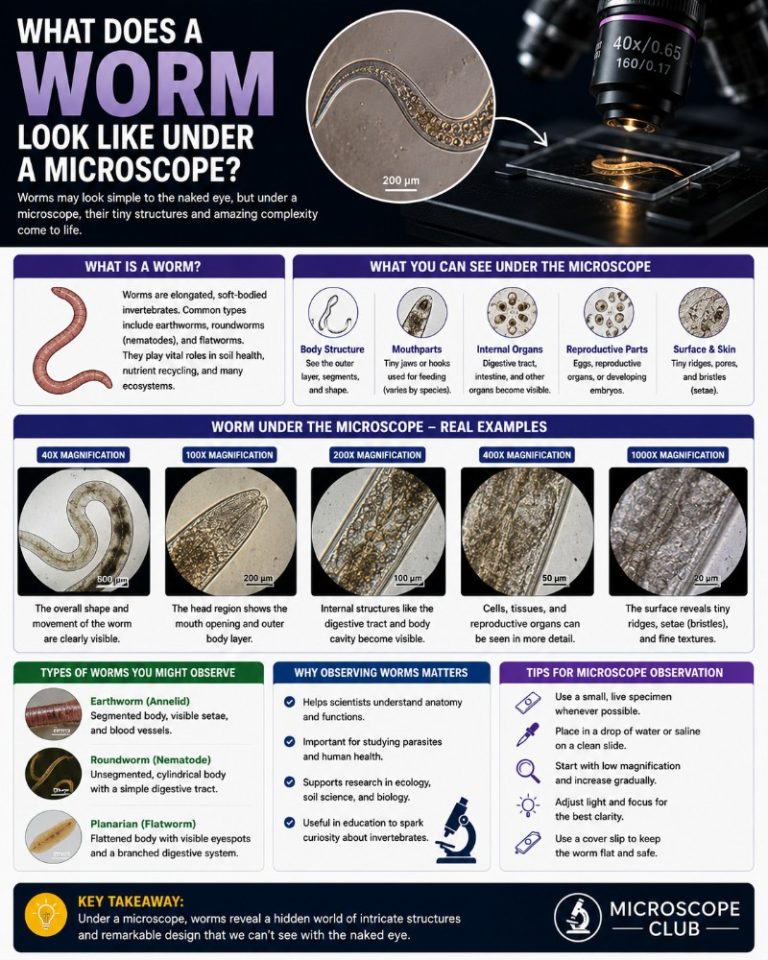
Worms under a microscope reveal a world far stranger and more detailed than a garden shovel ever shows: transparent organs pulsing with fluid, hair-like setae gripping a glass slide, and embryos assembling cell by cell inside a living body. Three completely unrelated groups — segmented annelids, flat platyhelminthes, and cylindrical nematodes — all carry the common name “worm,” yet under a compound microscope they look nothing alike. Knowing which microscope to use, which magnification to start on, and what structures to look for is what separates a frustrating first session from one that produces real images you can identify.
Three Body Plans: What Each Worm Type Looks Like Under the Microscope
The single most useful thing you can do before your first session is learn the three body plans side by side. Once you know what you’re looking for, identification is fast — even on a crowded slide.
| Feature | Earthworm (Segmented / Annelida) | Planaria (Flat / Platyhelminthes) | Eelworm / Vinegar Eel (Round / Nematoda) |
|---|---|---|---|
| Body shape | Cylindrical, tapered at both ends | Flattened, leaf-like | Cylindrical, thread-like, pointed tail |
| Segmentation | Yes — rings visible along full length | No | No |
| Typical size | 5–30 cm (usually viewed in section or as a juvenile) | 3–15 mm | 1–2 mm (Turbatrix aceti) |
| Best microscope | Stereo (live whole worm) or compound (cross-sections) | Compound (slide mount) | Compound, low power first |
| Starting magnification | 7–20× stereo for live; 40–100× compound for skin/setae | 40× to locate; 100× for eyespots and pharynx | 20–40× to find; 100–400× for internal structures |
| Telltale features | Segment rings; pale swollen clitellum (segments 14–16); S-shaped setae on each ring | Cross-eyed eyespots near head; leaf-shaped body; central pharynx mid-body | Transparent cylinder; muscular esophageal bulb; thrashing serpentine motion |
What Each Magnification Level Actually Reveals
One of the biggest beginner mistakes is jumping straight to high power. Start low to find and centre the specimen, then step up. Here is what each level shows on a typical worm slide:
- Stereo microscope / 7–40× — the best starting point for live earthworms in a Petri dish. At this range you get a three-dimensional view with enough working distance to manipulate the specimen with forceps. You can clearly see the worm’s overall body plan, segment rings, the swollen clitellum, and gross motion behaviour.
- Compound microscope, 40–100× — at 40× you locate the specimen; at 100× individual segments become distinct, setae are visible as tiny bristles projecting from the skin, and a vinegar eel’s thrashing motion is fully visible in culture liquid. This is the sweet spot for planaria identification.
- 400× (compound, high-dry objective) — internal structures come into view: the pharynx, esophageal bulb, reproductive organs, and gonad architecture in nematodes. On prepared H&E-stained cross-sections, individual muscle layers and intestinal epithelium are clear at this magnification. For egg identification (hookworm, Ascaris), 400× is standard.
Early Discoveries and the Fossil Record
Antoni van Leeuwenhoek made the first recorded microscopic observations of worm-like creatures in 1674, finding tiny organisms moving through pond water that later scientists associated with nematodes. Charles Darwin, who spent years studying earthworms during his travels, was among the first to document in detail that earthworms benefit agriculture — their tunnelling aerates soil, and their castings leave behind nutrient-rich organic matter that benefits plants.
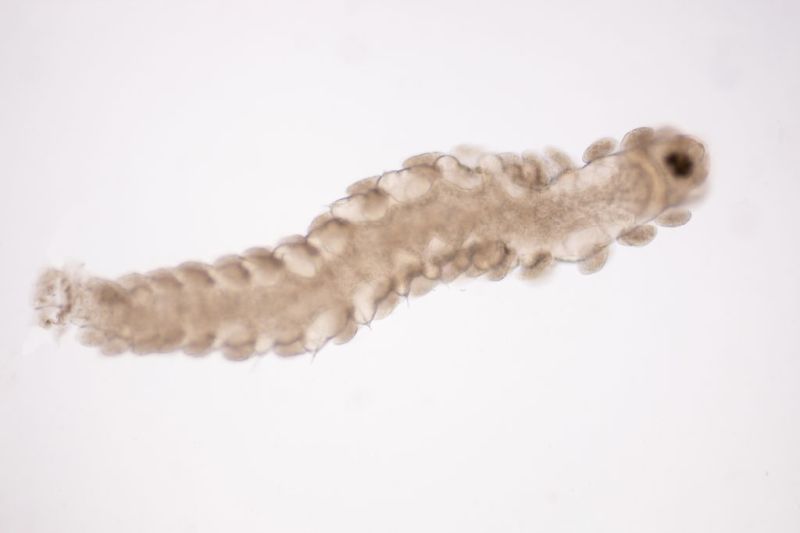
The fossil record extends worm ancestry back over 500 million years. Kootenayscolex barbarensis, described in 2018 from the 508-million-year-old Burgess Shale at Marble Canyon, British Columbia, is an ancestral annelid up to 3 cm long with bristles (chaetae) distributed even along its head — an arrangement that links it directly to modern leeches and earthworms. The Burgess Shale specimen shows that the basic annelid body plan has been remarkably stable across deep geological time.

Common Types of Worms
Many types of worms exist across the world’s habitats — marine, freshwater, soil, and inside other organisms as parasites. These are the groups most commonly encountered in microscopy sessions:
- Leeches — around 700 species worldwide, on every continent except Antarctica. Most are freshwater; roughly 100 species are marine. They attach to hosts via sucker-shaped or tooth-covered ends and have been used medicinally since antiquity.
- Tapeworms — segmented flatworms that live in the intestines of vertebrates including pigs, cows, and humans. Each body segment, called a proglottid, reproduces independently by producing eggs that pass into the environment with the host’s feces.
- Roundworms (Nematoda) — the most species-rich animal phylum on earth. Roundworms have a complete, one-way digestive tract: a mouth (typically ringed by three or six lips) opens into a buccal cavity, then a muscular pharynx, intestine, rectum, and anus. They absorb nothing through their skin; every nutrient enters through the mouth. Roundworms live in soil, freshwater, marine environments, and as parasites inside virtually every other animal species.
- Polychaete worms — segmented marine annelids with paired, paddle-like parapodia bearing hair-like chaetae on every segment. They range from free-swimming hunters to sedentary tube-dwellers and can resemble serpents when seen at a distance in water.
- Hookworms — parasitic nematodes that live in the small intestine of humans and animals, where they can cause blood loss, malnutrition, and anaemia. Any suspected infection requires diagnosis by a medical professional, not self-identification.
- Pseudobiceros fulgor — a marine polyclad flatworm inhabiting coral reefs and seagrass beds. It has two lip-like structures near its head and moves using a continuous muscular wave.
- Yellow Papillae Flatworms — free-living flatworms with a gelatinous body covered in brownish-yellow protrusions. They feed on plankton and small invertebrates.
OUR RECOMMENDED STEREO MICROSCOPES
No products found.
C. elegans — The Transparent Worm That Transformed Biology
Caenorhabditis elegans is approximately 1 mm long and completely transparent — and it is the single most-studied animal in biology. Under an ordinary compound microscope with a live mount, you can watch internal organs, developing oocytes forming in the U-shaped gonad, sperm migrating to the spermatheca, and embryos dividing inside the uterus, all in a living worm that requires no special staining. No dissection, no dye, just a worm on a slide.

What makes C. elegans uniquely tractable is that the adult hermaphrodite has exactly 959 somatic cells, and scientists have mapped every single cell division from fertilised egg to adult — the only complete cell lineage of any animal. Because the body plan never varies between individuals, every structure is always in the same location. The pharynx appears as a bright, rhythmically contracting bulb near the anterior end; the intestine runs the length of the body as a slightly darker strip; the gonads loop back on themselves in the posterior half of the body. At 400×, you can see individual nuclei in the intestinal cells.
For a first C. elegans observation: place one drop of a liquid culture on a glass slide, add a coverslip (no agar needed for a quick look), and go to 40× first to locate the worms. They will be actively sinusoidal — thrashing in tight S-shaped curves. Once you have one centred, step up to 100× and you will see the transparent body wall, the bulb of the pharynx, and the granular intestine. Step to 400× if you want to see gonad architecture or embryos. The common beginner mistake is applying a coverslip too firmly and crushing the worms flat — lower the coverslip edge-first to leave a thin layer of liquid underneath.
Observing Worms Under a Magnifying Glass First
Using a magnifying glass before the microscope is genuinely useful — it gives you a map of the specimen before the microscope crops your field of view to a small window.
The Earthworm
Under a magnifying glass with good raking light, an earthworm’s ring-like segments run its full length. The segments are not all the same size: the prostomium at the very front is smaller and rounder than the body segments behind it. Somewhere around a third of the way along the body you will see the clitellum — a saddle-shaped region that looks swollen and is slightly paler, almost cream-coloured against the worm’s darker brown skin. That is the key reproductive structure. If you hold the worm under angled light and look at the underside, the tiny S-shaped setae catch the light as a faint roughness on the skin. Running your finger gently along the ventral surface you can actually feel them grip — a useful tactile cue that students remember.
The Flatworm
Planaria under a magnifying glass look like small grey or brown leaves — flat, with a wider anterior end that tapers to a pointed tail. The eyespots near the head appear as two dark dots that make the animal look permanently cross-eyed. If the worm is moving, you will notice it glides rather than crawls — it moves on a carpet of cilia on its ventral surface, with no visible muscular writhing at slow speed. The pharynx protrudes from the mid-belly when the worm feeds; under a glass you may see it as a pale, stubby projection.
The Eelworm (Vinegar Eel)
Vinegar eels (Turbatrix aceti) are roughly 1–2 mm long and nearly invisible against a pale background. Hold the culture dish over dark paper and use a hand lens: you will see tiny thread-like forms making fast serpentine movements near the surface of the liquid. Both ends taper to fine points. Because they are so small, most of the anatomical detail requires a compound microscope — the magnifying glass stage here is mainly to confirm you have a live culture before preparing slides.
The Earthworm Under the Microscope
A compound or stereo microscope reveals far more earthworm detail than the naked eye. With a stereo microscope you can observe a live earthworm in a Petri dish; with a compound microscope and prepared slides or cross-sections you see internal anatomy.
You will need:
- Stereo microscope (for live observation) or compound microscope (for slides/sections)
- Earthworm specimen
- Glass slide and coverslip
- Tweezers and forceps
- Water or alcohol solution
- Petri dish
Procedure — live observation (stereo microscope):
- Place the worm in a Petri dish with a small amount of water to keep it moist.
- Set the stereo microscope to its lowest power (7× or 10×) and position the dish on the stage.
- Focus by rotating the focus knob slowly while looking through the eyepiece.
- Locate the anterior end — it is narrower and has the prostomium (a fleshy lobe above the mouth).
- Observe the worm’s motion: the longitudinal and circular muscle layers drive the characteristic elongate-then-shorten crawling cycle. You can see the body wall expand and contract in waves.
- Move the dish so the clitellum comes into view in the centre of the field. Note that it lacks setae and has a smoother, paler appearance than the adjacent segments.
Procedure — slide/section (compound microscope):
- Place a drop of water on a clean glass slide and add a small piece of the earthworm’s body wall or a transverse section.
- Lower the coverslip edge-first to avoid trapping bubbles.
- Start at 40× to locate tissue, then step to 100× and 400×.
- At 100× the circular and longitudinal muscle bands are visible as distinct layers under the epidermis.
- At 400× on a stained cross-section, the coelom (body cavity), dorsal blood vessel, ventral nerve cord, and intestinal epithelium are all distinguishable.
What to Observe on the Earthworm
The prostomium is a fleshy bump above the mouth at the front end — under 40× it looks like a slight overhang. The setae on each segment (approximately 80–120 per segment, S-shaped) project at an angle from the body wall; they catch light as bright points against the darker skin. The worm’s ventral surface is flatter and slightly darker; the dorsal surface is more convex and paler. Between individual segments you may see a thin septum under higher power. The genital pores sit near segments 14–15, close to the clitellum, and are larger than the nephridiopores (excretory pores) that appear at regular intervals along the body.
Dissecting the Earthworm
To examine internal anatomy, dissection under a stereo microscope gives the best view of the organs in situ.
You will need:
- Dissecting tray and pins
- Earthworm specimen
- Dissecting scissors and blade
- Forceps
- Stereo microscope
Procedure:
- Pin the specimen ventral-side up at both ends in the dissecting tray.
- Make a shallow incision below the clitellum using the blade — shallow enough not to cut into the organs beneath.
- Lift the skin with forceps and run dissecting scissors anteriorly and posteriorly along the midline.
- Pin the body wall open flat on both sides so the internal organs are exposed and undisturbed.
Internal structures you will see:
- Five pairs of aortic arches — the “hearts” — are dark loops surrounding the esophagus near the front of the body, visibly pulsing in a fresh specimen.
- Pharynx — a muscular mass at the very front, lightly pigmented, near segments 1–6.
- Crop and gizzard — the crop stores food temporarily; the hard, spherical gizzard grinds it. The gizzard feels firm if you press it gently with a probe.
- Intestine — a long pink-beige tube that runs from the gizzard to the rear of the body; the typhlosole (a dorsal infolding) is visible as a thickening on the intestine’s top surface under a stereo scope.
- Seminal vesicles — white or cream lobed structures near the heart region; the testes and ovaries appear as small pale tissues nearby.
- Dorsal blood vessel — a dark line running along the top of the intestine from front to rear; shift the intestine gently to one side with a probe to expose the pale ventral nerve cord below.
The Flatworm Under the Microscope
Planaria (common freshwater planarians, genus Dugesia) are the flatworms most often used in classroom microscopy. They are soft enough that a standard glass mount works well, but they move quickly — the agar mount technique below slows them just enough for focused observation.
You will need:
- Compound microscope
- Glass slides and coverslips
- Vaseline
- Agar (4–5%; some protocols add a trace of copper sulfate to slow the worm)
- Water and dropper
- Specimen
Procedure:
- Melt the agar and pour a thin layer onto a clean glass slide; use a second slide pressed flat across the top to level it. Remove the levelling slide after the agar solidifies.
- Add one small drop of water to the agar surface.
- Transfer the flatworm to the drop of water using a fine-tipped pipette or soft brush.
- Apply a thin ring of Vaseline around the edge of a coverslip and lower it gently edge-first over the worm. The Vaseline creates a shallow chamber that keeps the worm alive and limits its movement without crushing it.
- Place on the stage at 40× to locate the specimen, then step to 100×.
Observing the Flatworm Under the Microscope

The flatworm’s body looks exactly like a flattened leaf — you can often see the intestinal branches through the translucent body wall as dark, tree-like branching lines. The two eyespots near the head are the most immediately distinctive feature: each is a crescent-shaped cluster of pigment cells that makes the anterior end look cross-eyed. These are photoreceptors, not true image-forming eyes, but they are unmistakable at 40×.
At 100× the auricles — small pointed projections on the side of the head — become visible. These are chemosensory organs for detecting food in the water. The pharynx is located mid-body; if the worm is active and feeding, you may see it extended ventrally as a pale tube. Under a transmitted-light compound microscope, the cilia covering the ventral surface sometimes show as a faint shimmer at the body margins — the same cilia that propel the worm in a smooth, gliding motion. Switching to a dark field setting can improve contrast on these transparent body edges considerably.
The Eelworm (Vinegar Eel) Under the Microscope
Vinegar eels (Turbatrix aceti) are nematodes — roundworms — roughly 1–2 mm long that live in unpasteurised cider vinegar. They are completely transparent, which makes them excellent for observing nematode internal anatomy in a living specimen without any staining at all — the same transparency advantage you get with other living microorganisms under the microscope like yeast. Despite the name, they are not eels or fish of any kind.
To culture vinegar eels before observation, you will need:
- Glass culture dish
- Starter vinegar-eel culture
- Cider vinegar (200 ml)
- A few apple slices
- Pipette
Procedure:
- Add 200 ml of cider vinegar to the culture dish.
- Add apple slices as a food source.
- Introduce the vinegar-eel starter culture and cover loosely to allow gas exchange while limiting evaporation.
- Agitate gently with a clean pipette daily to oxygenate the culture.
- After a week, hold the dish over dark paper — you should see fine thread-like forms moving near the surface.
Observing the Eelworm Under the Microscope

You will need:
- Compound microscope
- Glass slide and dropper
- Vinegar-eel culture
Procedure:
- Use a dropper to place two drops of vinegar-eel culture on a clean glass slide.
- Lower a coverslip edge-first; do not press — leave the worms free to move.
- Start at 20–40× to locate specimens; they will be in continuous sinusoidal motion.
- Step to 100× and then 400× to examine internal structures.
What you will see: The eelworm body is cylindrical and thread-like, transparent throughout. At 40× you see the overall body shape and the characteristic thrashing motion — a sign the worm is alive and healthy. At 100× the esophageal bulb becomes visible: a small, spherical, muscular structure near the anterior end that pumps food into the intestine with a rhythmic squeezing action. It is one of the most satisfying things to watch under a microscope — a tiny visible pump. The intestine runs as a slightly darker strip from the bulb to the pointed posterior end. At 400× the reproductive organs are visible, usually positioned in the mid-to-posterior body; females carry larvae internally and give birth to live young. The common beginner mistake is pressing the coverslip too hard and stopping the worms from moving — always leave a fluid layer beneath the coverslip.
No products found.
Worm Eggs Under the Microscope
Microscopic identification of worm eggs in stool samples is the standard diagnostic method for intestinal parasites in clinical and veterinary settings. The following is for educational observation only — any suspected parasitic infection in a human or animal must be diagnosed by a medical professional, not by self-examination.
Two of the most commonly identified parasitic worm eggs show strikingly different morphologies under a compound microscope at 400×:
- Hookworm eggs — oval, roughly 64–76 µm × 36–40 µm, with a very thin, clear hyaline shell. Inside the shell sits a cluster of cells (typically 4–8 cells when freshly passed) with clear space visible between the cells and the shell wall. The thinness of the shell is diagnostic; it collapses easily if the sample is old. (CDC DPDx — Hookworm)
- Ascaris lumbricoides eggs — round to oval, 45–75 µm, with a thick mammillated outer coat that looks lumpy and brown under transmitted light. Fertilised eggs have a visible internal mass; unfertilised eggs are elongated and have a thinner coat. The mammillated surface makes them unmistakable once you have seen one.
Prepared demonstration slides of helminth eggs are available from scientific suppliers and are safe for classroom use. Working with actual stool samples requires a clinical laboratory setting and appropriate containment.
Tissue Staining for Cross-Sections
Whole live mounts are the starting point, but prepared and stained cross-sections reveal internal organ layers that are invisible in a live, unstained specimen. The standard histological method is haematoxylin and eosin (H&E) staining: haematoxylin stains nuclei blue-purple; eosin stains cytoplasm and connective tissue pink. On a transverse section of an earthworm or planarian, this colour contrast makes individual tissue layers sharply readable.
On an H&E-stained earthworm cross-section at 100–400×, you can see from outside to inside: the thin cuticle and single-cell epidermis, then the circular muscle layer (thin band), then the longitudinal muscle layer (thicker, striated appearance), then the coelomic cavity (clear space), and finally the intestine in the centre with its dorsal typhlosole infolding stained pink. The dorsal blood vessel appears as a tube with haemoglobin-containing cells.
On planarian cross-sections, H&E staining reveals the gastrodermis (digestive epithelium), the mesenchyme (loose connective tissue packed between organs), and the muscle layers — detail that is completely invisible in a live, unstained flatworm mount.
Prepared H&E-stained slides of earthworm and planarian cross-sections (anterior, mid-body, and posterior sections) are standard classroom items available from biological supply companies. They require no additional preparation — mount under bright field illumination and observe at 100–400×.
Preparing Your Specimens: A Quick-Reference Guide
Collecting Earthworms
- Wear gloves and use a small trowel or sieve to collect soil samples from moist ground after rain.
- Remove worms with forceps and transfer to a Petri dish with moist paper towel to keep them hydrated.
Collecting Flatworms
- Collect water from a shallow pond or slow-moving stream in a clear container.
- Hold the container up to the light or over dark paper and use a hand lens to look for 3–15 mm grey or brown forms gliding near the bottom.
- Transfer individual worms to a slide using a soft pipette. See our guide to preparing your slides for glass-slide basics before mounting.
Collecting Eelworms
The vinegar-eel culture method described above is the simplest approach. For plant-parasitic nematodes (0.4–1.2 mm, considerably smaller than vinegar eels), identify an infected crop — tomatoes, potatoes, or rhubarb showing galls or wilting — then:
- Break the infected tissue into small pieces and submerge in water for 30 minutes.
- Decant carefully and collect the sediment, which will contain the nematodes.
- Transfer to a Petri dish with a small amount of water for magnifying-glass and then microscope examination.
Frequently Asked Questions
Is a vinegar eel actually an eel?
No. Turbatrix aceti is a nematode — a roundworm — not a fish or eel of any kind. The name comes from its eel-like serpentine movement and its habitat in cider vinegar.
Do roundworms have a digestive system?
Yes — roundworms (nematodes) have a complete, one-way digestive tract running from mouth to anus. The mouth is typically ringed by three or six lips, followed by a buccal cavity, muscular pharynx, intestine, rectum, and anus. This is a defining feature of the phylum Nematoda and a key distinction from flatworms, some of which (tapeworms) lack a gut entirely. (LibreTexts — Phylum Nematoda)
What is the most studied worm in science?
Caenorhabditis elegans. Its complete transparency, small size (~1 mm), short generation time, and invariant 959-cell body plan have made it the organism of choice for genetics, developmental biology, neuroscience, and ageing research since the 1970s.
Do I need a compound or stereo microscope for worms?
It depends on what you want to see. A stereo microscope (7–40×) is best for observing live earthworms in 3D and watching their movement. A compound microscope (40–400×) is needed for slide-mounted specimens, internal anatomy, C. elegans, vinegar eels, cross-sections, and egg identification. For a first session covering all three worm types, a compound microscope with a 4×, 10×, and 40× objective set is the minimum; a stereo scope is a valuable addition for earthworm live work.
Can you see a worm with the naked eye before using a microscope?
Earthworms and planarians, yes — easily. Vinegar eels (1–2 mm) are just barely visible as moving specks against a dark background, but individual anatomy is invisible without magnification. C. elegans (~1 mm) is at the limit of naked-eye visibility. Plant-parasitic nematodes (0.4–1 mm) and parasitic worm eggs (45–75 µm) cannot be seen without a microscope.
Conclusion
Worms under a microscope are not one thing — they are three entirely different body plans that happen to share a common name. Segmented earthworms reveal their internal organs through dissection and cross-section staining; flatworms like planaria show eyespots, branching intestines, and cilia-driven motion in a live mount; cylindrical nematodes like C. elegans and vinegar eels display transparent bodies where every internal structure — the pumping pharyngeal bulb, the gonad loop, developing embryos — is visible in a living animal without any preparation at all. The practical starting point for any session is the magnification ladder: stereo scope or 40× compound to locate and centre your specimen, 100× for body plan and major structures, 400× for cells, eggs, and fine anatomy. Get those three levels down, and what looked like a featureless worm on a slide becomes a readable biological system. The same magnification ladder applies equally well when you move on to other invertebrates under the microscope.
RELATED POST
- What does a Mold look like under a microscope?
- What do Cancer cells look like under a microscope?
- What does Salt look like under a microscope?
- What do Onion Cells look like under a microscope?
- What do Cork Cells look like under a microscope?
Originally posted 2022-01-28 04:38:26.
Last update on 2026-10-24 / Affiliate links / Images from Amazon Product Advertising API