Leaf structure under a microscope reveals a precisely organized stack of tissue layers — transparent epidermis on top, a dense photosynthetic core in the middle, and a gas-permeable spongy zone on the bottom, all threaded by vascular bundles that carry water in and sugar out. A thin cross-section mounted on a glass slide shows every one of these layers at once. It transforms what looks like a flat, featureless leaf into one of the most elegantly engineered structures in biology. This guide names every cell type you’ll see, explains why each is shaped the way it is, and shows you how to prepare the slide yourself with nothing more than a basic compound light microscope and a razor blade.
The Layers of a Leaf, Top to Bottom
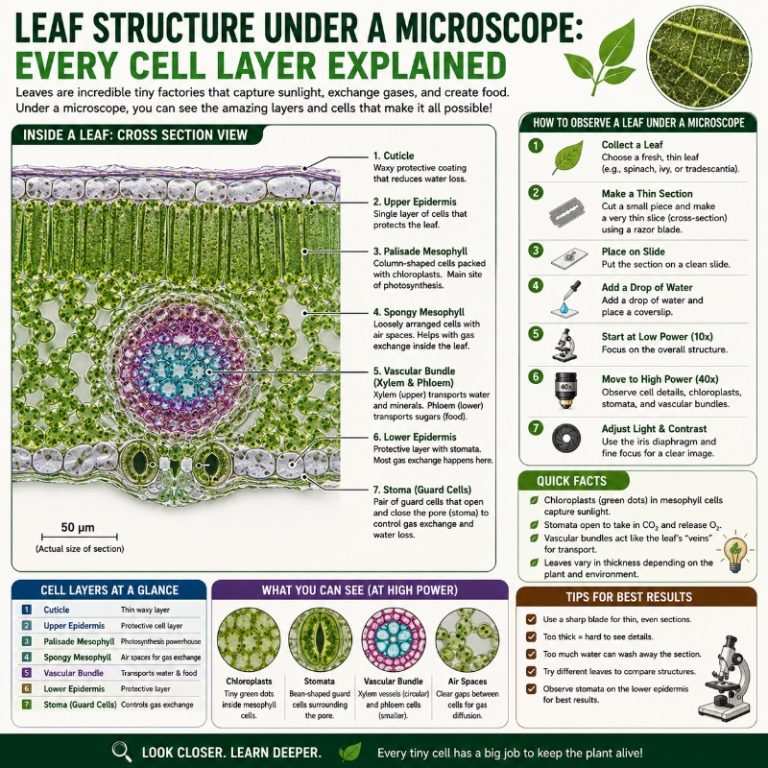
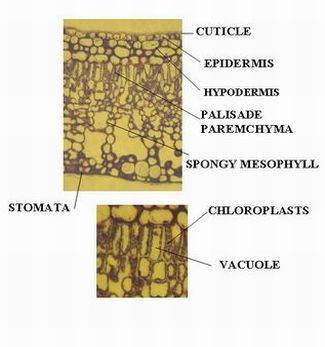
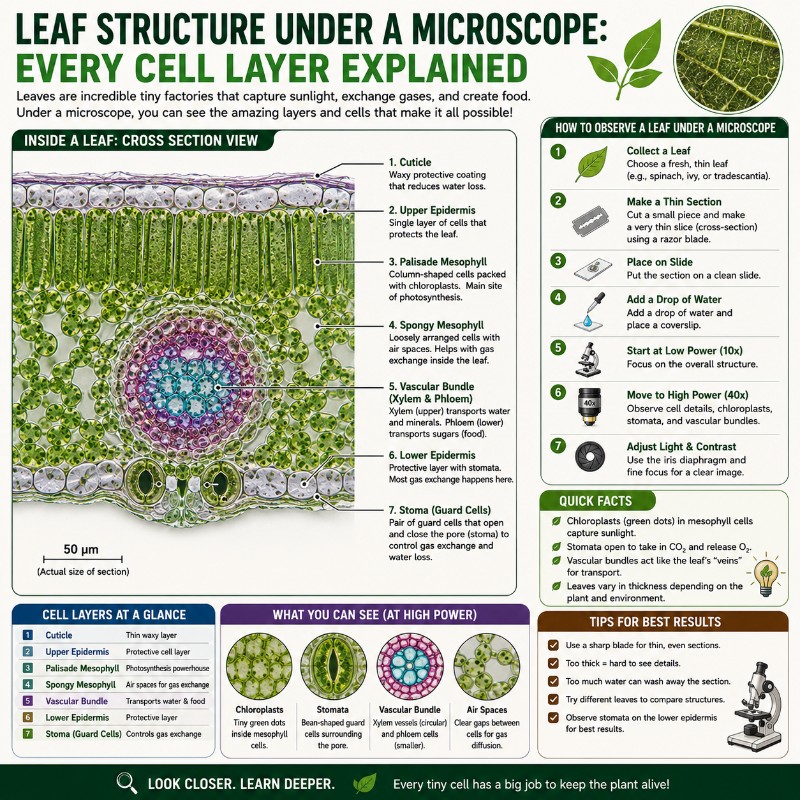
A typical dicot leaf (think privet, lilac, or bean) is organized into distinct horizontal zones that you can see clearly in a cross-section. Here’s the complete layer map before we dive into each one:
| Layer | Cell Type(s) | Main Function | What You See (~100–400x) |
|---|---|---|---|
| Cuticle | None (non-cellular) | Waterproofing | Thin glassy film on upper surface |
| Upper epidermis | Flat, transparent cells | Light transmission, protection | Clear, tightly packed brick-like cells |
| Palisade mesophyll | Column-shaped, chloroplast-dense | Photosynthesis | Rows of tall green cylinders |
| Spongy mesophyll | Irregular, loosely packed | Gas exchange | Green blobs with visible air gaps |
| Lower epidermis | Flat cells + guard cells | Protection, gas exchange | Clear cells with bean-shaped stomata pairs |
| Vascular bundle | Xylem, phloem, bundle sheath | Water and sugar transport | Dense oval cross-section (the vein) |
Cuticle and Upper Epidermis — Transparent but Critical

The outermost layer isn’t a cell layer at all — the cuticle is a waxy, non-cellular coat of a polymer called cutin that the upper epidermal cells secrete. It’s transparent under light microscopy, appearing as a thin glassy film along the leaf’s upper edge. Its job is to block water loss from evaporation, which is why succulents have an especially thick cuticle.
Directly beneath it sits the upper (adaxial) epidermis — a single layer of flat, tightly packed cells that lack chloroplasts. That’s intentional: colorless epidermal cells let sunlight pass straight through to the photosynthetic tissue below. On a surface peel (rather than a cross-section), epidermal cells appear as irregular, jigsaw-puzzle or brick-like shapes with clearly defined cell walls. You’ll notice there are almost no stomata on the upper surface of most dicots — that’s to minimize water loss from the sun-facing side.
Palisade Mesophyll — The Photosynthesis Powerhouse
Just below the upper epidermis you’ll find the most visually striking layer in any leaf cross-section: the palisade mesophyll. These cells are tall, narrow, and column-shaped, arranged vertically in one or two tightly packed rows — like soldiers standing at attention. Each cell is crammed with chloroplasts, making them the deepest green structures on your slide. The column shape is not accidental: it maximizes the number of chloroplasts that a beam of light hits as it travels downward through the cell, squeezing every photon for energy. Most of the leaf’s photosynthesis happens right here.
Spongy Mesophyll — Built for Gas Exchange
Below the palisade layer, the architecture changes completely. Spongy mesophyll cells are irregular in shape, loosely arranged, and separated by large intercellular air spaces that are immediately visible even at low magnification. These air pockets form a network connected directly to the stomata, allowing carbon dioxide to diffuse in and oxygen to diffuse out during photosynthesis. Spongy cells do contain chloroplasts, but fewer than the palisade layer above — their primary contribution is gas exchange, not light capture. The contrast between the tightly regimented palisade and the airy, random spongy layer is one of the most satisfying things to observe in any plant slide.

Lower Epidermis and Stomata — Where the Leaf Breathes
The lower (abaxial) epidermis mirrors the upper epidermis structurally — a single layer of flat, transparent cells — but with one key difference: it holds the majority of the leaf’s stomata. A stoma is the actual pore; each one is flanked by two kidney-shaped (or bean-shaped) guard cells. Unlike the surrounding epidermal cells, guard cells contain chloroplasts — one of the most commonly tested biology facts and one of the most commonly forgotten.
Guard cells regulate stomatal opening by changing turgor pressure. When water floods in and they become turgid, the cells bow outward and the pore between them opens. When they lose water and go flaccid, the pore closes. This is how the leaf balances photosynthesis (needs CO₂ → open stomata) against water conservation (loses water vapor → close stomata). Stomata are not always open, and they respond dynamically to light, temperature, and drought. On a lower-epidermal peel at 400x, the guard cells are distinct enough to watch in real time. This is particularly satisfying if you mount a peel in water and observe as it dries slightly under the light source.
Vascular Bundles — Xylem, Phloem, and the Bundle Sheath
The veins visible to the naked eye correspond to vascular bundles in cross-section. Each bundle contains two distinct tissue types in a predictable arrangement. Xylem sits toward the upper (adaxial) side — dead, lignified tubes with large lumens that transport water and dissolved minerals up from the roots. Phloem sits toward the lower (abaxial) side and consists of living cells that transport sugars produced during photosynthesis to the rest of the plant.

Many leaves also wrap the bundle in a bundle sheath — one or more rings of cells that form a tight collar around the xylem and phloem. In most dicots this sheath is thin and inconspicuous. In C4 plants like corn (maize), it becomes a prominent, chloroplast-rich ring called Kranz anatomy, which drives the carbon-concentrating mechanism that makes C4 photosynthesis so efficient. If you’re examining a grass or corn leaf, the dramatic bundle sheath ring is the first thing that will catch your eye.
How to Prepare a Leaf Slide at Home
You don’t need laboratory equipment to see all five layers. Both methods below work with household materials. Review preparing microscope slides for general mounting tips before you start.
Method 1 — Lower Epidermis Peel (Best for Stomata)
This is the easiest technique and the best way to observe guard cells and stomatal pores directly.

- Take a fresh leaf — spinach, privet, or lilac work well.
- Bend the leaf backward (underside up) so it snaps. The lower epidermis often peels away in a thin transparent sheet at the snap point.
- Grip the edge of that transparent film with fine tweezers and peel back a small section.
- Lay the peel flat in a drop of water on a clean glass slide.
- Lower a coverslip at an angle to avoid air bubbles. See how to make a wet mount slide for detailed technique.
- Observe first at 100x, then move to 400x to resolve individual guard cells and pores.
This method won’t show you the mesophyll layers, but for observing stomata it beats a cross-section every time.
Method 2 — Thin Cross-Section (Shows All Layers)
A cross-section is more challenging but reveals the full layer architecture.
- Cut a piece of carrot or a piece of soft foam roughly the size of a matchbook and slice a narrow slot into the edge.
- Insert your leaf into the slot so it’s held firmly upright.
- Using a sharp single-edge razor blade, slice as thin a section as possible across the leaf — aim for translucent. You’ll cut several before one is thin enough.
- Float the best sections in a small dish of water, then pick up the thinnest one with a fine brush or tweezers.
- Transfer to a drop of water on a slide, apply coverslip, and observe at 40x–400x.
The thinner your section, the more distinct each layer will appear. Sections thicker than about 100 µm tend to look like a blurry green slab.
Staining and Mounting
Plain water mounts work for a quick look, but a stain dramatically improves contrast. A drop of dilute iodine solution (Lugol’s) stains starch granules golden-brown and makes cell walls visible. Toluidine blue O stains cell walls blue-green and lignified xylem a vivid purple-blue — it turns a leaf cross-section into a color-coded diagram, and it’s a laboratory favorite if you can source it. Methylene blue (available in aquarium supply stores) works adequately for beginners. Add the stain beside the coverslip and let capillary action draw it under, then blot excess from the opposite side with a tissue. For the epidermal peel, staining isn’t strictly necessary because guard cells are already green from their chloroplasts.
What You See at Each Magnification
Understanding what each 4x, 10x, 40x objective lens reveals helps you work efficiently through a leaf slide. Go straight to maximum power on a fresh section and you’ll see nothing but a blur of green.
40x–100x — The Big Picture
At these magnifications a cross-section gives you the overall architecture. You can see the pale, narrow band of the upper epidermis, the darker green block of the palisade layer, the lighter spongy zone below it with its visible air spaces, and any vascular bundles as denser oval structures. You can count the layers and confirm their arrangement. An epidermal peel at 100x shows the jigsaw pattern of cells and hints at the stomatal pores as oval gaps, but guard cells themselves aren’t clearly resolved yet. This is the right magnification for orientation — always start here.
400x — Individual Cells and Chloroplasts
At 400x the world changes. Individual chloroplasts become visible as small, oval green discs (~5–10 µm) packed inside palisade cells. In a fresh, living peel, you can sometimes observe chloroplast streaming — the organelles moving slowly around the cell periphery in a process called cytoplasmic streaming. Guard cells are fully resolved: you can see their bean shape, the pore between them, and the green dots of their chloroplasts. In the spongy layer, the air spaces look dramatic — clear voids between the rounded green cells. Xylem vessels in the vascular bundle show their characteristic thick, lignified walls at this power. This is where the biology really comes alive.

Monocot vs. Dicot Leaf Structure
Everything described so far applies to a typical dicot leaf. If you slide a grass blade, corn leaf, or any monocot under the scope, the differences are immediately striking. Compare the structure of a grass blade under a microscope against a privet leaf and you’ll see the contrast firsthand.
| Feature | Dicot (e.g., privet, bean) | Monocot (e.g., grass, corn) |
|---|---|---|
| Mesophyll organization | Distinct palisade (top) + spongy (bottom) | Isobilateral — mesophyll not clearly divided |
| Venation pattern | Net/reticulate (branching) | Parallel (running lengthwise) |
| Stomata distribution | Mostly lower surface | Both upper and lower surfaces |
| Bulliform cells | Absent | Present in grasses — large, bubble-like cells that allow leaf rolling under drought |
| Bundle sheath | Thin, inconspicuous | Often prominent; Kranz anatomy (C4 plants like corn) has chloroplast-rich sheath ring |
The isobilateral mesophyll of monocots reflects a different light-exposure reality: grass blades grow nearly vertical, receiving sunlight on both faces equally, so there’s no need for a distinct palisade-on-top organization. The bulliform (motor) cells — large, bubble-like epidermal cells visible on the upper surface of many grasses — roll the blade inward during drought stress to reduce the area exposed to sun and wind, a structural adaptation you can observe directly on a dried grass section. Corn’s Kranz anatomy (from the German word for “wreath”) is the textbook example of C4 photosynthesis, where CO₂ is pre-concentrated in bundle sheath cells before entering the Calvin cycle — a structural trick that makes corn one of the most productive crops on earth.
For a related comparison in plant cell structure, onion epidermal cells offer a classic peel preparation — colorless and chloroplast-free — that makes a useful contrast with the chloroplast-rich leaf cells described here. The technique for peeling the onion epidermis is nearly identical to the lower-epidermis peel above. For a look at cork cells, the first plant cells ever observed by Robert Hooke, you can see how far plant microscopy has come since 1665.
For deeper reading on chloroplast structure itself, Spirogyra under the microscope shows chloroplasts in an almost diagrammatic helical arrangement — a simpler preparation that isolates the organelle without the complexity of a full leaf cross-section.
For authoritative background on leaf anatomy and photosynthesis, the Britannica entry on leaf anatomy provides a solid reference, and the NCBI Molecular Biology of the Cell chapter on chloroplasts goes deep on chloroplast ultrastructure if you want to connect the light-microscopy view to what’s happening at the molecular level.
Frequently Asked Questions
What magnification do you need to see leaf cells and stomata?
For a general overview of the layer arrangement, 40x–100x total magnification is sufficient. To clearly resolve individual cells and distinguish palisade from spongy mesophyll, use 100x–200x. To see stomatal guard cells, individual chloroplasts, and xylem wall detail, you need 400x. You can calculate total magnification by multiplying your eyepiece power (typically 10x) by your objective lens power.
Can you see leaf cells without staining?
Yes — a plain water wet mount of a fresh epidermal peel or a very thin cross-section shows the major layers without any stain, because chloroplasts provide natural green contrast in the mesophyll and guard cells. Staining becomes important when you want to distinguish cell walls clearly, highlight lignified xylem, or improve contrast on a section that’s slightly too thick. For classroom purposes, unstained fresh material is actually excellent for observing living cells, including chloroplast movement.
Can you watch chloroplasts move under a light microscope?
Yes — in fresh, living material at 400x you can observe cytoplasmic streaming (also called cyclosis): chloroplasts drift slowly around the cell periphery, carried by currents in the cytoplasm. It’s most visible in a fresh lower-epidermis peel mounted in water, particularly inside the guard cells, and in thin spongy mesophyll sections where cells haven’t been damaged by cutting. The movement stops if cells are stressed by dehydration, heat from the light source, or staining. Use a fresh leaf, keep the slide cool, and observe quickly after mounting for the best chance of seeing it.
How thin does a hand-cut cross-section need to be to see all the layers?
Aim for sections thin enough to be translucent when held up to light — roughly 50–150 micrometers. Sections thicker than about 200 µm look like an opaque green mass under the microscope, and the layers blur together. Cut many sections per session and use only the two or three thinnest ones. Using a carrot or foam insert to support the leaf makes consistent thin slicing much easier.
Why do my leaf cells look shrunken or distorted under the microscope?
The most common cause is dehydration — if the leaf dried out before you made the slide, or if the water on your slide evaporated under the light source, cells will collapse and lose their shape. Always use a fresh leaf and keep the slide wet during observation. If you’re using a stain, don’t let it dry completely before adding the coverslip. A drop of dilute glycerol (1 part glycerol to 9 parts water) instead of plain water slows evaporation and keeps cells looking natural longer.
Conclusion
A leaf cross-section under the microscope is one of the most complete lessons in biology you can fit on a single glass slide — every layer visible, every cell type doing a distinct and logical job. The transparent epidermis lets light in; the palisade cells capture it; the spongy cells distribute gases; the guard cells gate the whole exchange; and the vascular bundles supply the raw materials and carry off the finished product. Once you can point to each layer and explain why it’s shaped the way it is, the leaf stops being a flat green object and becomes a working machine.
Have you tried preparing your own leaf slide? Whether you nailed a perfect cross-section or ended up with a green blob on your first attempt, we’d love to hear about it — share your results or questions in the comments below.