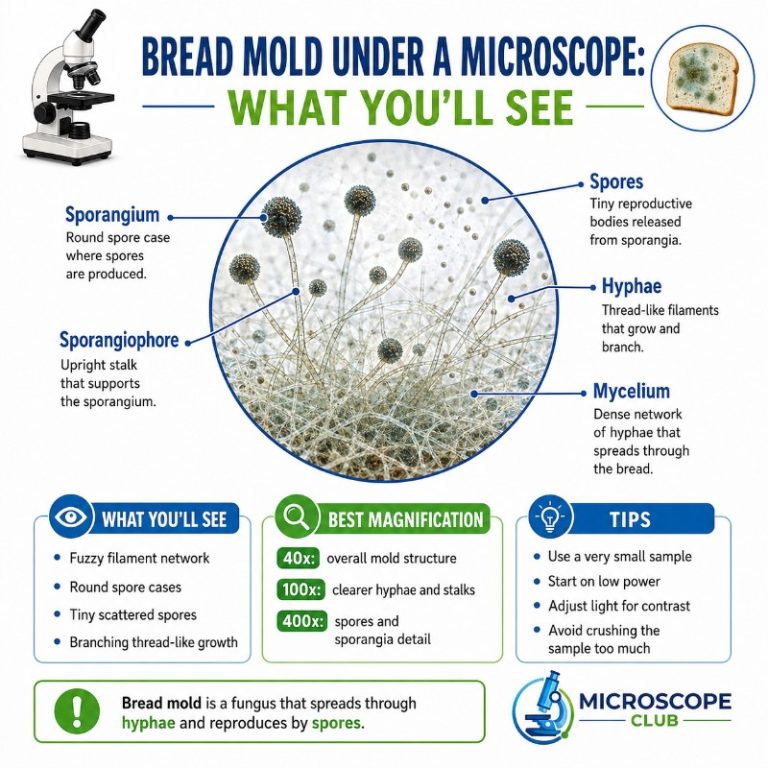
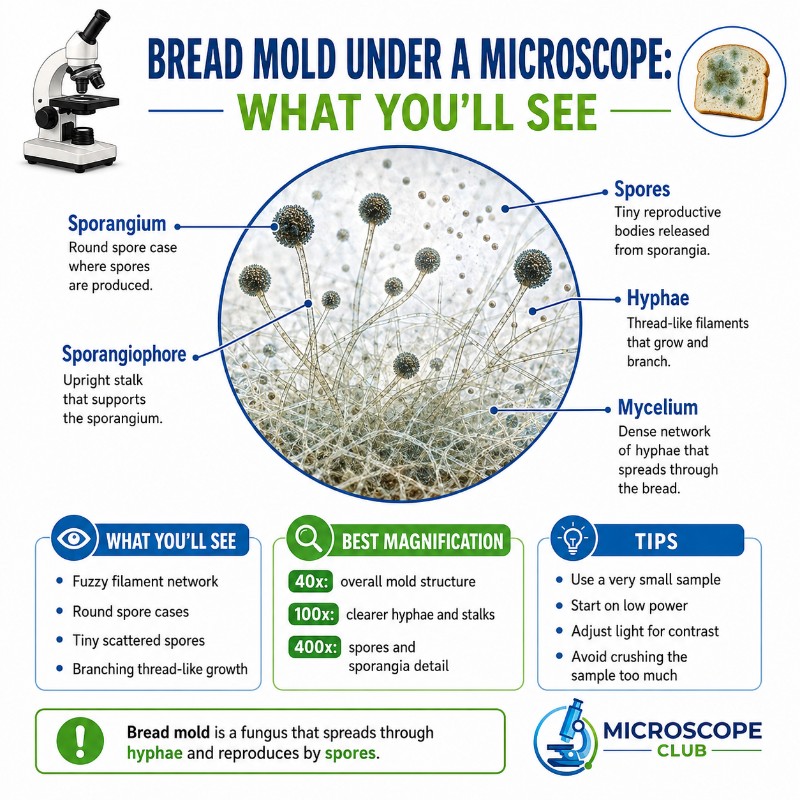
What you see when you examine bread mold under microscope lenses is a dense forest of thread-like filaments, tall upright stalks, and dark globe-shaped capsules stuffed with spores. The black “pinheads” visible on spoiled bread are sporangia — each one a reproductive capsule that can release thousands of microscopic spores when disturbed. A standard compound light microscope at 100x to 400x total magnification is all you need to see these structures clearly. The most common culprit is Rhizopus stolonifer, black bread mold, and its anatomy is one of the most visually distinctive in the fungal kingdom.
What Does Bread Mold Look Like Under a Microscope?
Under low magnification, bread mold appears as a tangled white-to-gray mat — the mycelium — with dark round dots scattered across its surface. Increase magnification and those dots resolve into sporangia perched atop tall stalks. By 400x, you can see individual spores and the dome-shaped structure inside each capsule (the columella). You can also confirm the absence of cross-walls in Rhizopus hyphae — a feature called non-septate or coenocytic, meaning the cytoplasm flows continuously through the entire filament without interruption.

| Magnification | What You Can See |
|---|---|
| Naked eye / stereo (10–40x) | Fluffy white-gray mycelium; black pinhead sporangia visible as surface dots |
| 40x total (4x objective) | Network of hyphae; sporangiophores with dark sporangia on top |
| 100x total (10x objective) | Clear hyphal strands; intact round sporangia; beginning to confirm non-septate walls |
| 400x total (40x objective) | Spore detail, columella, rhizoid branching, confirmed non-septate hyphae |
| 1,000x (100x oil immersion) | Individual spore morphology; rarely needed for bread mold identification |
For most students and hobbyists, 400x is the practical sweet spot. You get all the structural detail you need without the complication of oil-immersion technique. To understand how switching objective lenses (4x, 10x, 40x) affects what you see, that’s worth reading before you start.
Key Structures You’ll See
These are the main features to look for when you place a bread mold sample on a slide:
- Hyphae — thin, thread-like filaments that form the body of the mold. In Rhizopus, they are non-septate: no cross-walls, continuous cytoplasm, multiple nuclei throughout one filament.
- Mycelium — the entire interlocking mat of hyphae.
- Stolons — horizontal surface hyphae that spread across the bread. The species name stolonifer literally means “stolon-bearing.”
- Rhizoids — short, branching, root-like hyphae that anchor the mold to the bread and absorb nutrients. They are not true roots — there is no vascular system.
- Sporangiophores — tall, upright stalks that rise from the stolons at the points where rhizoids meet.
- Sporangia — the round, dark capsules at the tip of each sporangiophore. These are the black dots visible to the naked eye, each holding thousands of spores.
- Columella — a dome-shaped structure inside the sporangium, revealed when the capsule ruptures.
- Sporangiospores — the tiny reproductive cells released into the air when the sporangium bursts. Rhizopus spores measure roughly 5–8 micrometers in diameter.
For a broader look at how other fungi appear on slides, see our general guide to mold under a microscope.
Bread Mold at Each Magnification (40x, 100x, 400x)
Stepping through magnifications tells a story. Here’s what to expect at each stage and what to do when you get there.

At 40x total magnification (4x objective): The slide looks like a tangled nest of white threads with dark lumps scattered throughout. You can confirm you’re looking at a fungal colony, but individual structures aren’t yet sharp. Use this power to find a cluster of dark sporangia and center them in the field of view before increasing magnification. If you need to calculate total magnification for your scope, that’s a useful step before diving in.
At 100x total magnification (10x objective): Hyphae become clearly visible as distinct threads rather than a blurry mat. Sporangiophores stand out as taller, thicker strands rising above the mycelium. Intact sporangia appear as well-defined dark spheres. You’ll also start to notice the characteristic absence of cross-walls in Rhizopus hyphae — the filaments look smooth and uninterrupted rather than segmented into sections.
At 400x total magnification (40x objective): This is where the real detail opens up. Ruptured sporangia expose the columella — a pale dome rising from the tip of the sporangiophore inside the collapsed capsule wall. Loose spores are visible scattered around burst sporangia. Rhizoid branching becomes clearly apparent. You can definitively confirm the non-septate nature of the hyphae at this power, which is the single most useful identification trait for Rhizopus. Understanding magnification vs. resolution helps explain why some details only appear at this level rather than simply being “zoomed in.”

Is Bread Mold a Fungus? The Science Behind It
Yes — bread mold is a fungus, not a bacterium or a plant. Rhizopus stolonifer belongs to the phylum Mucoromycota (formerly Zygomycota), order Mucorales. Fungi form their own kingdom, separate from plants, animals, and bacteria. Unlike plants, they have no chlorophyll and cannot photosynthesize. Unlike bacteria, fungal cells have a true nucleus and complex organelles — they are eukaryotic.
Bread mold’s role in nature is as a decomposer: it secretes enzymes that break down the starches and sugars in bread, absorbing the resulting nutrients through its rhizoids. That’s why bread goes soft and discolored as the mold progresses — the structural carbohydrates are being digested from beneath the surface.
The black color that gives R. stolonifer its common name comes entirely from mature sporangia and spores, not from any pigment in the hyphae or from bacterial contamination. Young colonies are often white or pale gray; the characteristic dark color develops only as sporangia ripen and fill with pigmented spores.
To see exactly how bread mold compares to microorganisms that actually are bacteria, our post on how bacteria differ from fungi under the lens makes the distinction visually clear.
Rhizopus stolonifer — The Most Common Black Bread Mold
Rhizopus stolonifer is the species most commonly found on white bread and the textbook example used in most biology courses. Its anatomy is distinctive enough that, with practice, you can identify it by sight on a slide. The combination of non-septate hyphae, root-like rhizoids, and tall unbranched sporangiophores topped with single large sporangia is essentially unique among common bread molds.
For comparison, yeast, another common fungus found in bread dough, is unicellular — you won’t see hyphae or sporangia at all when viewing baker’s yeast (Saccharomyces cerevisiae) on a slide. The structural difference between Rhizopus and yeast is immediately obvious under the microscope.
The Lifecycle of Black Bread Mold
The dominant reproduction cycle in R. stolonifer is asexual and moves quickly — a new colony can establish and produce spores within 24 to 48 hours under warm, moist conditions:
- A spore lands on moist bread and germinates, extending germ tubes that elongate into hyphae.
- Hyphae spread across the surface as stolons; rhizoids extend downward into the bread to anchor and digest the substrate.
- Sporangiophores grow upward from the stolon-rhizoid junction points.
- The tip of each sporangiophore swells into a sporangium; nuclei inside divide and package into haploid spores.
- The mature sporangium darkens and eventually ruptures, releasing spores into the air — and the cycle begins again on a new surface.
Sexual reproduction is also possible when two compatible mating strains (+ and −) come into contact, forming a thick-walled zygospore. This is far less common than asexual reproduction and typically occurs under stressful conditions such as nutrient depletion.
How to Tell Bread Mold Species Apart (Rhizopus vs. Penicillium vs. Aspergillus)
Not all bread mold is Rhizopus. Blue-green patches are typically Penicillium; some green or black colonies are Aspergillus. The spore-bearing structures look very different under the microscope, making species-level identification achievable with a basic compound scope at 400x.
| Genus | Colony Color | Spore-Bearing Structure | Hyphae |
|---|---|---|---|
| Rhizopus stolonifer | White → gray → black | Round sporangium on a single tall unbranched stalk; rhizoids at base | Non-septate (coenocytic) |
| Penicillium | Blue-green | Brush-like (penicillus) conidiophore — chains of conidia on finger-like phialides | Septate |
| Aspergillus | Green, yellow, or black | Swollen vesicle with radiating chains of conidia — the “aspergillum” sphere head | Septate |
The single most diagnostic difference is hyphae structure: Rhizopus hyphae have no cross-walls (non-septate), while Penicillium and Aspergillus hyphae are clearly segmented (septate). At 400x, this distinction is easy to see. The spore heads are equally distinctive: the broom-like conidiophore of Penicillium and the radiating sphere of Aspergillus look nothing like the simple round sporangium of Rhizopus.
For additional taxonomic context on where Rhizopus sits in the fungal tree of life, Britannica’s article on Rhizopus is a solid reference. Also worth comparing are pollen grains under a microscope — the contrast between pollen grains and fungal spores under the scope is striking.
How to Prepare a Bread Mold Slide at Home (Step-by-Step)
Growing and mounting a bread mold specimen is one of the easiest intro-microscopy projects available. You need no special reagents, and the whole process takes 3–5 days of growth plus about 10 minutes of slide prep. This is also a great opportunity to practice how to make a wet mount slide using a real biological sample rather than a prepared specimen.
Safety Precautions Before You Start
Mold spores are airborne and can trigger respiratory issues in sensitive individuals. Follow these steps before handling any moldy sample:
- Grow the mold in a sealed zip-lock bag or closed container. Do not open it indoors once significant mold growth is visible.
- Wear latex or nitrile gloves whenever handling moldy material.
- Work in a well-ventilated area or near an open window.
- People with allergies, asthma, or compromised immune systems should avoid handling mold altogether. Some Aspergillus species produce mycotoxins and aflatoxins — a real health concern for immunocompromised individuals.
- After preparing the slide, add a cover slip and seal the edges with clear nail polish, or bag the slide in plastic before discarding it.
- Disinfect your work surface with a 10% bleach solution or 70% isopropyl alcohol when you’re done.
For authoritative guidance on mold health risks in US households, the CDC’s mold health resource is the go-to reference.
What You’ll Need
- A small piece of white bread — no preservatives. Sourdough or homemade bread molds faster than commercial white bread.
- A zip-lock bag or sealed container
- A few drops of water (to add moisture)
- Compound light microscope
- Glass slides and cover slips
- Tweezers or a toothpick
- Distilled or tap water as mounting fluid
- Gloves and a ventilated workspace
Step 1: Place the bread in the sealed bag with a few drops of water. Keep it in a warm, dark location around 77°F (25°C). Visible mold typically develops within 3–5 days.
Step 2: Once you see fuzzy white or gray growth with dark pinheads, it’s ready. Without opening the bag, identify the darkest clusters — those are mature sporangia. Then open carefully in your ventilated workspace.
Step 3: Use a toothpick to gently touch the surface of the mold and transfer a tiny smear to the center of a clean glass slide. You need far less material than you think — a visible smear is already too much.
Step 4: Add one drop of water over the sample, then lower a cover slip at an angle to minimize air bubbles. Press gently. Your slide is ready.
Step 5: Start at 40x to orient yourself, then step up to 100x and 400x. For more on handling slides and working systematically through the objective lenses, see our guide on preparing microscope slides.
For deeper technique guidance, MicroscopyU by Nikon offers free, well-produced resources on compound microscope technique that apply to student and hobbyist scopes alike.
Frequently Asked Questions
What are the black dots on bread mold?
The black dots are sporangia — spherical reproductive capsules perched on tall stalks called sporangiophores. Each sporangium holds thousands of tiny spores. The dark color comes from pigment in mature spores, not from bacteria or dirt contamination.
How long do bread mold spores stay alive in the air or on a slide?
Rhizopus spores are extremely hardy — they survive long, dry periods and high temperatures, which is why they are almost everywhere in indoor air. Airborne fungal spores can stay viable for hours to days depending on humidity, temperature, and UV exposure, and dormant spores on a dried slide can remain capable of germinating for weeks or longer if they later meet moisture. This is exactly why you seal or bag a mold slide before discarding it: the spores are not “dead” just because the sample looks dry.
What temperature kills bread mold, and does freezing stop it?
Most mold is killed by sustained heat of about 140–160°F (60–70°C), though toxins some species produce can survive even when the mold itself dies. Freezing does not kill mold — it is only fungistatic, meaning it forces spores into a dormant state and halts growth until warmer, moister conditions return. That is why a frozen loaf keeps mold-free but begins spoiling again once thawed.
Why does mold grow faster on some breads than others?
Four factors decide the speed: acidity, moisture, preservatives, and storage temperature. Sourdough resists mold because its low pH (around 4.2–4.5) and natural antifungal compounds produced by its bacteria slow fungal growth, while preservative-free white bread offers an easy, less acidic surface. Mold needs a water activity above roughly 0.85 to start, so moister, preservative-light bread kept warm and dark molds fastest.
What’s the safest way to dispose of a moldy sample after viewing?
Keep the sample and used slide sealed — do not reopen a container once heavy growth is visible. Soak the material in a 10% bleach solution (or seal it in a bag with a bleach-soaked paper towel for about 24 hours in a ventilated area) to deactivate the spores, then place everything in a closed plastic bag and put it in the trash. Finish by disinfecting your work surface and tools with bleach or 70% isopropyl alcohol and washing your hands.
Conclusion
Bread mold under a microscope is far more structured than the fuzzy patch on a forgotten loaf suggests. From the non-septate hyphae of Rhizopus stolonifer to the brush-like conidiophores of Penicillium and the radial spore heads of Aspergillus, each species leaves a distinct visual fingerprint at 100x to 400x magnification. Growing your own sample and preparing a wet mount takes less than a week and almost no equipment beyond a basic compound microscope.
Have you grown and viewed bread mold yourself? We’d love to know what species you found, which magnification gave you the clearest view, or any questions you ran into along the way — drop a note in the comments below.