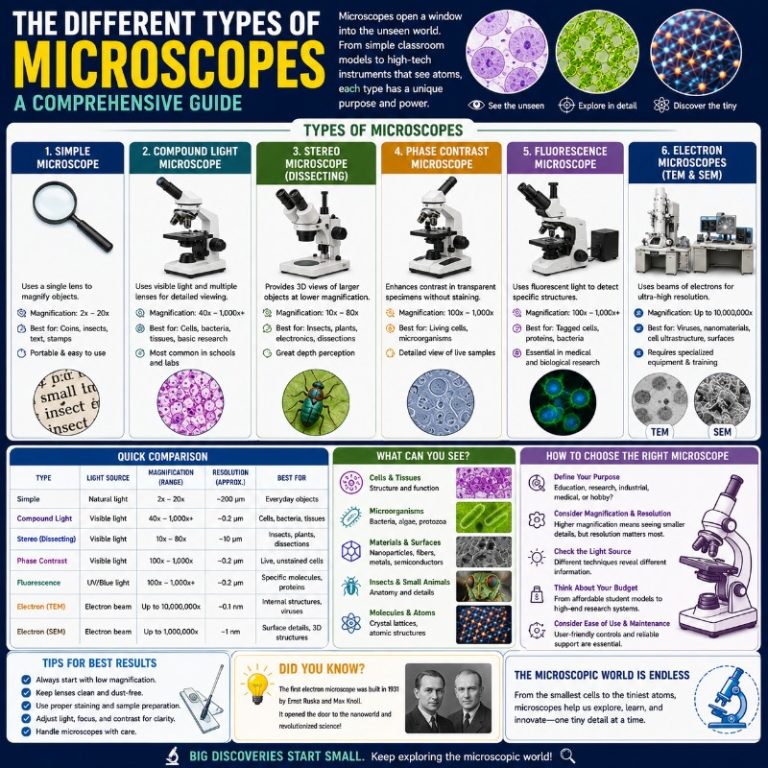
Most people picture a compound microscope the moment the word comes up — the upright tube and a rack of objectives that defined every middle school science class. But that single image barely scratches the surface: there are dozens of microscope types in regular use today, from handheld USB devices a kid can run off a laptop to aberration-corrected transmission electron microscopes that resolve individual atoms. Understanding how they differ — and why those differences matter — is the first step toward choosing the right tool for the job.
Magnification vs. resolution: the distinction that actually matters
Before cataloging types, it’s worth clarifying the two terms most people conflate. Magnification is how many times larger an image appears versus the actual specimen. Resolution is the smallest distance between two points that can still be distinguished as separate — it defines how much real detail you can see, not just how big the image is.
Push magnification past what the optics can resolve and you get what optical engineers call empty magnification: the image gets bigger but blurrier, adding no new information. [source] For a standard compound light microscope, useful magnification tops out at roughly 1,000× the numerical aperture (NA) of the objective. Go beyond that and you’re just enlarging blur.
This distinction shapes every choice below: an electron microscope isn’t “better” than a light microscope in every context — it’s better at resolution, but it comes with tradeoffs in sample prep, cost, and what you can image alive.
What is a microscope?
A microscope is any instrument that produces a magnified image of a specimen too small to resolve with the naked eye. The mechanism varies widely — visible light, electrons, X-rays, sound waves, and physical probes have all been pressed into service. Most microscopes have some combination of an illumination source, a magnifying system (lenses, magnetic coils, or a scanning tip), and an image-capture method (eyepiece, camera, or computer output).

Microscopes serve science from the classroom through to cutting-edge research: a basic stereo scope sits on a jeweler’s bench to inspect a watch movement; a cryo-electron microscope at a research university resolves protein complexes at near-atomic detail. The right microscope depends on what you need to see, whether the sample must stay alive, how much resolution you need, and your budget.
ALSO READ: MICROSCOPE APPS FOR APPLE AND ANDROID USERS
The first microscope

Long before vacuum chambers and electron guns, microscopy started with a single polished lens and a steady hand. The history of the microscope spans four centuries of optical invention, but it begins with one craftsman’s extraordinary lenses.
Simple microscope
The first practical microscope was a simple microscope — essentially a very powerful magnifying glass built around a single convex lens. Antony van Leeuwenhoek, working in the 1670s in Delft, hand-ground lenses of extraordinary quality. His best surviving lens achieves around ~270× magnification, far beyond anything his contemporaries could produce. [source] With that single-lens instrument he became the first person to describe bacteria, red blood cells, and the microscopic structure of muscle fibers — defining the entire field of microbiology in the process.

Adding a second lens to optically relay and re-magnify the image gave birth to the compound microscope and, eventually, every modern light microscope design descended from it.
Types of microscopes today

Modern microscopes fall into three broad families — light, electron, and scanning probe — with digital microscopy sitting at the intersection of light microscopy and computerized imaging. A fourth, smaller category covers instruments that use X-rays or acoustic waves. Within each family, different designs trade off resolution, sample requirements, image type, and cost.
Light microscopy

Light (optical) microscopy uses visible light — or in some variants near-UV — to illuminate and resolve specimens. It’s the oldest, most accessible, and most diverse category, encompassing instruments from a $30 school scope to a $200,000 super-resolution system. Resolution is limited by the wavelength of visible light to roughly 200 nm under ideal conditions.
Compound microscope
The compound light microscope is the most familiar instrument in the category — the one with a vertical tube, a rotating nosepiece carrying three or four objectives, and a binocular eyepiece. A standard eyepiece magnifies 10×; combined with a 40× objective you get 400× total, and with a 100× oil-immersion objective you reach 1,000× — the practical ceiling for visible-light optics.
What does 400× actually look like? Swab the inside of your cheek, smear it on a slide, stain with methylene blue, and drop it under a 40× objective. The squamous epithelial cells fill most of the field of view: pale, roughly hexagonal, with a darker nucleus sitting slightly off-center. At 1,000× under oil immersion, individual bacteria in a throat swab appear as tiny rods or cocci, wobbling with Brownian motion at the edges of the light cone. The biggest beginner mistake is cranking straight to 1,000× — start at 40×, center your feature, move to 100×, then 400×, then oil-immersion. Jumping objectives skips the orientation step that makes the jump to high magnification make sense.
Since the compound is a bright-field microscope, it uses transmitted light from below: the stage lamp shines through the specimen, and contrast comes from differential light absorption by stained structures. This makes it ideal for thin, semi-transparent specimens — stained tissue sections, blood smears, bacterial cultures, and fixed cell preparations. It’s the workhorse of biology classes and clinical labs worldwide.
Stereo microscope (dissecting microscope)
The stereo microscope looks like a compound scope but works on a different principle: two separate optical paths, angled a few degrees apart, feed left and right eyepieces independently, giving a genuine three-dimensional view of the specimen. Magnification is low — typically 7×–45× across most models, with some zoom systems reaching 80× — but that’s the point. You’re not trying to see cells; you’re trying to manipulate a whole object while watching it.
In practice, a stereo scope is where you dissect a preserved frog or pin an insect to a collection board, because you can see the specimen clearly and still move tools around it with both hands. Electronics assemblers use them to inspect solder joints on fine-pitch PCBs; watchmakers use them for movement cleaning; jewelers use them to set stones. Specimens sit directly on the stage without any slide prep — no fixing, no staining, no coverslip. The 3D view reveals surface texture and depth that a flat, transmitted-light image can’t show.
Phase contrast microscope
Transparent, unstained cells — living bacteria, cell-culture monolayers, unfixed protozoa — absorb almost no light and are nearly invisible under a standard bright-field compound scope. Phase contrast solves this without touching the cell. The technique exploits the fact that light passing through a cell travels slightly slower than light passing around it, creating a phase shift. A specially engineered objective and condenser annulus convert that phase shift into a difference in brightness, making otherwise-invisible internal structures (nuclei, mitochondria, vacuoles) appear as varying shades of gray.
The result: you can watch living, dividing cells for hours under a phase contrast scope without fixing or staining them. That’s why every cell biology lab has one. Phase contrast is the standard for monitoring cell cultures, timing mitosis, checking bacterial motility, and observing any living specimen where staining would kill the very behavior you want to see.
Dark field microscope
Dark field microscopy is the optical inverse of bright field: the direct illuminating beam never enters the objective. Only light scattered by the specimen reaches the eyepiece, so structures appear bright against a completely black background — like dust motes in a shaft of sunlight. This makes it excellent for specimens too thin or transparent to stain well, including live spirochetes (the bacteria that cause Lyme disease and syphilis), diatoms, and fine colloidal particles. Resolution is similar to bright field, but contrast on unstained specimens is dramatically higher.
Polarising microscope
The polarising (or polarization) microscope adds two polarising filters to a standard compound setup: one below the specimen (the polarizer) and one above (the analyzer). When a material is optically isotropic, the crossed polarizers block all light and the field appears black. Birefringent materials — those with different refractive indices along different optical axes — rotate the plane of polarized light and appear bright, often in vivid color.
This makes the polarising microscope the primary tool in geology and petrology for identifying minerals in thin rock sections: each mineral family has a characteristic interference color and extinction angle. It’s also used in materials science to examine polymer films, liquid crystals, and pharmaceutical crystals, and in medicine to identify uric acid crystals (gout) or calcium pyrophosphate crystals in synovial fluid.
Inverted microscope
A conventional microscope has its objectives above the stage. An inverted microscope flips that arrangement: objectives sit below the stage and point upward, while the light source is above. This seems like a minor engineering detail until you try to image live cells growing in a culture flask. Culture vessels have flat, transparent bottoms, and cells adhere to those bottoms — putting the objective below the flask means it’s looking directly at the cells through a thin glass or plastic floor, without disturbing the culture medium above.
Every cell biology lab running live-cell imaging uses an inverted scope. They’re also the preferred format for microfluidic chip experiments, organoid culture, and any assay where you need to observe cells while perfusing them with reagents from above.
Digital microscopy

Digital microscopy applies the optical principles of light microscopy but captures the final image with a sensor rather than an eyepiece, feeding a live video feed or high-resolution still image to a computer screen. The distinction matters in practice: digital output allows image stitching, measurement software, z-stacking for extended depth of field, and time-lapse recording without an operator sitting at the scope.
Digital microscope
The first commercial digital microscope was developed in 1986 in Tokyo by the company now known as Hirox Co. Ltd. [source] Early systems connected a lens assembly to a computer via S-video; modern ones output over USB 3 or HDMI and pair with measurement software that can calculate dimensions directly from the image.
A digital microscope may or may not have an eyepiece at all — the screen is the eyepiece. This opens up collaborative review (everyone looks at the screen together), ergonomic setups for long sessions, and automated inspection routines. High-end lab-grade digital microscopes include motorized focusing, multi-point z-stacking to produce a fully in-focus composite image of a rough surface, and image-comparison overlays for quality control.
USB computer microscope
The USB microscope is a consumer-grade simplification: a fixed-focus macro lens and LED ring, connected to a computer by a USB cable, with magnification up to around 200×. The depth of field is shallow and optical quality is modest, but the barrier to entry is low — under $30 in many cases — and no slide preparation is needed. For a student wanting to look at a coin’s surface detail, a piece of fabric, or a small insect, a USB scope is perfectly adequate. The images feed directly into photo-editing software or the manufacturer’s measurement app.
Pocket microscope
The smallest category in the digital family is the handheld or pocket microscope. Modern digital pocket scopes — like the Dino-Lite series — typically run 60×–120×, with higher-end models reaching 200× or more. They run on batteries and connect wirelessly or via USB for image capture. In the field, geologists use them to examine mineral grain size in hand samples; dermatologists use medical-grade variants to inspect skin lesions at high magnification during consultations. Resolution and working distance are limited, but portability compensates.
ALSO READ: BEST BINOCULAR MICROSCOPES
Electron microscopy

Electrons have a much shorter wavelength than visible light — and since resolution is fundamentally limited by wavelength, using electrons instead of photons breaks through the ~200 nm light-microscopy barrier by several orders of magnitude. Both types of electron microscope operate in a vacuum (electrons scatter off air molecules) and require specialized sample preparation, but the detail they reveal is unmatched by any optical method. For a breakdown of what this equipment actually costs, see our guide to electron microscope costs.
Transmission electron microscope (TEM)
The TEM fires a beam of electrons through an ultra-thin specimen — typically 50–100 nm sections cut with a diamond-edged ultramicrotome — and magnetically focuses the transmitted beam onto a detector or fluorescent screen. Resolution reaches sub-nanometre levels (roughly 0.05–0.2 nm) in modern instruments, with aberration-corrected TEMs pushing below 50 picometres — enough to image individual atom columns in a crystal lattice. [source]
The image is a 2D projection of internal structure: you’re seeing what the electron beam passed through, not the surface. Contrast comes from density differences — denser regions scatter more electrons and appear darker. Because TEM requires high vacuum and chemically fixed, resin-embedded sections, conventional TEM cannot image living specimens. The live-adjacent technique is cryo-EM, where samples are vitrified (flash-frozen in liquid ethane) to preserve near-native structure without chemical fixation, but even cryo-EM specimens are not alive during imaging. TEMs are used in semiconductor failure analysis, materials characterization, virology, structural biology, and nanotechnology.
Scanning electron microscope (SEM)
Instead of transmitting electrons through the specimen, the SEM rasters a focused electron beam across the sample surface and collects secondary electrons emitted in response. The result is a three-dimensional-looking surface image. Resolution typically runs 1–10 nm for standard SEMs, and below 2 nm for field-emission SEMs (FE-SEM) — significantly better than light microscopy but lower than TEM, which images internal structure at atomic resolution. The two instruments are complementary: TEM for what’s inside, SEM for what’s on the surface.
Non-conductive specimens (biological material, ceramics, polymers) must be sputter-coated with a thin conducting layer (~5–10 nm) to prevent charge buildup that would distort the image. Common coating materials include gold, gold-palladium alloy, platinum, chromium, silver, or carbon, chosen by application — gold gives fine grain and high conductivity for high-resolution imaging; carbon is used when elemental analysis (EDS) must not be contaminated by the coating. SEM is widely used in biology (insect anatomy, cell surfaces, bone microstructure), materials science (fracture surfaces, coatings), forensics, and gemology.
Reflection electron microscope (REM)
A specialized electron microscope used primarily in surface science, the REM reflects a narrow beam of accelerated electrons off the outermost atomic layers of a crystalline surface (rather than transmitting through or scanning it). The reflected (diffracted) beam contains information about surface reconstruction, step edges, and adsorbate structures at atomic-level resolution. When combined with electron energy-loss spectroscopy or other analytical techniques, the REM can characterize both the geometry and composition of crystal surfaces — a tool for fundamental surface physics rather than routine laboratory work.
ALSO READ: BEST DIGITAL MICROSCOPE REVIEW
Other types of microscopy
Fluorescence microscope

A fluorescence microscope excites fluorescent molecules (either naturally occurring fluorophores or synthetic dyes/fluorescent proteins attached to specific targets) with light at a specific wavelength, then uses a dichroic mirror and emission filter to capture only the longer-wavelength light the fluorophore emits. The rest of the illumination is blocked. The result: the labeled structure glows against a black background, while everything else is invisible — giving you molecular-level specificity inside a whole cell.
This makes fluorescence microscopy the backbone of modern cell biology. You can label the nucleus in blue, the mitochondria in green, and a specific surface receptor in red, then image all three channels simultaneously and see how they relate spatially inside a living cell. It’s used to identify pathogens (immunofluorescence), track protein dynamics in live cells (GFP tagging), and diagnose cancer by labeling tumor-specific markers.
Important distinction: fluorescence microscopy and confocal microscopy are not the same thing, though they’re often conflated. In a standard widefield fluorescence microscope, the entire specimen is illuminated at once and the detector captures all the emitted light — including out-of-focus light from planes above and below your focal plane. That out-of-focus haze blurs the image in thick specimens.
Confocal laser scanning microscope (CLSM)
The confocal microscope is a specialized type of fluorescence microscope that solves the out-of-focus blur problem. It uses a focused laser point to illuminate a single point in the specimen at a time, and a physical pinhole in the detection path physically blocks out-of-focus emitted light before it reaches the detector. The result is optical sectioning — you collect a razor-thin focal plane with virtually no out-of-focus contribution.
By scanning the laser across the specimen (hence “scanning”) and stepping the focal plane up and down in z, a confocal can reconstruct a full 3D volume of a labeled specimen. This makes it the standard tool for imaging thick fluorescently labeled samples: embryos, tissue sections, organoids, and 3D cell cultures. The tradeoff versus widefield fluorescence is signal efficiency (the pinhole blocks most emitted light, requiring longer exposures or brighter labels) and speed (point scanning is slower than full-field imaging).
X-ray microscope
X-ray microscopes use a beam of X-rays — which pass through soft tissue but are absorbed differently by denser structures — to image specimens without staining or physical sectioning. Because X-rays have much shorter wavelengths than visible light, they can achieve higher resolution than optical microscopes. Living cells can in principle be imaged, since X-rays don’t require the vacuum environment of electron microscopy and some soft X-ray setups can work with hydrated specimens. However, X-ray exposure at high doses damages biological material, so imaging times are limited. Synchrotron X-ray microscopes at national facilities produce some of the highest-resolution images of cellular structures outside of electron microscopy.
Scanning probe microscope (SPM)
Scanning probe microscopes don’t use light or electrons at all. Instead, an atomically sharp physical probe is raster-scanned across a surface at distances of a fraction of a nanometre, and the instrument measures a surface–probe interaction to build a topographic or property map. SPMs hold the record for the best spatial resolution of any microscopy technique.
There are two dominant forms:
- Scanning tunneling microscope (STM) — measures the quantum tunneling current between a conductive tip and a conductive or semiconductive sample surface. The current drops exponentially with tip–surface distance, so sub-ångström height sensitivity (~0.01 nm vertically, <0.1 nm laterally) is achievable. The STM can image and manipulate individual atoms. It earned its inventors (Gerd Binnig and Heinrich Rohrer at IBM Zürich) the 1986 Nobel Prize in Physics. Limitation: both tip and sample must be electrically conductive.
- Atomic force microscope (AFM) — measures the deflection of a tiny cantilever with a sharp tip as it traces across a surface, detecting tip–sample forces (repulsive or attractive). Unlike STM, AFM works on any material — conductors, insulators, biological membranes, DNA strands. Resolution in air is typically a few nm laterally; in liquid (relevant for imaging biomolecules) sub-nm lateral resolution is achievable. AFM is the workhorse of nanoscience, used to image protein complexes, cell membranes, polymer surfaces, and semiconductor features. [source]
Acoustic microscope
The acoustic microscope uses focused high-frequency ultrasound waves — typically in the GHz range — to image the interior of solid materials without destroying them. The ultrasound beam is focused through a coupling fluid (usually water) onto the specimen; reflections from internal interfaces (cracks, delaminations, voids, inclusions) are detected and mapped. Because sound penetrates materials that light cannot, acoustic microscopy excels at non-destructive quality inspection: detecting delamination inside semiconductor packages, voids in solder joints, cracks inside ceramic components, and adhesive failures between bonded layers — all without cutting the part open.
Quick-reference comparison table
| Type | Illumination | Magnification range | Resolution | Primary use | Cost tier |
|---|---|---|---|---|---|
| Compound (bright field) | Visible light | 40×–1,000× | ~200 nm | Cells, bacteria, stained tissue | $ – $$ |
| Stereo (dissecting) | Visible light | 7×–45× (to ~80×) | ~1–2 mm | Whole specimens, dissection, QC | $ – $$ |
| Phase contrast | Visible light | 40×–1,000× | ~200 nm | Living, unstained cells | $$ – $$$ |
| Polarising | Polarized light | 40×–600× | ~200 nm | Minerals, birefringent materials | $$ – $$$ |
| Inverted | Visible light | 40×–600× | ~200 nm | Live cells in culture vessels | $$ – $$$$ |
| Fluorescence (widefield) | Filtered excitation light/laser | 100×–1,000× | ~200 nm | Labeled proteins, immunofluorescence | $$$ – $$$$ |
| Confocal (CLSM) | Laser | 100×–1,000× | ~180–250 nm (optical sectioning) | 3D imaging of thick fluorescent samples | $$$$ |
| Digital / USB | LED | 20×–200× | Limited by sensor/optics | Education, hobbyists, QC inspection | $ – $$ |
| SEM | Electron beam (surface) | 10×–500,000× | 1–10 nm | Surface topography, morphology | $$$$ |
| TEM | Electron beam (transmission) | 2,000×–2,000,000× | 0.05–0.2 nm | Internal ultrastructure, atomic imaging | $$$$ |
| AFM | Mechanical probe | Surface scan | <1 nm | Surface topography, biomolecules | $$$ – $$$$ |
| STM | Tunneling current | Surface scan | <0.1 nm | Conductive surfaces, atomic manipulation | $$$$ |
| X-ray | X-rays | Variable | Sub-nm (synchrotron) | Hydrated cells, dense materials | $$$$ |
| Acoustic | Ultrasound | Variable | ~1–10 µm | Non-destructive internal inspection | $$$ |
How to choose the right microscope
The right microscope is the one that resolves the feature you need, with the sample in the state you need it, at a cost that’s realistic for your setting. Here’s a quick decision map:
- Classroom / general biology (cells, bacteria, tissue sections): Compound light microscope, 40×–400× for most work, 1,000× oil-immersion for bacteria.
- Whole specimens, dissection, circuit board inspection, jewelry: Stereo (dissecting) microscope. Low magnification, 3D view, hands-free manipulation.
- Living, unstained cells (culture monitoring, motility, mitosis): Phase contrast inverted microscope if cells are in a flask; phase contrast upright if on a flat slide.
- Specific proteins or cell structures inside living cells: Widefield fluorescence or confocal. Confocal if you need optical sectioning (thick specimens, 3D reconstruction).
- Surface topography at nanometre scale (coatings, fractures, microstructures): SEM — fast, great 3D surface visualization, no wet samples.
- Internal ultrastructure at near-atomic resolution (viruses, protein complexes, materials): TEM (or cryo-EM for biological macromolecules in near-native state).
- True atomic resolution on a conductive surface, atom manipulation: STM.
- Biological membranes, DNA, soft materials without vacuum prep: AFM.
- Minerals in thin rock sections, pharmaceutical crystals: Polarising microscope.
- Non-destructive internal inspection of manufactured parts: Acoustic microscope.
- Kids / hobbyists / field use: USB microscope or digital pocket scope.
Frequently asked questions
What are the three main types of microscopes?
The three main families are light (optical) microscopes, electron microscopes, and scanning probe microscopes. Some frameworks add digital microscopy as a fourth category, though it overlaps substantially with light microscopy.
What are the two most common types of microscopes?
The compound light microscope and the stereo (dissecting) microscope are found in the widest range of settings — from school labs to hospitals to factory floors. Among research-grade instruments, the compound scope and SEM are the most widely deployed.
What is the difference between a compound and a stereo microscope?
A compound vs stereo microscope comparison comes down to what you’re trying to see: a compound scope transmits light through a thin, usually stained specimen to reveal internal structures at high magnification (up to 1,000×). A stereo scope reflects light off an opaque, unprepared specimen at low magnification (7×–45×) to give a 3D surface view you can work on with your hands.
What is the difference between a light microscope and an electron microscope?
See our dedicated light microscope vs electron microscope comparison for full detail. In brief: light microscopes use photons and can image living samples in color; electron microscopes use electrons, require vacuum and special sample prep (no living specimens in conventional TEM/SEM), but resolve structures hundreds to thousands of times smaller.
What is the difference between SEM and TEM?
See our transmission vs scanning electron microscope guide. SEM scans a surface to produce a 3D-looking surface image at ~1–10 nm resolution; TEM transmits electrons through an ultra-thin section to produce a 2D projection of internal structure at sub-nanometre resolution. SEM is faster and sample prep is simpler; TEM gives higher resolution but requires much thinner specimens.
What is the most powerful type of microscope?
For resolution, the aberration-corrected TEM (and cryo-EM at modern research facilities) currently holds the record in terms of practical atomic-resolution imaging of materials and biological macromolecules. STM resolves individual atoms on conductive surfaces and can position single atoms, but is limited to conductive samples.
What is the difference between magnification and resolution?
Magnification is how much bigger the image appears. Resolution is the smallest detail that can actually be distinguished. Pushing magnification past the resolution limit gives you “empty magnification” — a bigger blur, not more detail. For any given microscope type, resolution sets the ceiling on useful magnification.
Which microscope is used to view living cells?
Phase contrast and widefield fluorescence microscopes are the standard choices for living cells on slides. For cells growing in culture vessels (flasks, dishes), an inverted phase contrast or fluorescence microscope is standard — the objective looks up through the bottom of the vessel. Confocal microscopes are used for live-cell 3D imaging. Electron microscopes (TEM, SEM) cannot image living cells.
What is the difference between fluorescence and confocal microscopy?
All confocal microscopes are fluorescence microscopes — but not all fluorescence microscopes are confocal. Widefield fluorescence illuminates the whole specimen at once and captures all emitted light, including out-of-focus blur. Confocal uses a focused laser point and a pinhole to reject out-of-focus light, producing sharp optical sections that can be stacked into a 3D volume. Confocal gives better contrast and depth resolution in thick samples; widefield is faster and more light-efficient for thin specimens or fast live-cell imaging.
What microscope is best for beginners or students?
A compound microscope at 40×–400× is the standard learning platform for biology — it covers cells, bacteria, plant material, and tissue sections. A stereo microscope pairs well with it for whole-specimen work and dissection. For younger students or hobbyists without a wet lab, a USB microscope is the lowest-friction entry point.
Summary
Microscopes span from a simple hand lens to instruments that resolve individual atoms, and every design in between represents a specific set of tradeoffs: resolution vs. sample survival, magnification vs. cost, detail vs. prep time. The compound and stereo microscopes remain the most common tools in classrooms and routine labs. Electron microscopes — SEM for surfaces, TEM for internal structure — dominate research that needs nanometre-scale or atomic-level resolution. Scanning probe microscopes push beyond even that, with STM and AFM mapping single atoms and molecular forces. And specialized techniques like phase contrast, fluorescence, confocal, and polarisation extend light microscopy’s reach far beyond what a simple bright-field setup can show.
Knowing which type to reach for comes down to one question: what do you actually need to see, and in what condition does the sample need to be to see it?
Originally posted 2020-04-09 01:21:29.