Pick up any compound light microscope, flip on the LED, and within a minute you’re watching a single drop of pond water teeming with organisms you can’t see with your naked eye. That’s the appeal — straightforward enough to use at a kitchen table, powerful enough for serious biology, and affordable enough that millions of schools, clinics, and home labs rely on them every day. This guide covers everything you need to know: how they work, what you actually see in the eyepiece, how to set one up correctly, and how to pick the right model for your budget.
What is a compound light microscope?
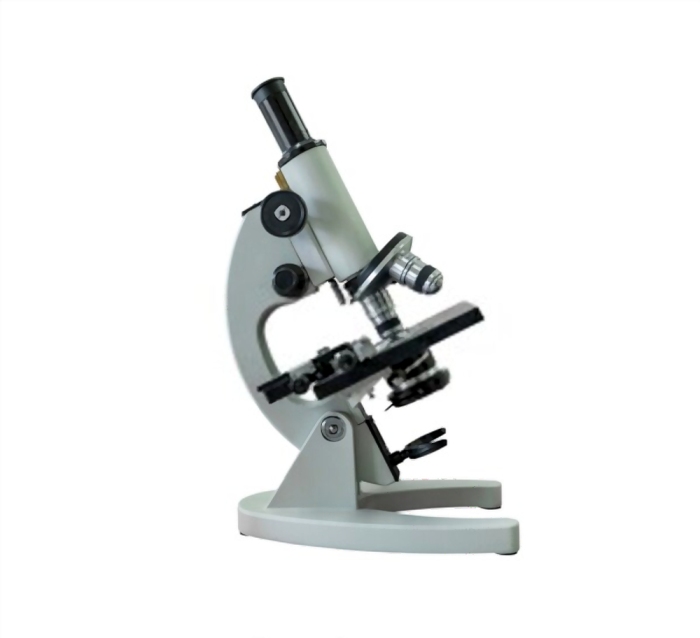
A compound light microscope is an upright, transmitted-light instrument that uses two lens systems in series — an objective lens close to the specimen and an ocular (eyepiece) lens at the top — to build a highly magnified, two-dimensional image. Because it compounds the magnification of at least two lenses, “compound” distinguishes it from a simple single-lens magnifier. You’ll also hear it called a biological microscope (its most common application), a high-power microscope (contrasted with low-power stereo scopes), or just a compound microscope.
Origin and history
The compound microscope is most commonly credited to Zacharias Janssen — sometimes together with his father Hans Janssen — in the Netherlands in the 1590s, though the attribution is genuinely disputed; contemporary scholarship notes that Hans Lippershey and others may have developed similar instruments independently around the same period. (APS) If you want the full story, the history of the microscope goes deeper. What’s certain is that over four centuries those primitive collapsing-tube devices evolved into precision optical instruments capable of resolving structures far smaller than a human hair.
What is a compound light microscope used for?
The core use case is examining specimens too small to see unaided — typically anything below about 0.1 mm. In practice that covers:
- Biology and medicine: blood cells, bacteria, tissue sections, chromosomes, fungi, parasites
- Microbiology research: cell structure, mitosis, organelle identification
- Education: the go-to instrument in school and university science labs
- Industrial / materials QA: surface coatings, fiber analysis, pharmaceutical checks
A compound microscope reaches useful magnifications up to around 1,000× under standard optics. That ceiling puts it squarely in the “cell and microorganism” range — detailed enough to see bacteria, not powerful enough to resolve viruses or individual molecules (more on why under Limitations).
What can you see with a compound light microscope?
This depends on magnification, preparation, and staining. Here’s an honest picture of what you actually encounter in the eyepiece:

Unstained wet mounts (lower power, 40×–100×): Pond water is endlessly rewarding at this level. Paramecia drift across the field as grey-translucent torpedoes with a faint ripple of cilia along their edges; you can watch them spin and reverse in real time. Plant cells — onion epidermis is the classic first slide — appear as a tight brick wall of rectangular cells, their walls sharp purple-brown against a pale background if stained with iodine. Algae strands like Spirogyra show a vivid spiral chloroplast that looks almost artificial. The depth of field is forgiving at 40× — you can see structure without much prep at all.
Stained thin sections (higher power, 400×–1,000×): Step up to the 40× objective and then the 100× oil-immersion lens and the experience changes noticeably. The field of view shrinks, the image dims unless you open the condenser aperture, and you become very aware of how shallow the focus plane is — rotating the fine-focus knob even slightly pulls different layers in and out of sharpness. Stained blood cells look like soft pink disks (red blood cells) dotted with the denser, purple-stained nuclei of white blood cells. Gram-stained bacteria appear as vivid violet clusters (Gram-positive, like Staphylococcus) or pink-red rods (Gram-negative), small enough that you’re scanning a crowded field to find them.
The inverted image: One thing first-timers always notice: the image is flipped both vertically and horizontally. Move the slide to the right and the specimen appears to drift left in the eyepiece. Move it away from you, and it travels toward you on screen. This is a fundamental property of the two-lens system — not a problem with your scope.

For practical guidance on making your own slides, see how to prepare microscope slides.
Types of compound microscopes
Most people encounter the biological bright-field type in school, but the compound design is a platform that supports several distinct imaging modes:
Biological (bright-field) microscope
The most common type. Light passes from a source below, through the specimen and up to the objective. The specimen’s contrast comes from how much of that light it absorbs. Thin, stained specimens show strong contrast; transparent unstained specimens are harder to see. Modern biological scopes use Köhler illumination — a setup where the field diaphragm and aperture diaphragm are adjusted independently to produce even, glare-free light across the field. It’s been the standard since August Köhler described it in 1893, and every quality transmitted-light scope is designed around it.
Fluorescence microscope
A fluorescence microscope illuminates the specimen with a specific excitation wavelength (e.g., blue light), causing fluorescent dyes or proteins attached to cellular structures to emit a longer-wavelength color (e.g., green). This is a completely separate concept from a confocal microscope: a widefield fluorescence scope illuminates the entire specimen plane at once, including out-of-focus regions, which creates some background haze. A confocal microscope is a specialized subset of fluorescence microscopy that adds a pinhole in front of the detector to physically block out-of-focus light, dramatically improving contrast and enabling optical sectioning for 3-D reconstructions. Confocal ⊂ fluorescence — they are not synonyms.
Phase-contrast microscope
Uses a matched phase annulus in the condenser and a phase ring in the objective to convert minute differences in the refractive index of cellular structures into visible contrast — without staining. Ideal for viewing live, unstained cells: you can watch bacteria swimming, cells dividing, or organelles shifting position in real time. Blood cells and protozoa are particularly crisp under phase contrast.

Polarizing microscope
Adds a polarizer below the specimen and an analyzer above to exploit birefringent materials (those that split light along different crystal axes). Widely used in geology (identifying mineral crystals), pharmacy (crystal polymorphism), and materials science. Many specimens that look featureless under bright field reveal vivid interference colors under polarized light.
Metallurgical microscope
Inverts the illumination: light comes from above and reflects off the specimen surface rather than transmitting through it. Essential for opaque specimens — metals, alloys, semiconductors, ceramics — where transmitted light is useless. Often combined with dark field microscopy for surface-defect detection.
For a broader overview, see types of microscopes.
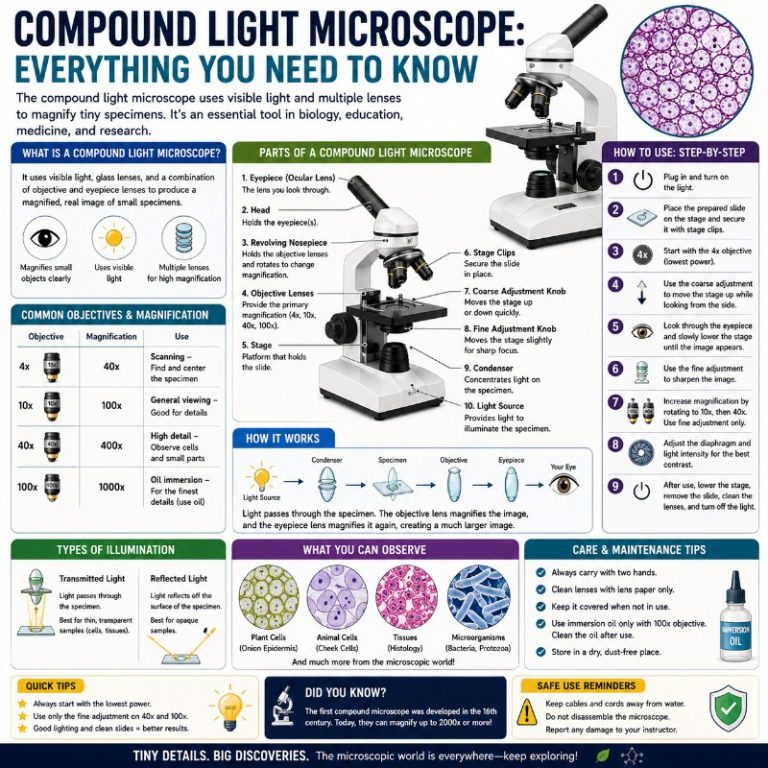
Parts of a compound light microscope

A compound microscope’s optical performance boils down to two lens groups, but the mechanical system around them matters just as much for usability. For a full breakdown, see parts of a compound microscope. Here’s the functional summary:
Objective lenses
The objectives sit on a rotating nosepiece (turret) and are the primary magnifiers. A standard four-objective set covers:
- 4× scanning — wide field, great for orienting yourself on a slide
- 10× low power — a workhorse for unstained specimens and initial exploration
- 40× high (dry) — where most detailed biology work happens
- 100× oil immersion — for resolving bacteria, fine cellular detail, highest NA
The quality designation matters: plan objectives keep the entire field flat and in focus edge-to-edge; semi-plan objectives are a budget compromise where the center is sharp but edges blur. Achromat objectives correct for two wavelengths of color; apochromats (higher-end) correct three, giving truer color rendition on stained specimens.
Ocular lenses (eyepiece)
The eyepiece magnifies the real image projected by the objective. A standard 10× eyepiece is universal; some scopes include a 5× for wider context. Binocular heads (two eyepieces) are far more comfortable for extended use and allow independent diopter adjustment for each eye. Monocular heads are lighter but fatiguing over time. Trinocular heads add a vertical port for a camera — essential if you’re doing documentation or sharing images digitally.
Light source and condenser
Modern scopes use LED illuminators — cooler, longer-lasting, and more consistent in color temperature than tungsten halogen. The condenser beneath the stage focuses that light onto the specimen and contains the aperture diaphragm that controls the cone angle of light. Setting the condenser correctly is the single most-overlooked step in Köhler illumination setup: a poorly centered, too-open or too-closed condenser costs you resolution and contrast.
Stage and focus controls
The mechanical stage clips and moves the slide via X–Y knobs. The coarse-focus knob moves the stage (or body tube, depending on design) large distances; the fine-focus knob is used at high power where depth of field is less than a micron. The rack stop is a physical limiter to prevent the 40× or 100× objective from crashing into the slide — set it once when the 40× objective just clears your thickest slide, and it protects you from accidentally driving the nosepiece into the glass.
How does a compound light microscope work?
Light from the base illuminator passes upward through the condenser, through the specimen, into the objective lens, which forms a real, magnified, inverted image at a plane inside the body tube. The eyepiece then acts like a magnifying glass, further enlarging that intermediate image so your eye sees the final virtual image. Two-lens compounding is why the magnifications multiply rather than add.
Bright-field microscopy and Köhler illumination
Bright-field microscopy is the most common mode: the background is bright, and the specimen absorbs some of that light to create contrast. The practical problem is that diffuse, uncontrolled illumination produces glare and washes out detail at high magnification. Köhler illumination solves this by conjugating the light source image to the aperture diaphragm plane (not the specimen), producing even, shadow-free illumination and allowing independent control of field size and illumination aperture. If your scope has a sub-stage condenser with an adjustable aperture iris, it’s designed for Köhler — and the difference between a properly Köhler-aligned scope and a sloppily lit one is dramatic.
Magnification and resolution — the two numbers that matter
Total magnification
Total magnification = objective magnification × eyepiece magnification.
A 40× objective with a 10× eyepiece gives 400×. A 100× objective with a 10× eyepiece gives 1,000×. Simple multiplication — there’s no magic.
Numerical aperture (NA): the spec that actually controls resolution
Magnification tells you how big the image appears. Numerical aperture tells you how much detail it actually contains. NA is a measure of the cone of light the objective can collect, defined as NA = n × sin(θ), where n is the refractive index of the medium between lens and specimen, and θ is the half-angle of the maximum cone of light the objective accepts.
Resolving power (the minimum distance between two points that can be distinguished as separate) follows the Abbe diffraction limit: d = λ / (2 · NA). With a 500 nm (green) wavelength and NA 1.4, that works out to roughly 180 nm — about the floor for a light microscope. Higher NA → smaller resolvable features → more actual detail.
When shopping, look at the NA printed on the barrel of each objective. A 40×/0.65 NA gives noticeably less resolution than a 40×/0.75 NA at the same magnification.
Useful vs. empty (false) magnification
There’s a ceiling to useful magnification set by NA. The practical rule: useful total magnification runs from approximately 500 × NA to 1,000 × NA. For a 1.4-NA oil-immersion objective, that means up to roughly 1,400× is useful; beyond that you’re just enlarging a blurry image — every pixel gets bigger but no new detail appears. This “empty magnification” is why cheap microscopes advertising “2,000×” or “3,000×” are misleading: they hit the optical ceiling of a light microscope long before those numbers.
Oil immersion: how it pushes NA above 1
Dry objectives work with air (n = 1.0) between lens and slide, limiting NA to below 1. Immersion oil (n ≈ 1.515, close to glass) fills that gap, letting the objective gather a much wider cone of light and pushing NA up to ~1.4. The physics: because the oil and glass have the same refractive index, light passes from slide to lens without bending at that interface, so more high-angle rays reach the objective.
Always use oil only on the 100× objective. One small drop on the coverslip is sufficient. After use, wipe it off immediately with lens paper — dried immersion oil is harder to remove and can damage the cemented elements inside the objective.
Depth of field
As magnification and NA increase, depth of field shrinks rapidly — at 1,000× you’re focused on a slice thinner than most bacteria. This is why you’ll notice at 400× or 1,000× that rotating the fine-focus knob continuously brings different focal planes through sharp focus, almost like scrolling through layers. It’s not a defect; it’s the physics of high-NA optics. For a detailed explanation see the site’s guide on numerical aperture and resolution.
Wet mount vs. prepared slide — when to use each
Wet mount: place the liquid specimen on a clean slide, lower a coverslip at an angle to minimize bubbles, and you’re ready within 30 seconds. Best for living specimens (pond organisms, fresh cheek cells) where you want to observe movement and natural morphology. Drawback: it dries out in minutes, and staining is limited.
Prepared (fixed and stained) slide: the specimen is killed, dehydrated, embedded, sectioned, and stained before mounting in a permanent medium. Results in permanent, high-contrast slides that reveal internal cell structure far more clearly than an unstained wet mount. Preparing microscope slides covers both techniques with step-by-step instructions.
Staining basics: Natural pigmentation often isn’t enough for clear contrast. Common stains include:
- Gram stain — the primary differential stain for bacteria. Distinguishes Gram-positive (appear violet, e.g. Staphylococcus) from Gram-negative (appear pink-red, e.g. E. coli) based on cell-wall differences.
- Methylene blue — a simple cationic dye applied in minutes. Stains nuclei and bacterial cell walls blue, useful for a quick look at cell morphology and arrangement but doesn’t differentiate cell-wall types the way Gram does.
- Fuchsin (basic fuchsin) — used as a counterstain in several protocols, including acid-fast staining for mycobacteria and as a connective-tissue stain.
- Iodine — cheap, safe, and ideal for plant cells (starch granules go dark blue-black; cytoplasm turns yellow-brown).
Note: identifying what you see under stain is educational — compound microscopy describes morphology. Diagnosing infection or disease requires clinical training, controlled protocols, and validated testing beyond a standard light microscope setup.
How to use a compound light microscope
Step 1 — Assembly and startup
- Carry the microscope with one hand through the arm and the other supporting the base. Place it on a stable, level surface with the arm toward you.
- With the nosepiece, rotate the lowest-power objective (4× or 10×) into position — you should feel and hear it click.
- Turn on the LED and set it to medium brightness. Look through the eyepiece and center the light field with the condenser centering screws if needed. Open the aperture diaphragm fully to start.
- Adjust the interpupillary distance (binocular heads only) until both fields merge into one circle. Set diopter on your weaker eye by closing the other.
Step 2 — Placing the slide and finding focus
- Place the slide on the stage with the specimen over the aperture. Secure the stage clips.
- While watching from the side (not the eyepiece), use the coarse focus to bring the 10× objective close to the slide — within about 5 mm. Do not look through the eyepiece while cranking the objective down. This is the most common beginner mistake that results in a cracked slide or scratched objective.
- Now look through the eyepiece and slowly raise the objective (or lower the stage, depending on your scope’s design) with the coarse focus until the specimen comes into view. Fine-tune with the fine focus.
- Set the rack stop now: while the 40× objective is just clearing your slide, tighten the rack stop screw. This prevents you from crashing into the slide every time you switch objectives.
Step 3 — Moving to higher magnification
- Center the feature of interest at 10×, then rotate to 40×. Because objectives on a good scope are parfocal (all pre-focused to the same plane), the specimen should be nearly in focus — just touch the fine focus.
- For the 100× oil objective: first confirm the 40× view looks good. Rotate the nosepiece to a blank position (between 40× and 100×), place a small drop of immersion oil on the coverslip, then rotate the 100× into position. Use fine focus only — coarse focus at 100× oil risks cracking the slide.
- Close down the aperture diaphragm slightly at high power to increase contrast; opening it increases resolution but lowers contrast. Finding the right balance is part of getting a good image.
Common mistakes and fixes:
- Image too bright, no contrast: Reduce LED intensity or close down the aperture diaphragm slightly.
- Can’t find the specimen: Step back to 4× scanning objective and scan the slide systematically before jumping to high power.
- Image blurry at 100× even with fine focus: Check that the oil drop isn’t bubbled, the coverslip is clean, and you haven’t accidentally gotten oil on the 40× objective (clean it immediately with lens paper if so).
- One eyepiece stays blurry in binocular mode: Adjust the diopter ring on that eyepiece while keeping the other closed.
Step 4 — Shutdown and aftercare
- Lower the stage (or raise the body tube) before removing the slide.
- Rotate back to the lowest-power objective and click it into place.
- Switch off the LED.
- Clean objective lenses with dedicated lens paper only — no tissue, no cotton, no breath-and-wipe. The 100× oil objective must be cleaned after every session; dried immersion oil hazes the glass permanently over time.
- Fit dust caps on objectives when not in use and cover the microscope or store it in its case. Dust on optical surfaces is the silent killer of image quality.
Compound microscope vs. stereo microscope — which do you need?
The most common buying confusion. Quick answer: if you’re looking at a specimen (surface detail, 3-D objects, insects, circuit boards, coins, soldering), get a stereo microscope — lower magnification, enormous working distance, true 3-D view. If you’re looking through a thin specimen (cells, microorganisms, stained tissue sections), get a compound microscope. For a full breakdown see compound vs stereo microscope.
Limitations of a compound light microscope
A compound light microscope is bounded by the Abbe diffraction limit: no matter how good the optics, light-based microscopy cannot resolve structures smaller than roughly 200 nm (0.2 µm). That rules out:
- Viruses (20–300 nm — borderline to invisible)
- Individual protein molecules (~5–10 nm)
- Atoms (~0.1–0.5 nm)
- DNA double helix (~2 nm diameter)
If you need sub-200 nm resolution, you need electron microscopy (SEM/TEM) or a super-resolution fluorescence technique (STED, STORM, PALM) — different tools, different costs, different preparation requirements.
How much does a compound light microscope cost?
Prices have shifted considerably since the early 2020s. Current (2026) market tiers:
- Student / beginner: ~$70–$300. Monocular or basic binocular heads, achromat objectives, built-in LED. Fine for school work and exploring biology as a hobby. Most lack plan objectives and have limited NA on the 40×/100× lenses.
- Serious hobbyist / amateur lab: ~$300–$800. Binocular head, Seidentopf eyepiece tube, plan or semi-plan objectives, better condenser with iris diaphragm, trinocular option for camera attachment. This tier makes a noticeable quality jump.
- Entry professional / clinical: ~$1,000–$5,000. Plan achromat or plan apochromat objectives, proper Köhler illumination, mechanical stage with coaxial controls, often includes phase-contrast or fluorescence capability.
- Research / advanced: $10,000–$50,000+. Motorized stages, DIC, confocal modules, environmental chambers, high-NA apochromat objectives. This is university and clinical-research territory.
Specs to prioritize when buying:
- NA on the 40× and 100× objectives — 40×/0.65 is entry-level; 40×/0.75–0.85 is better. 100×/1.25 is standard; 100×/1.4 is excellent.
- Plan objectives vs. standard (non-plan) — flat-field makes a real difference at 40× and above.
- Binocular head — worth it for any use beyond occasional quick looks.
- LED illumination — lower heat, longer life, consistent color temperature.
- Avoid scopes advertising 2,000× or higher total magnification as a selling point — those figures represent empty magnification, and the actual optical components rarely support even 1,000× usefully.
Frequently asked questions
What is the maximum magnification of a compound light microscope?
The practical useful ceiling is around 1,000× for a standard configuration (10× eyepiece × 100× oil objective). Some research configurations push to 1,500× with higher-magnification eyepieces, but anything beyond ~1,000 × NA enters “empty magnification” territory where enlargement adds no new detail.
Why is the image inverted and backwards under a compound microscope?
The objective forms a real, inverted image inside the body tube. This inversion is a geometric consequence of how a converging lens works when the object is beyond its focal length — the same reason a camera projects an upside-down image on its sensor. The eyepiece doesn’t re-invert it, so the final view is rotated 180°. Moving the slide right moves the image left; moving the slide away moves the image toward you. It becomes second nature within one or two sessions.
What is the difference between a compound microscope and an electron microscope?
A light microscope uses photons of visible light (wavelengths ~380–700 nm) and is limited by the Abbe diffraction limit to ~200 nm resolution. An electron microscope uses a beam of electrons (effective wavelength far shorter — <0.01 nm at typical accelerating voltages) to achieve resolution down to the atomic scale (~0.1 nm for TEM). Electron microscopes require high vacuum, extensive sample preparation (usually fixed and metal-coated), and cannot image living specimens.
How do you calculate total magnification?
Multiply objective magnification by eyepiece magnification. Example: 40× objective × 10× eyepiece = 400× total. If you’re using a camera with a relay lens, factor in the camera adapter’s magnification as well.
Can you see bacteria with a compound light microscope?
Yes — most bacteria are 0.5–5 µm in length, well within the resolution limit of a 100× oil-immersion objective. You’ll need a stained preparation (Gram stain is standard for bacteria) or a phase-contrast objective for unstained live bacteria. At 1,000× you can clearly see cell shape (cocci, rods, spirals) and arrangement (clusters, chains, pairs), but you cannot see flagella or internal molecular structure without electron microscopy.
What is numerical aperture and why does it matter?
NA is the number engraved on every objective barrel (e.g., “40×/0.65”) that describes how much light the objective collects and, by extension, its resolving power. Higher NA = finer detail visible. See numerical aperture and resolution for the full explanation.
Final tips
A few things that separate people who get consistently good results from those who don’t: always start at the lowest power and work up — you’ll find your specimen every time. Learn Köhler illumination setup once properly; it takes five minutes and permanently improves every image you make. Keep the 100× oil objective clean after every session. And when a cheap scope promises 2,000× magnification, understand that the number is marketing — the physics don’t support it.
A good compound light microscope, properly set up and maintained, can last a lifetime. It won’t show you viruses or molecules, but it opens up a genuinely alien world at the scale of cells — and that’s a world most people never get to explore properly.