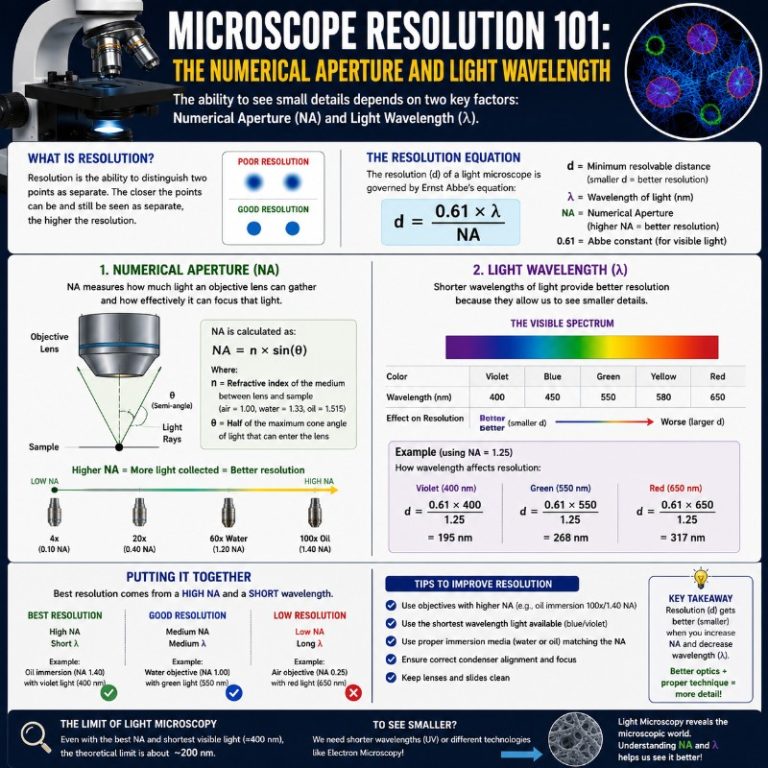
Microscope resolution — the ability to distinguish two closely spaced points as separate — is the true measure of what a microscope can actually reveal, and it is governed by physics, not by the magnification dial. Understanding it changes how you choose objectives, set up illumination, and interpret what you see on a slide. This guide covers the governing formula, the variables you can actually control, and the practical steps that make a real difference at the bench.
What microscope resolution actually means

Microscope resolution, also called resolving power, is the minimum distance between two points on a specimen that the instrument can render as distinct rather than merged. If two features are closer together than that minimum distance, they blur into a single smear regardless of how much you magnify them.
The clearest way to picture this: imagine looking at a diatom frustule under a compound light microscope. At low power the whole shell comes into focus cleanly. As you push to higher objectives you see the pore pattern sharpening — until, somewhere around the 40× mark, you hit a wall. The pores closest together stop resolving. You can push to 100× oil, and they sharpen further, but there is a hard limit past which no objective and no eyepiece can go: roughly 200 nm for visible light. That floor is not a quirk of your microscope — it is the diffraction limit, and it is baked into the physics of light itself.
Simply put: resolution is how much fine detail the image actually contains, separate from how large it appears.
The Abbe diffraction limit — the formula that governs everything
The Abbe diffraction limit defines the smallest resolvable distance d in a light microscope:
d = λ / (2 × NA)

where λ is the wavelength of light and NA is the numerical aperture of the objective (or, more precisely, the combined NA of objective and condenser). A shorter wavelength and a higher NA each push d down — meaning finer detail becomes visible.
The Rayleigh criterion gives a slightly more conservative estimate used in many optics texts:
d = 0.61 × λ / NA

Rayleigh states that two points are just resolvable when the central peak of one Airy disk falls exactly on the first dark ring of the other. In practice, the two formulas give similar results and both are in common use. The Abbe formula is more commonly cited in microscopy; Rayleigh is more common in astronomy and general optics.
Worked example — see the numbers yourself
Take green light at λ = 550 nm, which is a common laser or LED illumination wavelength and sits near the middle of the visible spectrum.
- 100× oil immersion objective (NA 1.4): d = 550 / (2 × 1.4) = 550 / 2.8 ≈ 196 nm
- 10× dry objective (NA 0.25): d = 550 / (2 × 0.25) = 550 / 0.5 = 1,100 nm (1.1 µm)
The 10× objective resolves features roughly five times coarser than the 100× oil. Swapping to blue light (λ ≈ 450 nm) on the 100× oil drops theoretical resolution to about 161 nm — a genuine, measurable improvement, not just a setting change. You can plug your own objective and illumination wavelength directly into this formula to get your system’s theoretical limit.
What factors affect microscope resolution?
Two variables dominate the Abbe formula — numerical aperture and light wavelength — but several practical factors determine whether you actually achieve the objective’s rated limit at the bench.
Numerical aperture
Numerical aperture is defined by the equation NA = n × sin θ, where n is the refractive index of the medium between objective and cover glass, and θ is the half-angle of the maximum cone of light the objective can capture. A higher NA means the lens accepts a wider cone of light, capturing more of the diffracted light from fine specimen features — and it is that captured diffracted light that encodes detail.
The reason this matters in practice: when I swap from a 10× dry objective (NA 0.25) to a 40× dry (NA 0.65) while keeping everything else constant, the improvement in fine detail is immediate and dramatic — the diatom pore edges snap into definition, grain boundaries in a mineral section suddenly separate. But when I go from the 40× dry to the 100× oil (NA 1.4), I need to drop immersion oil on the slide first or the image actually gets worse, not better, because a dry 100× is just a glorified medium-NA objective until the oil is in place.
High NA = high resolution. The practical ceiling for each medium type:
| Immersion medium | Refractive index (n) | Practical NA ceiling |
|---|---|---|
| Air | ≈ 1.00 | < 1.0 |
| Water | 1.33 | up to ~1.2 |
| Glycerol | ≈ 1.47 | up to ~1.35 |
| Immersion oil | 1.515 | up to ~1.4 |
Oil’s refractive index is matched to glass (n ≈ 1.515), which eliminates the air gap between objective and cover glass that would otherwise cap NA below 1.0. That is why oil immersion objectives can reach NA 1.4 while the best dry objectives top out below 1.0 [source].
Light wavelength
Light wavelength is the distance between successive crests of the electromagnetic wave, measured in nanometers (nm). The visible spectrum runs from about 400 nm (violet, ~405 nm is a common laser line) to 700 nm (red). Because resolution scales directly with λ, shorter wavelengths produce finer detail.
A shorter wavelength produces a higher-resolution image. This is why many fluorescence microscopes use 405 nm or 488 nm laser lines rather than white light — the shorter wavelength directly narrows the resolvable distance. Ultraviolet illumination (250–400 nm) pushes further still, though it requires specialized quartz optics because glass absorbs UV. UV microscopy is a real, practical technique used in virology and materials science.

Köhler illumination and condenser alignment
Köhler illumination is the standard method for aligning a microscope’s condenser and light path so that the back focal plane of the objective is evenly filled with light. This matters because the condenser’s NA determines how wide a cone of illuminating light reaches the specimen — and that illuminating cone is half of the resolution equation. A misaligned or stopped-down condenser can reduce effective NA by 30–50%, throwing away much of what your expensive objective is capable of.
In practice: open the condenser aperture diaphragm to roughly 70–80% of the objective’s NA rather than fully open (fully open trades a little contrast for maximum resolution) or fully closed (which destroys resolution despite giving a crisp-looking but detail-poor image). Setting this correctly is one of the highest-impact, zero-cost adjustments most users never make.
Other factors — specimen preparation and optics quality
Even with a top-rated objective and matched illumination, you can lose resolution at the slide. The most common culprits:
- Cover glass thickness. Most high-NA dry and oil objectives are corrected for a standard 0.17 mm (#1.5) cover glass. Using a #1 or #2 coverslip introduces spherical aberration that blurs fine detail — the effect is most severe above NA 0.7.
- Immersion oil bubbles or wrong viscosity. A bubble in the oil path scatters light and collapses resolution immediately. Use a small drop and lower the objective slowly; if bubbles form, lift the objective and re-apply.
- Mounting medium mismatch. Aqueous mounts under an oil objective introduce a refractive-index step that degrades resolution for deeper focal planes.
- Dirty optics. A smear on the front element of the objective — especially common with oil immersion — is one of the fastest ways to lose resolution. Clean with lens tissue and appropriate solvent before attributing softness to anything else.
- Specimen contrast. Resolution is a physical property of the optical system, but perceived resolution in an image also depends on specimen contrast. A stained, high-contrast section will reveal detail that an unstained, low-contrast specimen hides even at identical optical resolution.
Resolution vs magnification — why higher zoom isn’t more detail
Magnification and resolution are not the same thing, and conflating them is the most common mistake beginners make. Magnification is simply how large an image appears; resolution is how much detail it actually contains.
Empty magnification is the term for what happens when you magnify past the resolving power of the objective: the image gets bigger but no new detail appears — the blurry blob just becomes a bigger blurry blob. The rule of thumb: useful magnification tops out at roughly 1000× the objective’s NA. A 40× dry objective at NA 0.65 is optimally useful up to about 650× total magnification. Pushing it to 1000× with a stronger eyepiece adds nothing — you are just enlarging a resolution-limited image.
This is why the NA printed on an objective is more informative than the magnification number when you are evaluating resolving power. A 40× objective at NA 0.95 resolves finer detail than a 60× at NA 0.7, even though the 60× is nominally more powerful. For the highest magnification and greatest resolution, you need both — a high-magnification objective with a correspondingly high NA.
Note also the tradeoff with depth of field: high-NA objectives have shallower depth of focus, which means you may need to focus through a specimen in thin slices to cover it fully. High NA also narrows the field of view, so you see a smaller area of the specimen at once.
Resolution limits by microscope type
The practical resolution ceiling varies dramatically depending on the instrument. The table below uses the Abbe formula at λ = 550 nm to give comparable figures across objective types, with published values for specialized instruments.
| Objective / instrument | Typical NA | Approx. resolution (λ ≈ 550 nm) |
|---|---|---|
| 4× dry | 0.10 | ~2.75 µm |
| 10× dry | 0.25 | ~1.1 µm |
| 40× dry | 0.65 | ~420 nm |
| 100× oil immersion | 1.40 | ~200 nm |
| Confocal (optimal, same objective) | — | ~180 nm lateral / ~500 nm axial |
| Stereo / dissecting microscope | ~0.05–0.1 | ~1–3 µm (varies with working distance) |
| SEM | — | ~1–20 nm |
| TEM / aberration-corrected STEM | — | ~0.05–0.2 nm |
Compound light microscopes
No products found.
Most compound light microscopes use visible-light illuminators — halogen, incandescent, or LED — which constrains λ to 400–700 nm. The diffraction-limited lateral resolution for a high-end oil-immersion system is approximately 200 nm (179 nm theoretical at NA 1.4 with 500 nm light). Features on the specimen that are separated by less than this distance cannot be resolved as distinct, regardless of magnification.
A confocal microscope uses a pinhole aperture to reject out-of-focus light, which dramatically improves axial (z-axis) resolution — down to roughly 500 nm — and enables optical sectioning through thick specimens. Its lateral resolution is only marginally better than wide-field, around 180 nm at optimal settings [source]. If you need a confocal, it is for the optical sectioning capability, not a step-change in xy detail.
Stereo (dissecting) microscopes operate at long working distances with low-NA optics (NA ~0.05–0.1), which places their resolution in the low-micrometre range (~1–3 µm) — well suited to viewing gross specimen structure, insect anatomy, or PCB components, but nowhere near the nanometre range. They are designed for breadth of view and working distance, not fine detail.
Electron microscopes
Electron microscopes bypass the visible-light diffraction limit entirely by using a beam of electrons, whose de Broglie wavelength is orders of magnitude shorter than visible light. Scanning electron microscopes (SEM) typically resolve features in the 1–20 nm range. Transmission electron microscopes (TEM) achieve point resolutions around 0.2 nm, and aberration-corrected STEM instruments can reach 40–80 pm (0.04–0.08 nm) — resolving individual atomic columns. The resolution range for modern electron microscopes is roughly 0.05–20 nm, not “10 to 0.2” as older sources state [source].
How to improve your microscope’s resolution — a practical checklist
These steps are ordered by impact. Work through them in sequence before concluding your system has hit its physical limit.
- Match the objective NA to the task. For sub-micron features, you need NA ≥ 0.65 minimum; for anything close to the 200 nm limit, use a 100× oil objective (NA 1.3–1.4). Using a 10× to investigate cellular organelles is wasted effort — the physics will not cooperate.
- Apply immersion oil correctly with 100× objectives. Place a small drop (2–3 µL) on the coverslip, then slowly lower the objective into contact. Check for air bubbles by looking at the oil meniscus from the side; if you see one, lift the objective, wipe the lens and coverslip with lens tissue, and start again. The wrong oil viscosity or a dried-on residue from a previous session are both common resolution killers.
- Open the condenser aperture diaphragm to ~70–80% of the objective’s NA. Remove the eyepiece, look down the tube, and you will see the back focal plane of the objective filled with a circle of light. Adjust the condenser diaphragm until that circle covers ~70–80% of the back aperture. Fully closing it increases contrast but costs resolution; fully opening it maximizes resolution but reduces contrast slightly — 70–80% is the practical sweet spot.
- Align Köhler illumination. Focus the field diaphragm image onto the specimen plane using the condenser height adjustment, center it with the condenser centering screws, then open it to just beyond the field of view. This ensures even, optimal illumination that fills the condenser NA uniformly.
- Use shorter-wavelength illumination where possible. If your microscope has a green or blue filter, use it. Green (546 nm) is a common choice because it maximizes achromat correction; blue (450–488 nm) gives the best resolution but reduces contrast on unstained specimens. For fluorescence, the excitation wavelength is usually fixed by your fluorophore.
- Verify your resolution with a calibration target. A stage micrometer confirms magnification calibration; a USAF 1951 resolution target lets you directly measure the finest bar pattern your system can resolve. This is the only way to know whether your system is performing to spec or whether something — dirty optics, a bubbled oil path, misaligned condenser — is robbing you of resolution.
Beyond the diffraction limit — super-resolution techniques
Super-resolution microscopy breaks the ~200 nm Abbe barrier using physical tricks that circumvent diffraction rather than fight it. STED (stimulated emission depletion) uses a doughnut-shaped depletion beam to shrink the effective fluorescence spot below the diffraction limit — achieving 20–50 nm lateral resolution. STORM and PALM localize individual fluorescent molecules one at a time and reconstruct a composite image, reaching 10–20 nm. SIM (structured illumination microscopy) uses patterned illumination to roughly double resolution to ~100 nm and works on live cells with standard fluorophores.
Each technique requires specialized equipment and sample preparation, but they are now available in core facilities worldwide and are not exotic. For a full breakdown, see our guide to super-resolution techniques like STED and STORM.
How to check your microscope’s resolution yourself
You do not need a specialist facility to get a rough measurement. Two common methods:
- Stage micrometer: A slide with a scale bar etched at known intervals (typically 0.01 mm = 10 µm). Focus on it, photograph, and measure the finest divisions you can clearly separate. This tells you practical resolving power in real imaging conditions.
- USAF 1951 test target: A standard resolution chart with bar groups down to 0.78 µm per line pair (group 9, element 1 on a standard target). Focus on it and identify the finest group where you can separate the three-bar elements. Each group corresponds to a specific line pair per millimeter — straightforward to convert to a resolving distance. This is the fastest way to diagnose whether a system change (new oil, cleaned objective, adjusted condenser) actually improved resolution or just felt like it did.
Frequently asked questions
What is the formula for microscope resolution?
The Abbe formula: d = λ / (2 × NA), where d is the minimum resolvable distance, λ is the wavelength of light, and NA is the numerical aperture of the objective. The Rayleigh criterion gives d = 0.61 × λ / NA. Both formulas show that resolution improves with shorter wavelength and higher NA.
What is the maximum resolution of a light microscope?
The diffraction-limited lateral resolution of a visible-light microscope is approximately 200 nm (~0.2 µm), achieved with a 100× oil immersion objective at NA 1.4 using green light. This is a hard physical limit set by the wavelength of visible light, not a limitation of any particular instrument.
Does higher magnification mean higher resolution?
No. Magnification and resolution are independent. Increasing magnification past roughly 1000× the objective NA produces “empty magnification” — a larger image with no additional detail. Resolution is set by NA and wavelength, not the eyepiece or total magnification.
How does numerical aperture affect resolution?
Numerical aperture (NA = n × sin θ) determines how much of the diffracted light from fine specimen features the objective can capture. A higher NA captures a wider cone of light, encoding more spatial information and yielding a smaller resolvable distance — finer detail. Doubling the NA (roughly) halves the resolvable distance.
Why does shorter wavelength improve resolution?
Because resolution is directly proportional to wavelength (d = λ/2NA). Shorter wavelengths produce smaller diffraction patterns (Airy disks), allowing two closely spaced points to be distinguished before their patterns overlap. Violet light at 405 nm resolves roughly 1.5× finer detail than red light at 700 nm at the same NA.
What is the difference between resolution and magnification?
Magnification scales the apparent size of the image. Resolution determines the finest detail contained in that image. A 1000× image of a specimen can look large but be completely blurry — high magnification, poor resolution. True useful magnification requires both adequate magnification and sufficient NA to support it.
What is the diffraction limit / Abbe limit?
The Abbe diffraction limit is the minimum spatial feature that an optical microscope can resolve, set by the wave nature of light. For visible-light microscopy it is approximately 200 nm under ideal conditions. Features closer together than this limit merge into a single blurred spot regardless of how sophisticated the optics are. Super-resolution techniques like STED and STORM use physical tricks to break this barrier.
What is the resolution of an electron microscope vs a light microscope?
A compound light microscope resolves down to ~200 nm. Scanning electron microscopes (SEM) achieve ~1–20 nm. Transmission electron microscopes (TEM) reach ~0.2 nm, and aberration-corrected STEM instruments can resolve individual atomic columns at 0.04–0.08 nm. Electron microscopes bypass the visible-light diffraction limit because electron de Broglie wavelengths are far shorter than visible light wavelengths.
Conclusion
Microscope resolution is governed by a single formula — d = λ / (2 × NA) — and every practical improvement traces back to it: higher NA through immersion media, shorter illumination wavelength, proper Köhler alignment to actually realize the objective’s rated NA. Magnification is a separate variable that adds nothing once it exceeds roughly 1000× the objective NA. For visible-light microscopy the diffraction-limited floor is approximately 200 nm; electron microscopes and super-resolution techniques push far below it, each by different mechanisms. The most actionable next step: identify which objective you most commonly use, calculate its theoretical resolution using d = λ / (2 × NA) with your illumination wavelength, and then run through the six-step checklist above to confirm your system is actually achieving it — or find out what is holding it back.
Last update on 2026-09-13 / Affiliate links / Images from Amazon Product Advertising API