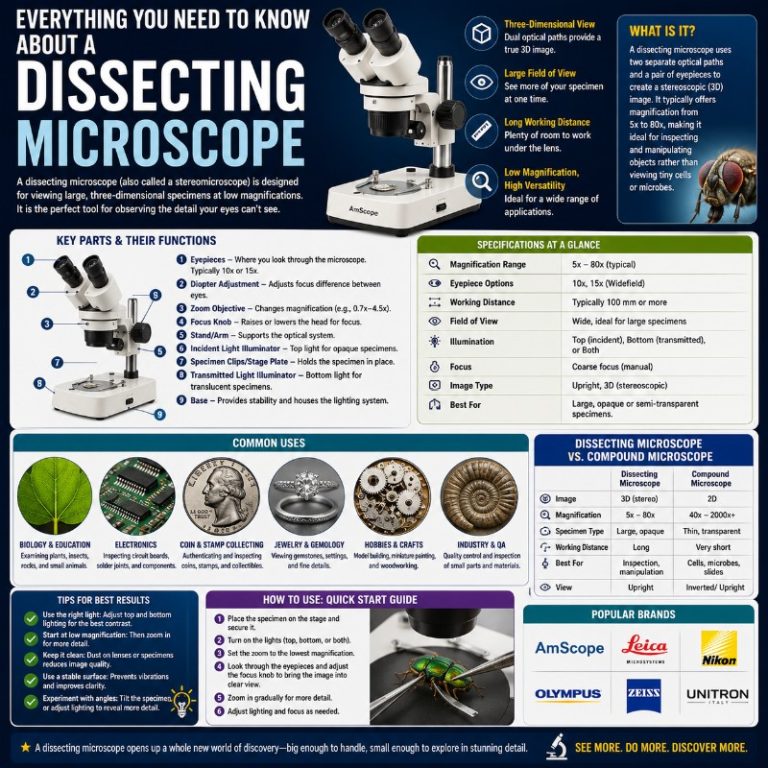
A dissecting microscope — also called a stereo microscope — gives you a true three-dimensional view of whole, opaque specimens at low magnification, making it the go-to tool for anyone who needs to work with their hands while looking through the eyepieces. Whether you’re pinning an insect, inspecting a solder joint, or grading a gemstone, this is the scope that keeps the object in full view and leaves room for your tools.
Dissecting microscope vs stereo microscope: are they the same thing?
Yes — completely interchangeable terms. “Stereo” describes the optics: two separate angled light paths that give each eye a slightly different view, producing genuine depth perception. “Dissecting” describes the original use case: you can reach under the lens with scalpels, forceps, or soldering irons while observing in real time. Every stereo microscope is a dissecting microscope; every dissecting microscope is a stereo scope. You’ll see both names used on spec sheets, in lab manuals, and in search results — they mean the same instrument (Wikipedia: Stereo microscope).
How a dissecting microscope produces a 3D image
The three-dimensional effect comes from two completely separate optical paths that converge on the specimen at an angle of roughly 10–12° (Nikon MicroscopyU). Your left eye and right eye each receive a slightly different view of the same object — exactly what happens when you look at anything in normal life. Your brain fuses the two views into a single image with genuine depth.
This is categorically different from a binocular compound microscope. A binocular compound scope also has two eyepieces, but both eyes receive the same single image — a beam splitter or prism divides one optical path into two. The result is flat and two-dimensional. The stereo scope’s two entirely separate objectives and prism systems are what create the 3D view, not simply having two eyepieces.
The two main optical designs that achieve this are:
- Greenough design — two complete angled optical systems in one body. Less expensive, high numerical aperture, slight keystone distortion on flat surfaces. Most entry and mid-range scopes use this.
- Common Main Objective (CMO) design — one large shared objective lens splits the light via prisms into two paths. Longer working distance, better camera integration, minor “doming” effect on perfectly flat specimens. Standard on professional research and industrial models.
Magnification: fixed-power vs zoom stereo models
The familiar “10x–40x” figure only describes basic fixed-power models. There are two distinct categories:
- Fixed-power models — a set of paired objectives gives discrete steps (commonly 10x, 20x, 40x). Simple, reliable, and less expensive. Nothing to go wrong with the zoom mechanism.
- Zoom stereo models — a continuously variable zoom objective (commonly 0.7x to 4.5x) multiplied by 10x eyepieces gives a smooth 7x to 45x range (6.5:1 zoom ratio). You turn a knob and the image grows or shrinks without swapping objectives. This is the most practical format for dissection and inspection work where you constantly shift between surveying the whole specimen and examining a detail.
Magnification formula:
Total magnification = eyepiece magnification × objective magnification

Examples with a 10x eyepiece pair:
10x eyepiece × 0.7x zoom = 7x (survey view)
10x eyepiece × 2.0x zoom = 20x (working view)
10x eyepiece × 4.5x zoom = 45x (detail view)
The whole category stays under roughly 100x total magnification — well below a compound microscope’s 40x–1000x+ range. You’re trading magnification for working distance, depth of field, and a workable three-dimensional view.
Working distance: why it matters more than you’d think
Working distance is the gap between the bottom of the objective and the top of your specimen. On a stereo scope, it typically ranges from 20 mm to 140 mm, with a comfortable bench value around 100 mm (about 4 inches). That 4-inch clearance is what makes the “dissecting” part of the name mean something: you can reach in with forceps to flip an insect wing, hold a soldering iron steady while watching a joint flow, or turn a gemstone without banging it into the lens.

On a compound microscope, the objective nearly touches the slide. That’s fine for thin, stained sections — but you’d never get a tool under there. Working distance is the single spec most often ignored by first-time buyers and most regretted afterward.
What is a dissecting microscope used for?

The stereo scope’s combination of 3D view, long working distance, and wide field makes it the right tool across a surprisingly broad range of fields:
School and college laboratories
Students dissecting frog specimens, examining insect anatomy, or observing seed germination all benefit from the stereo scope’s ability to keep the whole specimen in view while allowing hands-on work. Low magnification means the whole object stays in frame — no hunting around like you do at 400x on a compound scope.
Electronics and PCB rework
Surface-mount components can be smaller than 1 mm. Soldering, re-flowing, or inspecting solder joints on a circuit board at 10x–20x with both hands free is where stereo scopes earn their keep in commercial electronics labs. A long working distance is non-negotiable here — you need room for the iron.
Gemology and jewelry
Gemologists use stereo scopes to examine inclusions, assess surface finish, and grade stones under consistent illumination. The dual-illumination capability — incident light from above for surface features, transmitted light from below for clarity — makes internal and external characteristics readable in one sitting. At 10x, inclusions invisible to the loupe become apparent; at 40x, growth patterns and treatment artifacts show clearly.
Watchmaking and micro-assembly
Setting jewels, fitting hairsprings, and aligning escapement parts under a stereo scope is standard practice for watchmakers. The 3D depth perception is essential — flat images won’t tell you whether a pivot is seated or hovering a fraction of a millimeter above its hole.
Botany and entomology
Whole flowers, leaf surfaces, insect wings, and beetle elytra are opaque, three-dimensional objects. A compound scope would require destructive thin-sectioning to see anything. A stereo scope lets you examine the full specimen as-is: the iridescence of a fly’s compound eye, the venation of a moth wing, the trichomes on a cannabis leaf — all visible without mounting, staining, or destruction. See what viewing insects under a dissecting microscope actually looks like.
Biological research and microsurgery
Stereo scopes are used for micro-dissection in research settings — excising tissue, isolating embryos, performing fine needle work. Note that surgical operating microscopes used in the operating theater are a distinct product category: floor- or ceiling-mounted, much higher optical quality, sterile-field optics, and costs of $20,000–$100,000+. Bench stereo scopes share the same 3D optical principle but are not interchangeable with surgical scopes.
Coin, stamp, and mineral collecting
Coin graders use incident light to read die marks and surface luster; stamp collectors examine perforations and paper texture; lapidary hobbyists check cutting quality and natural crystalline structure. All are opaque surfaces that photograph terribly but look stunning at 10x–20x under raking light.
Dissecting vs compound vs digital: comparison
The table below compares the three main microscope formats. For a broader overview of all scope types, see our guide to different types of microscopes (Microscope World).
| Feature | Dissecting (stereo) | Compound | Digital / USB |
|---|---|---|---|
| Typical magnification | 7x–45x (under ~100x) | 40x–1000x+ | 10x–250x (screen-dependent) |
| Image | 3D (true stereoscopic) | 2D (flat) | 2D (flat, on-screen) |
| Primary light path | Reflected/incident (top) | Transmitted (bottom) | Either (model-dependent) |
| Specimen type | Opaque, solid, whole objects | Thin, translucent sections/slides | Either (low resolution) |
| Working distance | 20–140 mm (~100 mm typical) | 0.1–10 mm | Variable (10–200 mm) |
| Hands-free work | Yes — designed for it | No — objective nearly touches slide | Limited |
| Best for | Dissection, assembly, inspection, collecting | Cell biology, histology, microbiology | Sharing images, kids, remote viewing |
| Price range | $50–$5,000+ | $100–$3,000+ | $20–$300 |
Parts of a dissecting microscope
Understanding the parts helps you set up quickly and troubleshoot confidently the first time something looks wrong.
Objective lens (or zoom objective)
On a fixed-power model, two separate objectives connect to each eyepiece; you rotate a turret to change power. On a zoom model, a single continuously variable zoom block sits between the eyepieces and the specimen — a zoom ratio knob on the side moves the internal optics. The objective is the lens closest to your specimen and does most of the magnification work.
Ocular lenses (eyepieces)
Most stereo scopes ship with 10x eyepieces. The field of view at any given total magnification is directly tied to the eyepiece’s field number — wider field numbers mean you see more of the specimen at once. Wide-field 10x eyepieces (field number 22–23) are standard on mid-range models; some accept 20x eyepieces to push maximum magnification if the objective supports it.
Diopter adjustment
One eyepiece — usually the left — has a rotating diopter ring. Its job is to compensate for the difference in vision between your two eyes so both images merge into one sharp 3D view. The beginner mistake: skipping this adjustment and then spending the whole session fighting double vision or eye strain. Set it once per session: close your left eye, focus on the specimen with the focus knob using your right eye only, then close your right eye and adjust the diopter ring (not the focus knob) until the left eye’s image is equally sharp.
Interpupillary distance adjustment
The eyepiece tubes slide apart or together to match the distance between your pupils (typically 55–75 mm). If you skip this, you’ll either see two separate circles instead of one merged image or squint uncomfortably. Slide the tubes until you see a single circular field with no dark edges.
Focus knob
Entry and mid-range scopes use a rack-and-pinion mechanism: a toothed rack on the stand and a gear (pinion) on the focus knob that drives the entire head up and down. Premium models add a coaxial coarse/fine focus — two concentric knobs, one for coarse repositioning and one for fine focus — on a focus block that slides along a post. If you share a scope with multiple users or work at variable specimen heights (e.g., inside a container vs flat on the stage), the coaxial focus is significantly faster and less fatiguing.
Illumination
Modern stereo scopes use LEDs, not “natural light.” There are two modes, and many mid-range and above scopes have both:
- Incident / reflected (top) light — shines down onto the specimen and reflects back up through the objectives. Use this for opaque objects: coins, insects, PCBs, rocks, jewelry. This is the primary mode for most dissecting work.
- Transmitted (bottom) light — shines up through a glass stage plate from below. Use this for thin or translucent specimens — botanical sections, thin rock slices, small translucent invertebrates. Bottom light turns opaque objects into silhouettes, so switch back to top light for anything solid.
Accessories like LED ring lights (which mount around the objective) and fiber-optic gooseneck illuminators let you direct light precisely — useful for raking light to reveal surface texture, or for illuminating inside a cavity.
Stage plate
The flat surface your specimen rests on. Most scopes include reversible black-and-white stage plates: white for dark specimens, black for pale or reflective ones. Some include a glass insert for transmitted light. Stage clips are small spring clips that hold flat specimens steady — useful for slides or paper, less so for irregular 3D objects, which you simply place on the stage.
Trinocular port
Higher-end models add a third vertical tube above the stereo head for a C-mount camera adapter. A lever or knob routes some light to the camera (often 50/50 or 20/80 eye/camera splits). This is how educators project live images to a classroom screen, how PCB shops document repair work, and how entomologists photograph specimens for publications. If you plan to photograph through the scope, look for a trinocular model — adapter setups on binocular tubes are awkward and optically compromised.
History of the dissecting microscope
The full history of the microscope stretches back centuries, but the stereo-specific story begins in 1677, when a Capuchin monk named Cherubin d’Orléans (1613–1697) applied the binocular-telescope principle to a microscope — two separate eyepiece and objective systems so an observer could use both eyes at once. His goal was brighter, less fatiguing images, not 3D vision. Because both of his optical systems were inverting and placed side by side (rather than at converging angles), his design actually produced a pseudoscopic effect — depth was accidentally reversed, not reproduced correctly. A true working stereo effect awaited a better understanding of binocular vision.
That understanding came from Sir Charles Wheatstone, who demonstrated the principle of stereoscopic vision to the Royal Society in 1832 and published his foundational paper “On Some Remarkable, and Hitherto Unobserved, Phenomena of Binocular Vision” in 1838 (and elaborated further in 1852). Wheatstone showed that the brain fuses two slightly offset images into a single 3D percept — the same principle that makes both your natural vision and a stereo microscope’s two angled paths produce depth (Leica Microsystems). His work gave instrument makers the theoretical basis to deliberately engineer converging optical paths.
The 20th century brought the continuous-zoom stereo scope: the American Optical (AO) Cycloptic (1957) introduced a comfortable ~4-inch (100 mm) working distance that became the industry benchmark, and Bausch & Lomb’s StereoZoom (1959) popularized the continuously variable zoom objective. Both designs remain the basis of modern stereo scopes.
How to use a dissecting microscope

Preparation
- Carry the microscope with both hands — one on the arm, one under the base. The head can swing on cheaper models if you grab only the arm.
- Place it on a stable, level surface. Vibration kills fine focus; don’t put it on a bench next to heavy equipment running at speed.
- Select your stage plate (black or white) and illumination mode (top for opaque, bottom for translucent) before placing the specimen. If you’re working with biological material, read up on preparing specimens for viewing first.
Setup — do this every session
- Set magnification to its lowest power. A wide field of view makes finding and centering the specimen far easier. Beginners almost always start too high and can’t find anything.
- Adjust interpupillary distance: slide the eyepiece tubes until you see one circular field with no dark gaps at the edges.
- Set diopter: close your left eye, use the focus knob to sharpen the image with your right eye only. Then close your right eye and adjust the diopter ring (not the focus knob) until the left eye’s image is equally sharp. The two images should now fuse cleanly.
- Place your specimen on the stage, then use the focus knob to bring it into focus.
Viewing and working
- Zoom in gradually — don’t jump to maximum magnification. Find the region of interest at low power first, then zoom in.
- If you’re dissecting or doing fine work, rest your forearms on the bench surface to steady your hands. Even small tremors are amplified significantly at 20x–40x.
- Adjust the lighting angle or intensity rather than just increasing magnification when surface detail is hard to read. Raking incident light (low angle from the side) reveals texture that front-on illumination flattens completely.
Aftercare
- Remove the specimen and clean the stage plate. Biological specimens, adhesives, or solder flux residue will harden and etch the plate surface if left.
- Lower the head to its lowest position — reduces mechanical stress on the focus block during storage.
- Clean lenses only with lens tissue and lens cleaning solution. Never use paper towels, clothing, or compressed air that could deposit moisture. Breathe gently on the glass first if needed, then wipe in a spiral from center outward — never circular scrubbing motions.
- Replace the dust cover. Dust on the eyepiece lenses appears as stationary dark spots that move when you rotate the eyepiece — annoying and entirely preventable.
- Store in a cabinet or on a shelf with the cover on. A microscope left on an open bench collects dust daily and the foam armrests yellow under UV.
Price tiers: what to expect
- Entry ($50–$150) — Fixed-power models, plastic construction, basic top lighting. Fine for a first scope, school use, or occasional hobbyist work. Optical quality varies significantly at this tier; read reviews for sharpness and edge distortion before buying.
- Mid-range / zoom ($200–$500) — Zoom stereo heads (7x–45x), LED top and bottom illumination, metal construction, sometimes trinocular. This is where most hobbyists, educators, and small shop users land. AmScope, Omax, and Swift offer solid value here.
- Professional ($1,000+) — CMO design, apochromatic optics, research-grade illumination, modular accessory systems (ergo heads, camera ports, fluorescence). Leica, Zeiss, Nikon, and Olympus own this tier. Lifespan measured in decades.
FAQ
What magnification does a dissecting microscope have?
Fixed-power models: typically 10x, 20x, and 40x as discrete steps. Zoom models: continuously variable from 7x to 45x (0.7x–4.5x zoom objective × 10x eyepieces). The category stays under ~100x total magnification.
Does a dissecting microscope give a 3D image?
Yes — it’s the defining feature. Two separate optical paths at a ~10–12° convergence angle give each eye a slightly different view; your brain fuses them into a stereoscopic image with genuine depth perception.
Why is it called a dissecting microscope?
Because the long working distance and 3D view let you work with dissection tools (scalpels, forceps, probes) on your specimen while watching through the eyepieces. You’re not just observing — you’re actively manipulating.
What is the working distance of a stereo microscope?
Typically 20–140 mm depending on the model. A classic comfortable working distance for bench use is around 100 mm (~4 inches) — enough room to get a gloved hand and instrument in without touching the objective.
Can you see cells with a dissecting microscope?
No. At 7x–45x, cells are below the resolution threshold. You see surfaces, structures, and whole small organisms — not individual cells. For cell-level detail you need a compound microscope at 100x–400x or higher.
What’s the difference between incident and transmitted illumination?
Incident (top) light reflects off the specimen’s surface — use it for opaque objects. Transmitted (bottom) light passes up through the specimen — use it for thin, translucent materials. Many stereo scopes have both; switch based on whether your specimen is solid or see-through.
Is a dissecting microscope the same as a stereo microscope?
Yes, completely. The two names describe the same instrument from different angles: “stereo” for the optics, “dissecting” for the primary use case.
Conclusion
A dissecting microscope is built for one thing: giving you a clear, three-dimensional view of a whole specimen while your hands stay free to work. Its 7x–45x zoom range, 100 mm working distance, and reflected-light illumination make it the right tool for dissection, inspection, assembly, and collecting — tasks a compound microscope’s flat image and near-zero working distance can’t support. The key decisions when choosing one are zoom vs fixed-power, illumination options (top only vs top-and-bottom), and whether you need a trinocular port for a camera. Start at the lowest magnification, set your diopter every session, and match your stage plate color to your specimen — and the scope will do the rest.
If you’re ready to go deeper, our stereo microscope guide covers model comparisons, buying advice, and advanced techniques for getting the most out of your scope.