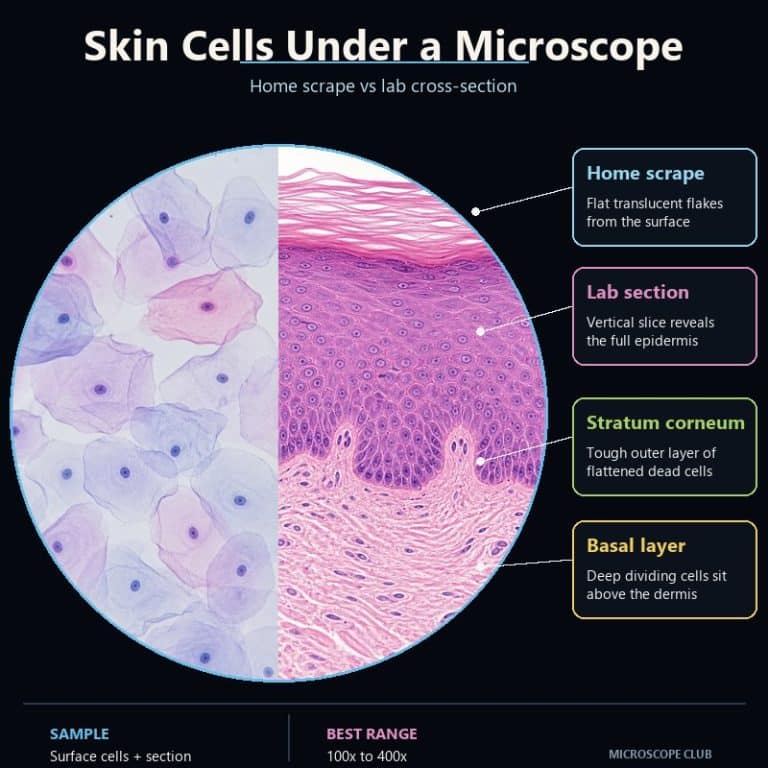
Skin cells under a microscope look nothing like the tidy textbook diagram most people expect: a simple home scrape shows a single sheet of flat, colorless, dead cells with no visible layering at all. The famous five-layer structure of the epidermis — from the tough outer stratum corneum down to the actively dividing stratum basale — only shows up in a professionally stained, vertical cross-section of a skin biopsy. It’s not something you can prepare on a kitchen table. This guide covers both views: how to look at your own skin cells and what you’ll realistically see, then the full layer-by-layer anatomy that only a lab section reveals.
How to Look at Your Own Skin Cells (Step by Step)
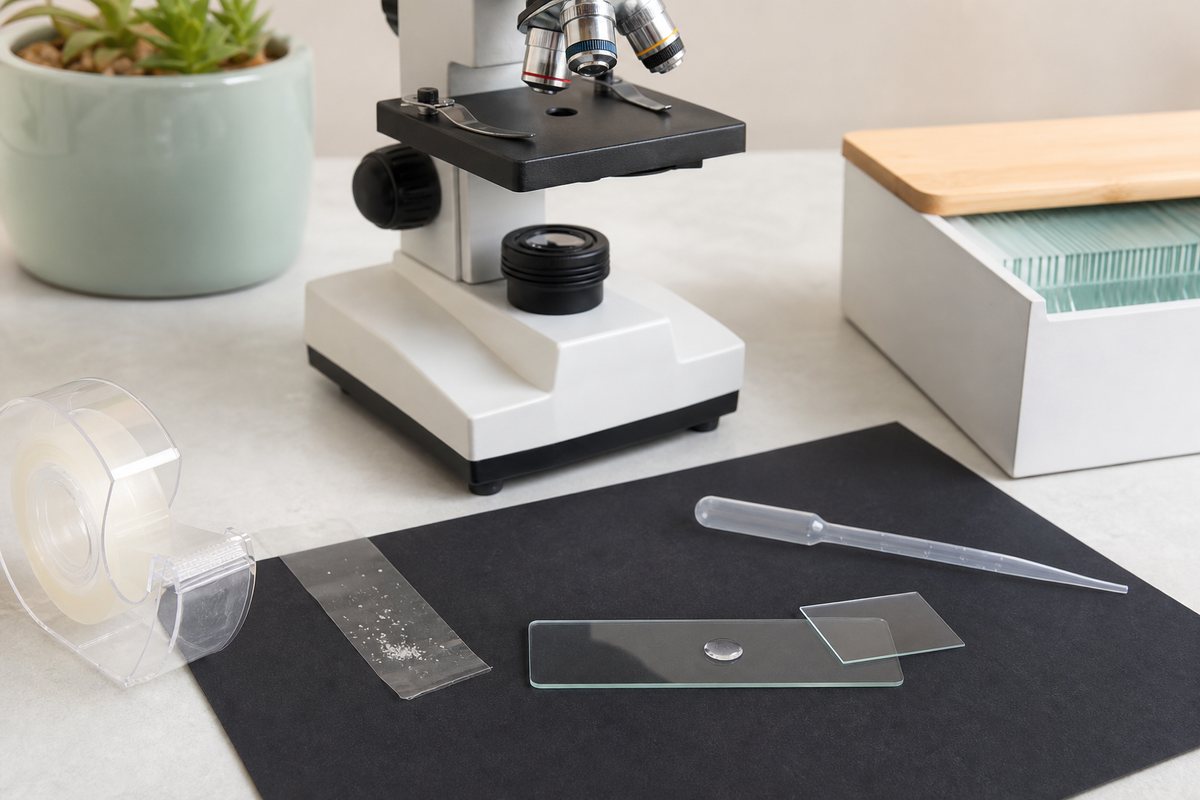
You don’t need lab equipment for this — a compound microscope, a strip of clear tape or a clean toothpick, and a naturally dry patch of skin are enough to get a usable slide.
- Find a naturally flaky patch. Elbows, shins, and heels right after a shower, or any patch that’s dry from cold weather, work best. The scalp works too — dandruff flakes are shed skin cells too, just from a different patch of skin. You want skin that’s already lifting on its own, not skin you have to force.
- Lift the flakes gently. Press a short strip of clear tape onto the flaky patch and peel it back — it will carry off a thin, roughly single-cell-thick layer of shed cells. A gentle scrape with the edge of a clean toothpick or a fingernail works too. Either way, you’re collecting what’s already loose, not digging into live skin.
- Build a wet mount. Press the tape sticky-side down onto a microscope slide, or transfer scraped flakes into a drop of water and lower a coverslip at an angle so you don’t trap air bubbles underneath. If you haven’t made one before, walk through how to make a wet mount slide first.
- Add a light stain (optional). A single drop of dilute methylene blue or iodine at the edge of the coverslip, wicked through with a torn corner of paper towel, adds contrast to otherwise near-transparent cells.
- Focus at 100x–400x. Start around 100x total magnification to find a thin, spread-out patch of flakes, then move up to 400x for individual cell detail. Close down the condenser diaphragm as you go — unstained squamous cells are so transparent that extra light washes them out completely. For a refresher on the full prep process, see how to prepare microscope slides.
One note before you start: this is an observation exercise, not a diagnostic one. Looking at your own skin cells under a microscope can’t tell you anything about a mole, rash, or infection — see a dermatologist for that. Stick to lifting flakes that are already loose; scraping hard enough to reach live skin risks bleeding and infection for no real payoff, since living basal cells aren’t what a surface sample collects anyway.
What You’ll Actually See (Home View)
Under the scope, a home skin-flake slide looks less like “cells” and more like shattered safety glass — flat, irregular, roughly polygonal plates that overlap and curl at the edges like scattered crazy paving. Unstained, they’re nearly colorless and semi-transparent, so at first you’ll find yourself hunting for edges against the light rather than seeing solid shapes. Add a wash of methylene blue and the plates pick up a faint blue tint, but most show no visible nucleus at all — just a faint ghost outline, or nothing, which surprises anyone expecting the dark, round nucleus from a textbook cell diagram. That absence is the point: these are dead corneocytes, roughly 30–50 µm across, and dead cells don’t keep a nucleus.
Expect some visual noise too. Flakes drape and crease where they lifted, sometimes stacking two or three deep so your focus drifts between layers of debris, and air bubbles or stray lint are usually the biggest distraction on the slide. If the sample dries out before you get it under the lens, the cells shrivel and crack, so work quickly and keep the mounting drop wet until you’re done looking. A clump that’s too thick will just read as an opaque blob — thin, spread-out flakes resolve far better than a heavy scrape.
Why Your Home Slide Shows No Layers
The epidermis is built from five stacked layers, but a home scrape only ever samples one of them: cells shed from the very top. Loose skin flakes come from the stratum corneum, the outermost dead, fully keratinized layer, and once a cell has reached that point it exists as an isolated flat plate with no visible connection to whatever produced it several layers down. Seeing the actual layering requires a vertical slice through the full thickness of the skin — fixed, embedded, thinly sectioned, and stained the way bone tissue is prepared for histology — and that’s lab work, not a kitchen-table project.
| Home Flake Mount | Lab Biopsy Cross-Section | |
|---|---|---|
| What you see | Flat, overlapping dead plates, one layer | All five stacked epidermis layers |
| Prep required | Tape-lift or gentle scrape, wet mount | Fixation, paraffin embedding, microtome sectioning, H&E stain |
| Cells alive or dead | Dead (corneocytes) | Mixed — dead at the surface, living below |
| Layering visible | No | Yes, all five layers distinct |
| Magnification | 100x–400x | 100x–400x |
The Five Layers of the Epidermis (the Lab Cross-Section View)
On a stained vertical section, the epidermis reads as five distinct bands from deep to superficial. Keratinocytes make up about 90% of the cells you’re looking at, being manufactured in the bottom layer and pushed upward as they flatten, die, and fill with keratin.

- Stratum basale — the deepest layer, a single row of column-shaped cells sitting directly on the basement membrane. This is the mitotically active layer that manufactures every cell above it, which is why it’s also called the stratum germinativum. Melanocytes, the pigment-producing cells, sit scattered among the basal cells here, along with touch-sensing Merkel cells.
- Stratum spinosum — the “prickle cell” layer, several rows of polyhedral keratinocytes connected by desmosomes. Those connections give the cells a spiny, bridged outline once fixed and sectioned. Langerhans cells, part of the skin’s immune defense, live in this layer too.
- Stratum granulosum — a thin band of flattened cells packed with dark-staining keratohyalin granules, giving it a grainy purple-blue look on an H&E section. Cells here are actively dying, losing their organelles as they’re pushed further from the blood supply below.
- Stratum lucidum — a thin, clear band of dead cells found only in thick (glabrous) skin — the palms of the hands and soles of the feet. Most body skin skips this layer entirely, which makes it a common point of confusion.
- Stratum corneum — the outermost layer, 15 or more sheets of flattened, dead, anucleate corneocytes packed with keratin. On a stained section it looks like pale, pink, basket-woven strands; in life, it’s the layer that continually sheds — the same layer a home flake sample comes from.
Dermatopathologist-reviewed anatomy references, like the StatPearls epidermis overview and Kenhub’s histology of the skin, walk through the same five-layer sequence in more anatomical depth if you want to go further.
Skin Cells vs. Cheek Cells vs. Other Squamous Cells
Skin flakes and human cheek cells look strikingly similar under the scope, and there’s a reason: both are squamous epithelial cells, the same broad shape class of flat, plate-like cells. The visible difference comes down to keratinization and life status rather than shape. Cheek cells are living, non-keratinized squamous cells swabbed from the inside of the mouth, and they usually show a clear, stainable nucleus. Skin flakes are dead, fully keratinized corneocytes shed from the stratum corneum, and — as the previous section covers — most show no nucleus at all. If you want a very different comparison point, the neat, rigid grid of onion cells shows what a plant cell wall does that no human squamous cell ever will.
Below the Epidermis (Brief)
A full-thickness biopsy section shows more than the epidermis. Beneath it sits the dermis — a thicker layer of collagen and elastin fibers, blood vessels, hair follicles, sweat glands, and nerve endings — and beneath that, the hypodermis, a fatty layer that cushions and insulates. Neither is visible on a home skin-flake slide; both only appear in the same kind of vertical, stained cross-section that reveals the epidermal layers. It’s worth remembering that the hair growing out of that same skin is its own distinct structure worth a look — see human hair under a microscope if you want to compare.

Frequently Asked Questions
What magnification do you need to see skin cells?
100x–400x total magnification is the practical range. 100x is enough to locate a thin, spread-out patch of flakes; 400x resolves individual cell edges and any faint nucleus ghosting after staining.
Are the cells you scrape off dead or alive?
Dead. A surface scrape or tape-lift collects corneocytes from the stratum corneum, the outermost layer of fully keratinized, anucleate dead cells. Living keratinocytes stay several layers below, in the stratum basale and stratum spinosum.
Will anything besides skin cells show up on my slide?
Almost always, yes. Air bubbles, textile lint, and dust are the most common contaminants on a home flake slide, and they’re often more visually obvious than the transparent cells themselves. A thin, well-spread sample and a slow, deliberate mounting technique cut down on this noise.
Do I need to stain the slide to see anything?
No, but it helps. Skin flakes are visible unstained if you close down the condenser diaphragm to boost contrast against the near-transparent cells. A light methylene blue or iodine wash makes the plate edges and any faint nucleus remnants noticeably easier to pick out.
Can a cheap toy or phone-clip microscope show skin cells?
Not reliably. Resolving individual corneocyte edges and any nucleus detail needs a real compound microscope reaching at least 100x–400x with a functioning condenser and diaphragm. Low-power toy scopes and most phone-clip lenses top out well below the magnification this specimen needs.
Why do my flakes look colorless instead of pink like textbook photos?
Textbook photos are almost always stained, professionally sectioned lab slides — the pink comes from eosin in an H&E stain. An unstained home flake sample has no dye in it at all, so the cells stay pale and nearly transparent unless you add your own stain.
Conclusion
The gap between “what a home slide shows” and “the textbook five-layer diagram” comes down entirely to sample prep: a surface scrape only ever reaches the dead, shed top of the stratum corneum, while the layered structure you know from anatomy class needs a full-thickness, stained cross-section that no home setup can produce. Once that distinction clicks, both views make sense on their own terms — the flat, colorless plates under your own scope, and the five-layer stack in a lab image, are simply two honest windows onto the same tissue.
Have you tried lifting your own skin flakes for a look? Tell us what you found — and whether staining changed what you could see — in the comments below.