The condenser of a microscope is the component most beginners ignore — and ignoring it is exactly why their images look flat, dim, or ringed with colour. Sitting between the light source and the stage, it gathers divergent light from the lamp and focuses it into a precise cone that fills the objective lens. Get it right and the difference is visible in seconds; leave it at factory position and you may never see what your objectives are actually capable of.
What Is the Condenser of a Microscope?

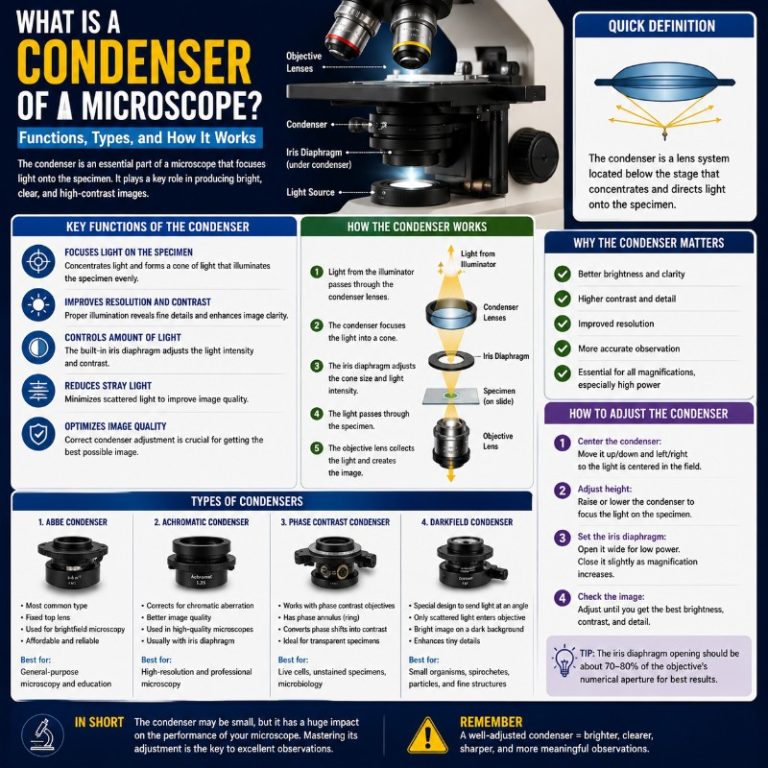
The condenser — sometimes called the substage condenser — is an optical assembly positioned directly beneath the stage, between the light source and the specimen. It consists of two to four lens elements plus an iris aperture diaphragm and, on most models, a swing-out (flip-top) top lens. Together these parts convert the broad, divergent beam from the lamp into a controlled cone of light that precisely illuminates the specimen.
The condenser’s job is not simply to add brightness. It controls the angle and numerical aperture (NA) of the illuminating cone, which directly determines the maximum resolution your objective can deliver. A condenser that is misaligned, racked too low, or set to the wrong aperture limits every objective it works with — regardless of how expensive those objectives are.
Location: the condenser sits on a vertical carrier beneath the stage and is moved up or down with the condenser focus knob, usually a small knurled ring separate from the coarse/fine focus knobs.
A Brief History of the Microscope Condenser
Early compound microscopes had no substage condenser at all. Observers relied on a concave mirror to redirect ambient or candle light upward through the specimen — a setup that was inconsistent and completely dependent on the brightness of the room.
The path toward the modern condenser began with better objectives, not better illumination. In 1830, British physicist Joseph Jackson Lister published his achromatic objective design, correcting both chromatic and spherical aberration in the objective lens. Once objectives could resolve finer detail, the limitations of uncontrolled illumination became painfully obvious — sharper lenses demand sharper light. French instrument makers, including Charles Chevalier and Félix Dujardin, began fitting achromatic substage condensers to compound microscopes around the late 1830s in response.

The decisive advance came in 1870 when Ernst Abbe — mathematician, physicist, and optical partner to Carl Zeiss — invented the Abbe condenser and, critically, defined the concept of numerical aperture as the mathematical framework linking illumination, objective design, and resolution. The Abbe condenser Abbe created is still the standard design found in most laboratory microscopes today. In 1893, August Köhler (also working at Zeiss) solved the remaining problem — the lamp filament showing through the specimen — by devising Köhler illumination, which uses the condenser and field diaphragm together to project a uniform, filament-free illumination field onto the specimen plane.
Related: What do you need to know about compound microscopes?
How the Condenser Works
Light from the lamp spreads in all directions. Without a condenser, only a fraction of those rays pass through the small stage aperture in a useful direction; the rest scatter and add glare without adding information. The result is a dim, low-contrast image with an uneven field — brighter in the centre, falling off toward the edges.

The condenser’s lens elements bend that divergent beam into a converging cone. All the light that would have scattered useless is now directed through the specimen at controlled angles. When this cone meets the specimen, it enters the objective lens above, and the image appears bright, crisp, and evenly lit across the entire field.

The two controls you interact with daily are the condenser focus knob (height) and the aperture iris diaphragm lever or ring. Raising the condenser concentrates the cone tighter and higher on the specimen; lowering it spreads it out and drops the focal point below the slide. The aperture diaphragm narrows or widens the cone’s angle, trading resolution for contrast.
Most Abbe condensers also have a swing-out (flip-top) top lens. Flip it out for low-power objectives (4× and 10×) so the light cone is wide enough to fill the large field of view. Flip it in for 40× and above, where you need a narrow, bright cone matched to the objective’s smaller front lens. Leaving the top lens in at 4× produces a narrow ring of light with a dark centre — a very common beginner mistake.
Numerical Aperture: Why the Condenser Sets Your Resolution Ceiling
Numerical aperture (NA) describes how wide an angle of light a lens can accept or produce. For microscope resolution, what matters is the combined NA of the objective and the condenser. The resolution formula is:
d = λ / (NAobjective + NAcondenser)

A worked example that surprises most beginners: suppose you have a quality 100× oil-immersion objective rated at 1.25 NA. You pair it with a standard dry Abbe condenser set to 0.65 NA. The effective resolution limit is determined by that 0.65 — you are throwing away roughly half the resolving power of the objective. The condenser is the bottleneck.
To realise the full 1.25-NA potential, the condenser must:
- Have an NA at least equal to the objective’s (standard oil-immersion Abbe condensers are rated ~1.25 NA; high-end achromatic-aplanatic models reach 1.4 NA).
- Have immersion oil applied between the condenser’s top lens and the underside of the slide — without it, the air gap limits effective NA to around 0.95 regardless of the condenser’s rating. This step is almost universally skipped, even by experienced users.
In practice: for objectives up to 40×, a dry condenser at its full aperture is fine. At 100× oil immersion in any serious imaging work, oil the condenser too. [Source: Evident/Olympus — Condensers]
The Three Functions of a Microscope Condenser
Light Concentration and Distribution
The primary function of the condenser is to gather available light and channel it efficiently into the specimen. A lamp filament — whether tungsten-halogen or LED (the modern default for brightfield) — radiates in all directions. Without a condenser the light reaching the specimen is weak and uneven. With it, even a modest LED lamp fills the field brightly and evenly at any magnification.
The “filament visible through the specimen” problem that plagued early compound microscopes was solved not by the condenser alone but by the combination of the Abbe condenser and the Köhler illumination technique (see below). Köhler illumination projects an image of the field diaphragm — not the lamp itself — onto the specimen plane, so the filament’s structure never appears in the image.
Aberration Correction
Higher-end condensers correct the two main optical aberrations that reduce image quality:
- Chromatic aberration — different wavelengths of light focus at slightly different points, producing colour fringing around specimen edges (a rainbow outline). Achromatic condensers eliminate this by using lens elements made of different glass types that bring all wavelengths to a common focal point.
- Spherical aberration — light passing through the edge of a spherical lens focuses at a slightly different point than light through the centre, producing blur and halo effects. Aplanatic condensers correct this with additional lens elements that flatten the focal surface. The fully corrected aplanatic-achromatic condenser corrects both.
The standard Abbe condenser corrects neither aberration, which is why images taken through a simple Abbe condenser may show slight colour fringing at high magnification — acceptable for routine lab work, visible in photomicrography.
Aperture and Contrast Control
The aperture iris diaphragm inside the condenser controls the angle of the illuminating cone. A wider opening admits more light at steeper angles (higher NA) and produces maximum resolution. A narrower opening produces a shallower cone with lower NA but greater contrast and depth of field.
The standard working rule: set the aperture diaphragm to approximately ⅔ to ¾ of the objective’s back aperture. You can check this by removing an eyepiece and looking down the tube — you should see a bright circle of light; close the diaphragm until its edge just enters the circle, then open it slightly. This gives the best balance of resolution and contrast for most specimens.
The most common beginner mistake is closing the diaphragm all the way to “get more contrast.” What actually happens: resolution drops sharply, and diffraction rings appear around specimen edges — those artificial halos that look like detail but are not. The image has more apparent structure but less actual information.
How to Set Up Köhler Illumination
Köhler illumination is the standard alignment procedure for every compound microscope with a built-in lamp and a substage condenser. It takes about two minutes and dramatically improves image quality. Redo it whenever you change objectives.
- Place a stained slide on the stage and focus the specimen with the 10× objective.
- Close the field diaphragm (the lever or ring usually on the lamp housing or base) until you see a small bright polygon appear in the field of view. If nothing appears, your condenser is probably too far down — raise it first.
- Raise or lower the condenser with its focus knob until the edges of that polygon are sharp and in focus.
- Centre the polygon in the middle of the field using the condenser’s centering screws (usually two small knobs on the condenser carrier).
- Open the field diaphragm until its edges just disappear beyond the field of view. The illuminated field now exactly matches your field of view — no wasted light.
- Set the aperture (condenser) diaphragm to ⅔–¾ of the objective’s back aperture: remove an eyepiece and close the aperture diaphragm until it fills about ⅔ of the lit circle you see, then replace the eyepiece.
- Change objective → repeat step 6 (and also step 5 if the field diaphragm is no longer correctly sized for the new field of view).
[Source: Nikon MicroscopyU — Köhler Illumination Tutorial]
What goes wrong without Köhler: the condenser racked all the way down is the factory default. At that position the illumination cone is too wide for most objectives, the light is uneven (bright centre, dark edges), and contrast is poor. Many users assume this is just what their microscope looks like. Spending two minutes on Köhler setup reveals the scope’s true capability.
Types of Microscope Condensers
Most microscopes you encounter in school, university labs, or entry-level research settings ship with an Abbe condenser — or no condenser at all on toy/children’s scopes. The type you need depends on your magnification range and imaging goals.
Abbe Condenser

The Abbe condenser is the workhorse of light microscopy — inexpensive, robust, and mass-produced. It typically uses two lens elements and a built-in iris diaphragm, and most Abbe condensers are rated 1.25 NA (oil). A swing-out top lens is standard.
What it does not do: it corrects neither chromatic aberration nor spherical aberration. In routine brightfield work at up to 40×, those limitations are rarely visible. At 100× with phase-contrast or photomicrography, they become apparent as slight colour fringing and residual blur at image edges. For those applications, step up to an achromatic or aplanatic-achromatic condenser.
Aplanatic Condenser
An aplanatic condenser adds corrective lens elements to eliminate spherical aberration — the blur at image edges that occurs when light through a lens’s periphery focuses at a slightly different point than light through its centre. With two or three elements inside, it flattens the focal surface and produces a crisper, more uniformly sharp image, especially noticeable at the field’s edges under high magnification. Chromatic aberration is not corrected; some colour fringing may remain.
Achromatic Condenser
An achromatic condenser uses a compound lens design (typically glass types with different dispersion) to bring all visible wavelengths to a common focal point, eliminating colour fringing. Images taken through an achromatic condenser have clean, colour-neutral edges — important for photomicrography and colour-sensitive specimens. Spherical aberration is generally not corrected, so edges may still show some softness at the extremes of the field.
Aplanatic-Achromatic Condenser
The aplanatic-achromatic condenser corrects both aberrations. With three to four lens elements, it delivers the cleanest possible illumination cone — essential for demanding photomicrography and fluorescence-adjacent brightfield work. It is also the most expensive condenser type, and the cost is a genuine deterrent for most users.
One important limitation applies to all condenser types: no single condenser handles the full range from 4× to 100× optimally. Very low-power objectives need a very wide illumination cone; high-power objectives need a narrow, intense one. The swing-out top lens on Abbe condensers partially bridges this gap, but at the extremes — a very low 2× or 4× objective versus a 100× oil — you may need to recentre and readjust the aperture diaphragm significantly. Some research setups use a separate low-power condenser for objectives below 10×.
Darkfield and Phase-Contrast Condensers
These are the two most common specialised condenser types:
- Darkfield condenser: a central stop blocks the direct, axial light cone so that only obliquely scattered rays — light that bounced off the specimen — enter the objective. The result is a bright specimen on a completely black background. Excellent for visualising transparent, unstained specimens (e.g., living bacteria, diatoms) that are nearly invisible in brightfield. See our guide to darkfield microscopy for setup details.
- Phase-contrast condenser: carries an annular ring (a ring-shaped aperture) matched precisely to the phase ring inside a phase-contrast objective. Together they convert phase differences in transparent specimens — cell membranes, nuclei, living cells — into amplitude (brightness) differences visible to the eye. You cannot use phase-contrast objectives with a standard Abbe condenser and get the phase effect; the annular ring is essential. See our guide to phase contrast illumination.
For inverted microscopes, the condenser sits above the stage rather than below it, and the geometry is mirrored — but the optical principles and alignment procedure are identical.
Keeping the Condenser Clean
The condenser top lens sits immediately below the slide, which means it catches drips from immersion oil, stage slides, and condensation. A dirty condenser lens reduces contrast and can introduce false detail into images — and because the contamination is far from the specimen focal plane, it shows up as a diffuse haze rather than a sharp foreign object, making it easy to mistake for a staining artefact.
Clean the top lens with lens paper and a small amount of optical lens cleaner or isopropyl alcohol. Never use tissues or clothing; they scratch the coating. After every oil-immersion session, wipe the oil from the condenser top lens immediately — dried immersion oil is harder to remove and can etch coatings over time.
Frequently Asked Questions
What are the three functions of a microscope condenser?
The condenser concentrates and distributes light onto the specimen, corrects optical aberrations (in achromatic and aplanatic models), and controls the angle and numerical aperture of the illuminating cone through the aperture iris diaphragm — which directly sets the balance between resolution and contrast.
Where is the condenser located on a microscope?
The condenser is mounted on a carrier directly beneath the stage, between the lamp and the specimen. A condenser focus knob (usually a small knurled ring or knob below the stage) raises and lowers it to align its focal point with the specimen.
What is the difference between the condenser and the iris diaphragm?
The condenser is the lens assembly that focuses light onto the specimen. The iris diaphragm is a variable aperture built into the condenser that controls the cone angle — and therefore the NA, contrast, and depth of field of the illumination. They work together: the condenser positions the focal cone, the diaphragm shapes it.
Should the condenser be all the way up or all the way down?
Neither extreme is correct for everyday use. For Köhler illumination, the condenser should be raised until the edges of the closed field diaphragm are sharp in the focal plane of the specimen — this is usually fairly close to the top of travel, but not at the stop. Leaving it all the way down (the factory default) produces dim, uneven, low-contrast illumination.
What numerical aperture condenser do I need for oil immersion?
A standard oil-immersion Abbe condenser is rated ~1.25 NA and is adequate for most 100× work. To actually achieve NA above ~0.95, you must apply immersion oil between the condenser top lens and the underside of the slide — without it, the air gap limits you to around 0.95 regardless of the condenser’s rating. For photomicrography at 100×, an achromatic-aplanatic condenser rated 1.4 NA (with oil) delivers the cleanest result. [Source: ZEISS — Oil Immersion and Lens Design]
What is an Abbe condenser?
The Abbe condenser is the standard substage condenser design, invented by Ernst Abbe at the Carl Zeiss workshop in 1870. It uses two to three lens elements and a built-in iris diaphragm, is rated ~1.25 NA with oil, and typically includes a swing-out top lens for low-power objectives. It does not correct for chromatic or spherical aberration, but is adequate for routine brightfield, darkfield, and phase-contrast work when paired with the correct annular rings.
Conclusion
The condenser of a microscope is not a passive light pipe — it is an active optical component that directly controls image resolution, contrast, and evenness of illumination. A well-adjusted condenser, aligned using Köhler illumination and set to the correct aperture for your objective, can make an average slide look like a textbook figure. The same slide through a racked-down, fully-opened condenser looks flat and muddy.
The practical takeaway: spend two minutes setting up Köhler illumination at the start of every microscopy session, match your condenser NA to your objective (and oil the condenser at 100× if you want its full resolving power), and flip the top lens out for any objective below 20×. These three habits — more than any expensive upgrade — determine whether you’re getting what your microscope is capable of.