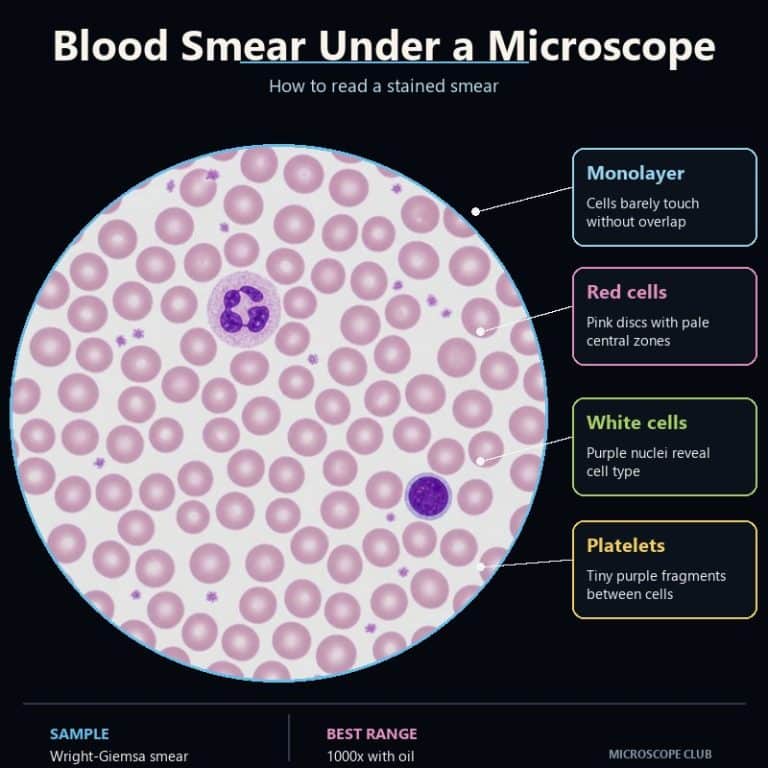
A blood smear under a microscope shows three things at once: pale pink red cells scattered like coins, purple-stained white cells with wildly different shapes, and tiny lilac specks called platelets. To read one, you move the slide to the monolayer just behind the feathered edge, sweep from 10x up to 100x oil immersion, and identify each cell type by its size, color, and nucleus shape. This guide is educational only — it teaches identification of normal cells, not diagnosis, which is the job of trained hematologists and pathologists.
What a Blood Smear Actually Is
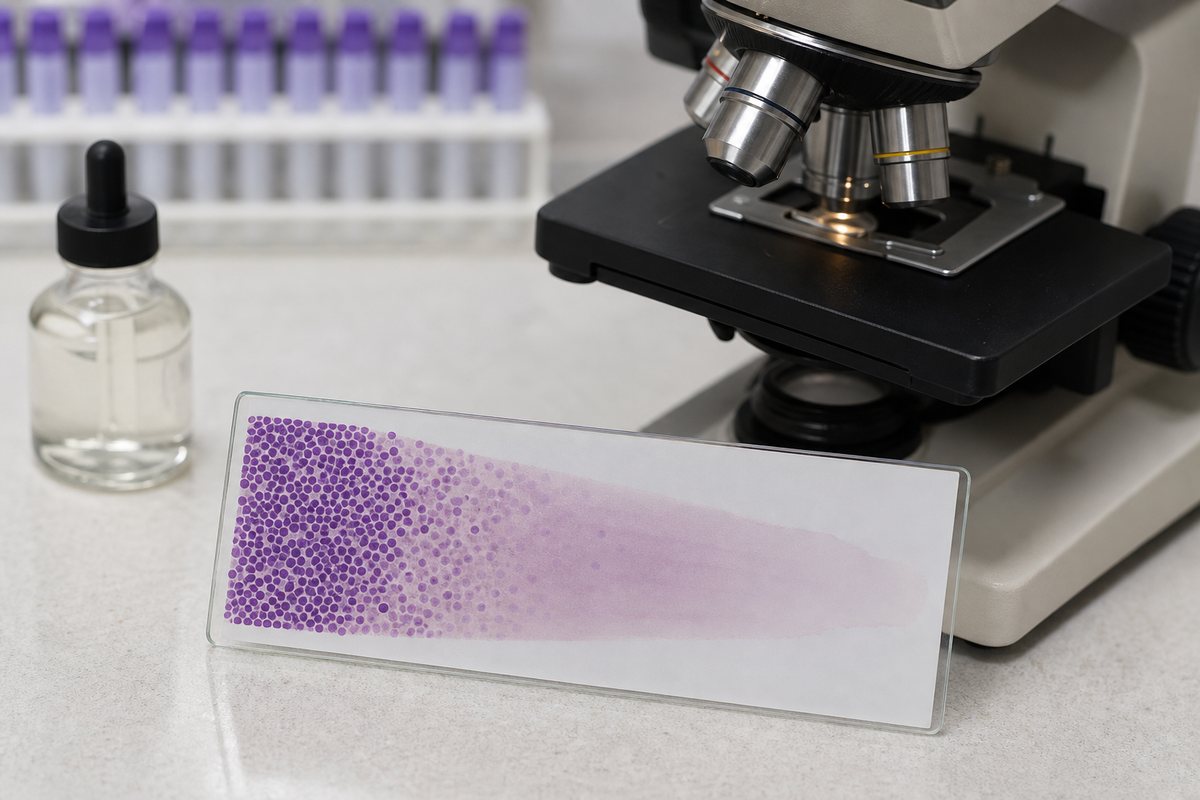
A peripheral blood smear (also called a blood film) is a single drop of blood spread into a thin layer on a glass slide, air-dried, and stained so individual cells become visible. It’s viewed with a compound light microscope, the same type of instrument used for most classroom and lab work. Unlike a wet mount slide, which holds cells in a drop of liquid under a coverslip, a stained smear is dried and fixed — there’s no water, no coverslip, and the slide can sit on a shelf for years without the specimen degrading.
How to Read a Blood Smear, Step by Step
Reading a smear isn’t a single glance under one objective — it’s a deliberate sweep from low magnification to high, ending at the one zone on the slide where cells are actually countable.
Start at Low Power and Find the Monolayer
Place the slide on the stage and begin scanning at 10x. At this power the smear looks like a smooth pinkish film, and you can watch the color change as you move the slide. It gets paler as you travel from the thick head end toward the thin, feathered tail. Chase that fading color until the red cells stop overlapping and start sitting alone, like scattered coins on a table. That zone is the monolayer, and it’s the only place on the whole slide where you can reliably identify and count cells.
The Feathered Edge vs. the Thick End — Where Not to Read
Two spots on a smear will waste your time. At the thick head end, red cells pile up three or four deep, overlapping so heavily that nothing can be identified. At the very feathered edge — the thinnest trailing tip — cells get dragged, flattened, and distorted by the spreading motion. The monolayer sits in between: a band where cells lie close together, occasionally touching, but never stacked. If you find yourself squinting at smashed or overlapping cells, you’ve drifted too far in one direction — move the slide back toward the middle of that band.
Move Up Through the Magnifications: 10x, 40x, 100x Oil
Once the monolayer is centered in the field of view at 10x, step up through the 4x, 10x, 40x and 100x objective lenses in order. At 40x (“high dry”), red cells resolve into pale salmon rings with a lighter “thumbprint” center. White cells jump out as darker purple blobs because their nuclei grab the stain hard. For final identification, switch to the 100x oil-immersion objective. Place a single drop of immersion oil directly on the dry, stained slide first, since that objective is designed to work only in oil, not air. Total magnification is always eyepiece times objective, so a 10x eyepiece with the 100x oil objective gives 1000x total. You can calculate total magnification the same way at any power. Once oil is on the slide, that objective is committed; don’t rotate the dry 40x objective back through it.
In practice, the reading procedure runs like this:

- Place the stained, dry slide on the stage without a coverslip.
- Scan at 10x, moving from the thick end toward the feathered edge.
- Locate the monolayer — the band where red cells sit separate, not overlapping.
- Switch to 40x to check cell morphology and confirm you’re in the right zone.
- Add a drop of immersion oil, switch to the 100x oil objective, and refocus.
- Identify red cells, the five white cell types, and platelets by size, color, and nucleus shape.
- Move through the monolayer in a consistent zig-zag (battlement) path so you don’t recount the same cells twice.
The Stain and Why Cells Have Color
Unstained blood cells are nearly transparent, so a smear is dyed with a Romanowsky-type stain — most commonly Wright stain or Wright-Giemsa — before it’s ever put under a lens. The stain combines a basic dye, methylene blue, which binds acidic material like DNA and RNA and turns it blue-purple. It’s paired with an acidic dye, eosin, which binds basic cell components and turns them red-pink. That’s why nuclei stain dark purple while red cell cytoplasm stains pale pink: the two dyes are reacting with different chemistry inside the cell. The CDC’s guide to preparing and staining blood smears walks through the same staining principle in more procedural detail.
Red Blood Cells — Your Size Reference
Red blood cells (erythrocytes) are the most numerous cell on the slide and the built-in ruler you’ll judge every other cell against. A normal red cell is round, roughly 6 to 8 micrometers across, and pale pink to salmon in color. Look closely and you’ll notice a paler zone in the middle — the central pallor — caused by the cell’s biconcave, disc-like shape. Central pallor is normal, not damage; beginners often mistake it for a hole or a defective cell, but it’s simply the natural thinning of the cell’s center. Mature red blood cells also have no nucleus, which makes them easy to distinguish from white cells at a glance. The Britannica entry on erythrocytes covers the biconcave shape and size range in more depth if you want the broader physiology.
The Five White Blood Cells and How to Tell Them Apart
White blood cells (leukocytes) are far less numerous than red cells but far more varied — five distinct types, each with a different nucleus shape, size, and granule pattern. A useful frequency mnemonic is “Never Let Monkeys Eat Bananas”: neutrophil, lymphocyte, monocyte, eosinophil, basophil, from most to least common.

| WBC Type | Approx. % of WBCs | Size vs. RBC | Key Visual Feature |
|---|---|---|---|
| Neutrophil | ~50–70% | 2–3x (~12–15 µm) | Multi-lobed nucleus (3–5 lobes), fine pale granules |
| Lymphocyte | ~20–40% | ~1–1.5x (~7–12 µm) | Large round dark-purple nucleus, thin rim of cytoplasm |
| Monocyte | ~2–8% | Largest WBC (~15–20 µm) | Kidney or horseshoe-shaped nucleus, gray-blue cytoplasm |
| Eosinophil | ~1–4% | Similar to neutrophil | Bi-lobed nucleus, large bright red-orange granules |
| Basophil | ~0.5–1% | Similar to neutrophil | Dark granules that often obscure the nucleus |
Under 100x oil, a neutrophil’s nucleus looks like a string of dark purple beads. A lymphocyte reads as a big dark marble with barely a sliver of blue cytoplasm around it. A monocyte looks noticeably bigger, grayer, and “smudged” compared to its neighbors — like frosted glass. An eosinophil’s granules glow orange, almost like fish roe, and a basophil is rare enough on a normal slide that spotting one is the exception rather than the rule. These normal differential percentages come from standard hematology reference ranges; the MedlinePlus entry on the blood differential lists the same ranges from a clinical source. The ASH Image Bank is a good place to compare your own field of view against verified reference images.
Platelets — The Easy-to-Miss Specks
Platelets (thrombocytes) aren’t whole cells — they’re small fragments broken off from a much larger cell called a megakaryocyte. On a stained smear they appear as tiny purple or lilac specks, only about 2 to 4 micrometers across, dramatically smaller than the red cells around them. Because they’re so small, new observers routinely miss them entirely or mistake them for dust and debris on the slide. They also tend to cluster in small clumps rather than sitting individually spaced like red cells. A group of platelets can momentarily look like a single odd structure until you resolve it at higher power.
What a Good Smear Looks Like vs. a Bad One
A well-made smear has a smooth, even monolayer with a gradual transition from thick to thin and a clean, unbroken feathered edge — no streaks, no holes, no bald patches. A poorly made smear shows cells piled up everywhere with little to no usable monolayer. This usually happens because the starting drop was too large or the spreader slide was angled too steeply or moved too fast. Streaks or holes in the film point to dust or grease on the slide or a chipped spreader edge. A smear that’s understained leaves cells too pale to tell apart, and one that’s overstained buries the nuclear detail you need for identification. Recognizing these problems matters because a bad smear simply can’t be read accurately, no matter how careful you are at the eyepiece.
A note on scope: this article teaches identification of normal cells only. It is educational, not medical advice, and any appearance that looks abnormal should be evaluated by a trained hematologist or pathologist — not diagnosed from an article.
Frequently Asked Questions
Why is my blood smear too thick, with cells piled up everywhere?
A smear that’s uniformly thick usually means the starting drop of blood was too large, or the spreader slide was held at too steep an angle or moved too fast when making the film. Either mistake pushes too many cells into the same area instead of thinning them into a single layer, leaving little or no usable monolayer to read.
Can I make a blood smear at home, and is it safe to try?
Blood is a biohazard, and lancing your own finger casually to make a slide isn’t something this article encourages. If you want hands-on practice reading smears, the safer route is a purchased, professionally prepared stained slide, which gives you the same viewing experience without the safety and hygiene risks of handling fresh blood yourself.
What is a differential count (a “diff”)?
A differential count, or “diff,” is a tally of the five white blood cell types expressed as a percentage of the total white cell population. It’s usually based on counting 100 cells in the monolayer. It’s the clinical procedure that the cell-identification skills in this article feed into, though the actual diagnostic interpretation of a diff is a job for trained lab and medical professionals.
Do you need a coverslip on a stained blood smear?
No. A stained, dried blood smear is viewed directly, without a coverslip, unlike a wet mount. The 100x oil-immersion objective goes straight into a drop of oil placed on the exposed, dry slide surface.
What happens if you try to view a smear at 100x without immersion oil?
The image goes dim and blurry almost immediately. The 100x oil objective is built to work with a medium that matches the refractive index of glass; without oil, light scatters at the air-glass interface and you lose the resolution needed to make out fine details like nuclear lobes and granules.
Why do platelets sometimes look like one big clump instead of separate specks?
Platelets naturally tend to stick together, so on a smear they often appear in small clusters rather than spaced out individually the way red cells are. At lower power a clump can look like a single odd structure; switching to 100x oil usually resolves it into several distinct platelet fragments.
Conclusion
Reading a blood smear comes down to finding the right spot on the slide and working through the magnifications in order. Locate the monolayer just behind the feathered edge, sweep from 10x to 40x to 100x oil, and use the red cell as your size reference for everything else. Once you can recognize a neutrophil’s lobed nucleus, a lymphocyte’s dense round one, and a platelet’s tiny purple speck, the slide stops looking like a random smear of pink and purple. It starts looking like an organized, readable field of cells.
Have you tried reading a prepared blood smear yourself, or spotted a cell type that took a while to recognize? Tell us what you found in the comments below.
Related Specimen
For a closer look at one specific cell type visible in a smear, see our full White Blood Cells guide.
Originally posted 2026-08-02 12:00:00.