A simple microscope uses a single convex lens to produce a virtual, erect, and magnified image of an object — making it the most fundamental optical instrument in science and everyday life. From Antonie van Leeuwenhoek’s 17th-century single-lens devices that first revealed bacteria, to the jeweller’s loupe you hold at arm’s length today, the same optical principle has remained unchanged for over three centuries. Here is a complete guide to the definition, history, working principle, magnification formulas, parts, uses, and limitations of the simple microscope.
What is a simple microscope?
No products found.
A simple microscope is a single converging (biconvex) lens with a short focal length that magnifies a specimen through angular magnification, forming a virtual, erect, magnified image on the same side of the lens as the object. The object is placed inside the focal length — between the lens and its focal point — so the lens acts as a magnifying glass rather than a projector. This is the most elementary form of microscopy, and the optical ancestor of every more complex instrument that followed.
The lens of a simple microscope is often called a loupe. In everyday use, loupes appear as jeweller’s magnifiers, watchmaker’s eyepieces, and the reading-glass components inside compound microscopes, telescopes, and camera viewfinders. A magnifying glass you can hold in one hand is, technically, a simple microscope.
Is a magnifying glass a simple microscope? Yes. Any single-lens optical magnifier that forms a virtual erect image by refracting light qualifies as a simple microscope. The terms are used interchangeably in optics and in most biology curricula.
History of the simple microscope

The history of magnification stretches back to ancient times. Man-made glass beads appeared in Mesopotamia around 2500 BCE, and glass vessels were being crafted in Egypt by roughly 1500 BCE (Wikipedia — History of glass). The idea that curved glass could bend light and enlarge images developed far later: Roger Bacon described the use of convex lenses to aid vision in his Opus Majus around 1267 CE, and spectacles were in use in Italy by the 1280s.

The compound microscope — using two lenses together — is generally credited to Dutch spectacle makers working around 1590, but the instrument that truly established single-lens microscopy as a scientific tool was built by Antonie van Leeuwenhoek in the 1670s. Leeuwenhoek was a Dutch draper with no formal scientific training, yet he ground tiny biconvex lenses of extraordinary quality, mounted each one in a small metal plate with a screw-and-pin specimen holder, and achieved magnifications of approximately 270× — far beyond what any contemporary instrument could do (Britannica). Looking through one of his devices at a drop of pond water, he was the first person to observe and describe bacteria and protozoa, which he called “animalcules.” The experience must have been genuinely startling: creatures darting and tumbling across a world that had been invisible to every prior generation of humanity.
Leeuwenhoek’s microscopes were painstaking to use — the lens was tiny (often less than 2 mm in diameter), the working distance was a few millimetres, and you had to press the device very close to your eye in bright light to see clearly. Despite that, his observations were so accurate that many were not improved upon for 200 years. Modern replicas bear this out: the lenses he left behind still resolve fine detail that surprises optical engineers today (FSU Molecular Expressions).
How a simple microscope works: the principle
Simple microscopes work on the principle of angular magnification: by placing a converging lens close to an object, the lens bends (refracts) the diverging rays from each point on the specimen so they appear to come from a larger virtual image located farther away. Your eye then sees that virtual image, which is erect, magnified, and on the same side of the lens as the specimen.

The optics in practice look like this:
- Position the object inside the focal length. If the focal length is f = 5 cm, the specimen must be closer than 5 cm from the lens. Move it back and forth in that range until the image snaps into focus.
- Hold the lens close to your eye. Eye relief matters. With a small-aperture loupe, pressing the lens to your eye socket maximises the field of view. With a larger stand loupe, a few centimetres of distance is comfortable.
- Control the lighting. Simple microscopes reveal surface detail, texture, and colour best under bright, angled light — not direct overhead. For transparent specimens on a slide, transmitted light from below passes through a condenser and diaphragm, which let you tune the cone of light for better contrast. The diaphragm narrows or widens this cone; narrowing it increases contrast for low-transparency specimens, while opening it brightens the image for denser specimens.
- The sweet spot. The image sharpens in a narrow band. Move the specimen toward the lens to increase size; move it away to sharpen contrast. First-time users almost always start too far out and creep inward — the clearest image is almost always closer to the lens than feels instinctive.
For thin or semi-transparent specimens, transmitted light passes through the object before the lens, and staining improves contrast significantly (crystal violet for bacteria, iodine for plant cells). For opaque objects — a coin, a gemstone, an insect — reflected light from the side works better.
Magnification formulas and worked example
Simple microscope magnification depends on how your eye is focused. Two cases apply (LibreTexts — OpenStax University Physics):
Near-point formula (image formed at 25 cm — standard comfortable reading distance):
M = 1 + D/f

Relaxed-eye formula (image formed at infinity — least eye strain for extended viewing):
M = D/f
In both formulas, D = 25 cm (250 mm) — the standard least distance of distinct vision assumed for a normal eye — and f is the focal length of the lens in the same units.
Worked example: A loupe has a focal length of f = 5 cm.
- Near-point: M = 1 + 25/5 = 6×
- Relaxed eye: M = 25/5 = 5×
Shorten the focal length and magnification rises fast: f = 2.5 cm gives M = 1 + 25/2.5 = 11× (near point). This is why Leeuwenhoek ground lenses as small and tightly curved as he could — shorter f directly equals higher magnification. The practical ceiling for a single hand-polished biconvex lens is roughly 270×, which is what he achieved.
The short focal length also means the working distance (space between lens and specimen) shrinks. At 5× a loupe gives you several centimetres to work with; at 40× it may be only 1–2 mm, which is why very high-power loupes become impractical for anything other than inspecting tiny, flat objects.
For a deeper look at how magnification and resolution trade off across different instruments, see our dedicated guide.
Simple microscope vs compound microscope
The simple and compound microscope are often conflated, but they are fundamentally different instruments. The single biggest question searchers have is which one to choose — this table answers it directly:
| Feature | Simple microscope | Compound microscope |
|---|---|---|
| Number of lenses | One (single convex) | Two or more (objective + eyepiece) |
| Typical magnification | ~10×–275× | 40×–2000× (objective × eyepiece) |
| Magnification formula | M = 1 + D/f (or D/f) | Mtotal = Mobj × Meye |
| Image type | Virtual, erect, magnified | Real inverted intermediate, then virtual |
| Resolution limit | ~0.2 mm | ~0.2 µm (~1000× finer) |
| Specimen preparation | Often none (direct viewing) | Thin section or smear on slide required |
| Typical uses | Loupe, hand lens, dermatoscope, field inspection | Lab microscopy, histology, microbiology |
| Portability / cost | Pocket-sized; $5–$200 | Benchtop; $100–$5,000+ |
The resolution gap is the decisive difference. A simple microscope can show you surface texture, crystal structure, fibre weave, or skin pattern — anything your eye almost resolves. A compound microscope goes far beyond that, resolving individual cells and subcellular structures. Choose a loupe when you need portability and instant results; choose a compound scope when you need to see things smaller than ~0.2 mm.
Parts of a simple microscope
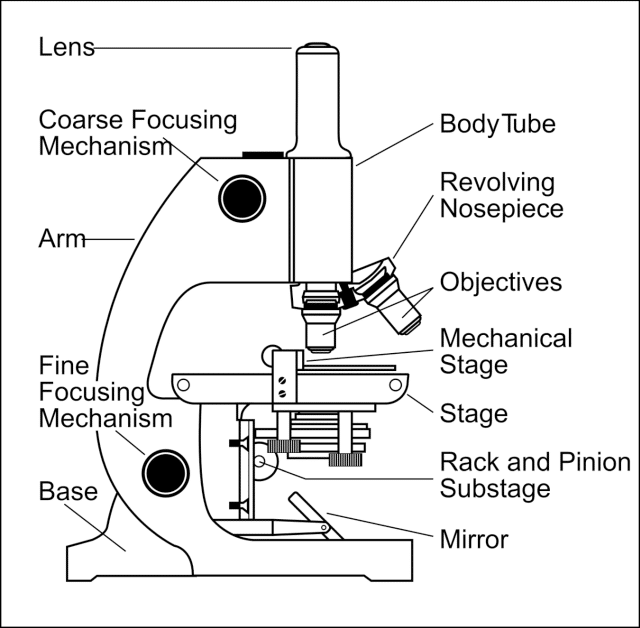
A simple microscope combines mechanical and optical components. Understanding each part helps you adjust the scope correctly and diagnose what’s wrong when the image looks poor.
Mechanical components
- Base — the heavy flat plate at the bottom that keeps the instrument upright and stable. When a viewed image vibrates every time you breathe, the base is usually too light or the table surface is absorbing vibration.
- Arm — the upright column connecting base to lens tube. On simple loupes this is just your hand; on stand-mounted models it positions the lens at the right height above the stage.
- Stage — the flat platform where the specimen or slide sits. A central aperture lets transmitted light pass through from below. Stage clips hold glass slides flat; if a slide tips or rocks under the lens, the clips need tightening.
- Focus control — on modern bench-top simple microscopes, a knob or rack-and-pinion mechanism moves either the stage or the lens tube up and down. On a loupe, you focus by moving the loupe closer to or farther from the specimen with your hand — there is no mechanical focus.
- Nosepiece — some modern models include a revolving turret holding two or more lenses at different magnifications, borrowed from compound microscope design. Rotating the nosepiece swaps lenses without removing and repositioning.
Optical components
- Objective lens — the single biconvex lens that does all the magnification. The shorter its focal length, the higher the power but the smaller the working distance. High-quality lenses use two glass elements cemented together to reduce chromatic aberration — colour fringing that blurs fine detail. See our guide to objective lenses for a full breakdown of what the numbers stamped on each one mean.
- Eyepiece (ocular) — on the simplest loupes the objective is the eyepiece; you look directly through it. On stand-mounted models a separate eyepiece lens may be added to further magnify or correct the image. In compound microscopes the eyepiece is a distinct, interchangeable unit with its own magnification (typically 10×).
- Mirror or illuminator — classic models use a concave mirror angled to direct ambient light upward through the stage aperture; you point the mirror toward a window. Modern versions replace the mirror with a built-in LED, which is far more consistent and adjustable. Poor or uneven lighting is the most common reason first-time users get blurry, washed-out images.
- Condenser and diaphragm — not all simple microscopes include these, but stand-mounted versions often do. The condenser focuses the light beam onto the specimen; the iris diaphragm controls the cone angle and intensity. For stained slides, a narrow cone (closed diaphragm) boosts contrast; for unstained, open it wider.
For a deeper reference on each component and how it compares across instrument types, see parts of a microscope.
Types of simple microscope (loupe types)
The simple microscope exists in several practical forms, each optimised for a different magnification range and use case:
- Handheld magnifier — the classic “reading glass” form. Focal length ~10–25 cm; magnification ~2×–4×. Used for reading fine print, stamps, maps, and basic inspection.
- Jeweller’s loupe — a compact folding loupe, typically 10× (standard in the diamond trade for grading clarity and colour). The lens must be held close to the eye; proper technique means placing it against the eye socket and bringing the stone into focus at a few centimetres. A good 10× triplet loupe is achromatic and gives a flat field with minimal colour fringing.
- Watchmaker’s loupe — similar to a jeweller’s loupe but lighter and worn clipped to the eye socket to free both hands for manipulation. Typically 3×–10×.
- Linen tester / thread counter — a calibrated loupe with a reticle etched into the lens, designed to count threads per inch in woven fabric. Usually 7×–10×.
- Dermatoscope — a clinical 10× loupe with a built-in cross-polarising light source, used by dermatologists to visualise subsurface skin structures that are invisible under normal light. The polarised light eliminates surface reflection, revealing capillary patterns, pigment distribution, and lesion structures that guide diagnosis of melanoma and other conditions (IJDVL). At 10× the field is roughly 15–20 mm wide — large enough to inspect most lesions in a single view.
- Field / geological loupe — robust 10× or 20× loupes used outdoors for mineral identification, fossil inspection, and insect study. Often has a folding body to protect the lens.
How to use a simple microscope
Using a loupe or stand-mounted simple microscope correctly makes the difference between a sharp, useful image and a blurry disc of light. The steps below apply to any single-lens device:
- Set up the lighting first. Bright, even illumination is the single biggest factor in image quality. For transparent specimens, use transmitted light from below. For opaque specimens, angle a lamp from the side to create oblique lighting that reveals surface texture. Poor light is the most common beginner mistake — the lens cannot fix what the light doesn’t show.
- Place the specimen on the stage or in your hand. For slides, clip them flat. For direct inspection of objects (gemstones, circuit boards, insects), hold the object steady or use a stand with a retaining clip.
- Position the lens inside the focal length. Bring the loupe or lens to within the focal length of the specimen. For a 10× loupe (f ≈ 2.5 cm) that means no farther than about 2.5 cm. Most beginners start too far away and wonder why nothing focuses.
- Hold the lens close to your eye. This maximises the apparent field of view. Rest the loupe on your eye socket or cheekbone for stability — it also frees one hand.
- Move the specimen slowly to find focus. Creep the specimen toward the lens until the image snaps sharp. The sharp zone is narrow; small movements matter.
- Adjust lighting and diaphragm. Once you have a focused image, fine-tune contrast by narrowing the diaphragm (more contrast, less brightness) or tilting the mirror/lamp angle. Stained slides almost always benefit from a slightly closed diaphragm.
Common beginner error: Starting with the specimen too far from the lens and sweeping outward. Nothing will ever focus beyond the focal length — you’ll see a bright blur, not an image. Always start close and pull back slowly.
What is a simple microscope used for?
Simple microscopes and loupes are still in active daily use across a wide range of professional and scientific fields:
- Gemology and jewellery — the 10× jeweller’s loupe is the universal tool for grading diamonds and coloured stones. Under a good loupe, inclusions appear as dark specks, clouds, or feathers; surface blemishes show as scratches, nicks, or polish lines. A GIA-graded stone is always verified at 10× under a triplet loupe. The experience of “finding the table” (the flat top facet) in focus and then hunting inward for the inclusion is a skill every jeweller develops over years.
- Dermatology — the dermatoscope (a 10× cross-polarised loupe) lets dermatologists examine pigmented lesions for dermoscopic patterns — atypical pigment network, regression structures, blue-white veil — that are predictive of melanoma. Without polarisation, surface reflection drowns these subsurface signals. At 10× the image is just large enough to read structural patterns; higher magnification narrows the field too much for useful lesion mapping.
- Watchmaking and electronics repair — working at 5×–10× with a loupe or binocular head magnifier to inspect gear trains, solder joints, and fine mechanical components. The depth of field at these magnifications is generous enough to see a full gear stack in a single view.
- Botany and field biology — a 10×–20× hand lens (field loupe) is standard equipment for botanists and entomologists doing fieldwork. Examining the venation pattern of a leaf or the structure of a flower’s stigma at 10× is routinely sharp enough to make species identifications that would otherwise require a lab.
- Microbiology (historical and teaching) — simple microscopes can visualise algae, fungi, large protozoa (like Paramecium), Hydra, and some larger bacteria under the right conditions and staining. They remain a standard first instrument in school biology labs because of their low cost and easy operation.
- Textile and material inspection — the linen tester (thread-counting loupe) quantifies thread counts in woven fabric, checks weave defects, and verifies fibre orientation. A similar approach is used for paper inspection, engraving authentication, and currency validation.
- Soil and geology field inspection — geologists and soil scientists use hand lenses in the field to identify mineral crystal forms, grain sizes, and structural features in rock and soil samples. Lab analysis uses compound or stereo scopes, but the field decision — is this granite or gneiss? — is often made with a loupe.
Limitations of the simple microscope
The simple microscope’s single-lens design creates inherent trade-offs that explain why compound and stereo microscopes replaced it for most scientific work:
- Chromatic aberration — a single lens bends different wavelengths of light at slightly different angles, so white light splits into a colour fringe around the specimen. Leeuwenhoek minimised this by grinding very small, spherical lenses (the smaller the aperture, the less fringing). Modern doublet and triplet loupes cement two or three glass elements together with different refractive indexes to cancel much of the fringing — but they cannot eliminate it entirely.
- Spherical aberration — rays passing through the outer edge of the lens focus at a slightly different distance than rays through the centre, causing a soft halo around fine detail. This limits how sharply a single-element lens can resolve at high power.
- Magnification ceiling — the practical limit for a single-lens simple microscope is roughly 275× (Leeuwenhoek’s best). Above that, aberrations and the tiny working distance (sub-millimetre) make the instrument unusable. Compound microscopes stack multiple corrected lenses to exceed this cleanly.
- Shallow depth of field at high power — at 40× a loupe, only a paper-thin slice of the specimen is in focus at one time. Tilting the specimen even slightly throws the image out. This makes systematic scanning of a specimen slow and requires a very steady hand.
- Fixed magnification — most loupes offer a single magnification power. A compound microscope swaps objective lenses to step through 4×, 10×, 40×, and 100× on the same specimen.
Frequently asked questions
What kind of image does a simple microscope produce?
A simple microscope always produces a virtual, erect, and magnified image — it cannot be projected onto a screen. The image appears on the same side of the lens as the object, at or beyond the near point (25 cm for a normal eye). This is in contrast to a compound microscope, which forms a real inverted intermediate image that is then re-magnified by the eyepiece.
Who invented the simple microscope?
Antonie van Leeuwenhoek (1632–1723) is credited as the father of single-lens microscopy. He built dozens of tiny biconvex-lens microscopes in the 1670s and was the first to observe bacteria, protozoa, red blood cells, and sperm cells — all with a simple microscope.
What is the principle of a simple microscope?
A simple microscope works on the principle of angular magnification. By placing a converging lens between an object and the eye, and positioning the object within the focal length, the lens refracts diverging rays so they appear to come from a larger virtual image farther away. The eye interprets this as a larger object.
What is the magnification of a simple microscope?
Common handheld loupes deliver 2×–10×. Professional single-lens instruments reach up to ~275×. Magnification is set by focal length: shorter focal length = higher magnification (M = 1 + 25/f for near-point viewing, with f in cm).
What is the formula for the magnifying power of a simple microscope?
Two formulas apply: M = 1 + D/f (image at near point, 25 cm) for relaxed viewing at maximum magnification, and M = D/f (image at infinity) for most comfortable extended viewing. D = 25 cm; f = focal length in cm.
Conclusion
A simple microscope — one converging lens, one focal length, one plane of magnification — is both the oldest and the most versatile optical magnifier in regular use. Its principle (M = 1 + D/f) is straightforward enough to calculate on paper and practical enough to apply immediately: find a 5 cm focal-length loupe and you have 6× of magnification in your pocket. Where the simple microscope ends (around 275× and ~0.2 mm resolution), the compound microscope takes over — a point worth understanding before choosing an instrument. If you are picking a first magnifier for fieldwork, gem inspection, dermatology, or a school lab introduction to microscopy, the simple microscope is still the right answer: inexpensive, immediate, and requiring no preparation beyond good lighting and steady hands. For cells and microorganisms, step up to a compound scope and the technique skills that go with it.
Last update on 2026-07-01 / Affiliate links / Images from Amazon Product Advertising API