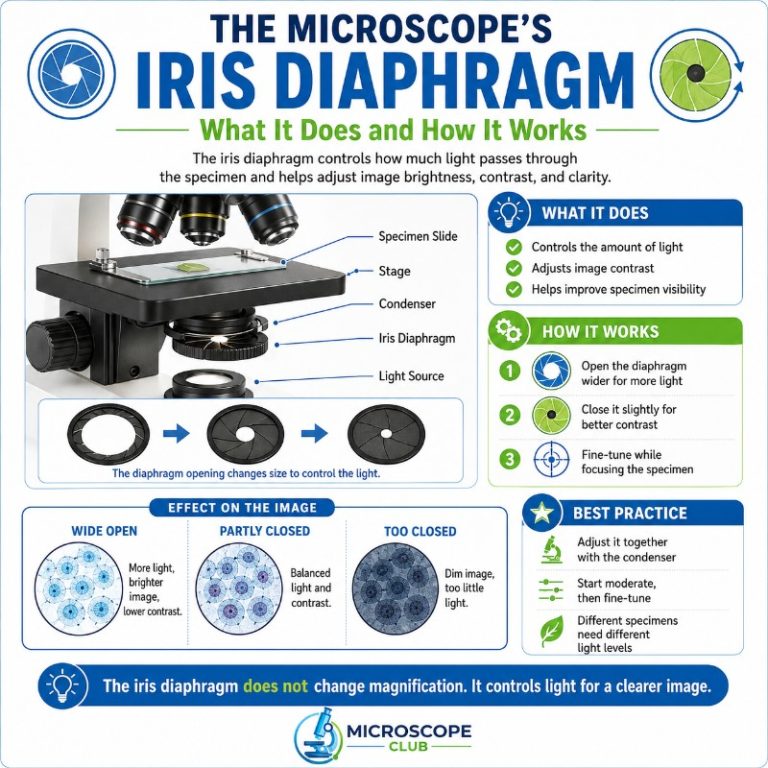
The iris diaphragm is one of the most frequently misused controls on a light microscope — and one of the most powerful when you know what it actually does. It sits inside the substage condenser, governs the cone of light that strikes your specimen, and directly determines the balance between contrast, resolution, and depth of field in every image you make.
What is a diaphragm in optics?
A diaphragm is an opaque structure with a central opening — the aperture — that limits how much light passes from a source to a lens. In any optical system, the diaphragm acts as an aperture stop or field stop, sitting along the optical axis between the light source and the lens it controls.
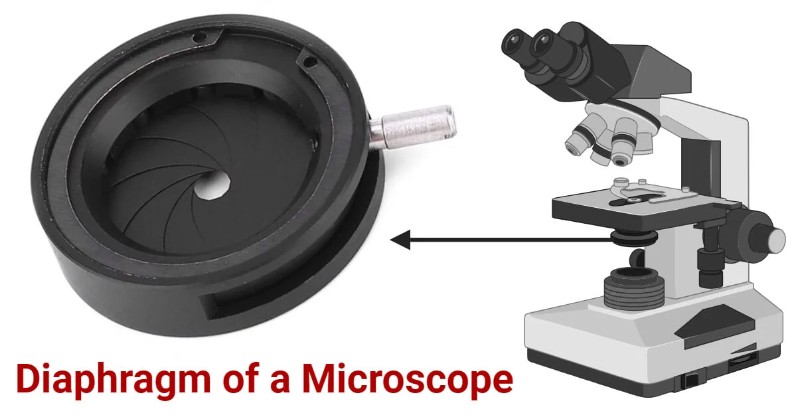
Fixed diaphragms have a single-size opening. Variable ones — called iris diaphragms, or simply irises — use a ring of overlapping metal blades that can be opened or closed continuously, much like the iris of a human eye dilating and contracting around the pupil.
What is an iris diaphragm on a microscope?
In a compound light microscope, “the iris diaphragm” almost always refers to the condenser aperture iris — the continuously variable blade assembly built into the substage condenser. It controls the angular width of the cone of light entering the objective from below.
Iris blades are thin, overlapping leaves of metal that rotate around a common axis. More blades, and curved ones, approximate a circle more closely; fewer or straight blades create a polygonal opening. The rounder the aperture, the cleaner the diffraction pattern and the more even the illumination across the field. Source
A lever or ring on the condenser body controls the iris. Rotating it clockwise typically closes the blades; counterclockwise opens them. On most student and mid-range scopes you can feel a slight resistance as the blades brush against each other — that tactile feedback tells you you’re near fully closed.
Two iris diaphragms — not one
This is the gap most introductory guides skip entirely: a microscope set up for Köhler illumination has two iris diaphragms, and confusing them causes real imaging problems. Source

Condenser aperture iris (aperture diaphragm)
Located inside or just below the condenser, this iris controls the angle of the illumination cone — specifically, the numerical aperture (NA) of the condenser. Adjusting it changes the trade-off between contrast, resolution, and depth of field. This is the iris you set for every objective change. It does not primarily control how bright the image looks. Source
Field iris (field diaphragm)
Located near the lamp housing at the base of the microscope, the field iris controls the diameter of the illuminated circle on the specimen plane — nothing more. When set correctly it is opened just enough so its edge clears the field of view; pulling it inside the field wastes light and causes glare. Opening and closing the field iris does not change the brightness of the image, it only controls how wide the beam is. Source
The common confusion: the rule “open the diaphragm until light barely extends beyond the field of view” is the field iris rule. It has nothing to do with setting the condenser aperture iris, which is governed by a completely different principle explained below.

What the condenser aperture iris actually controls
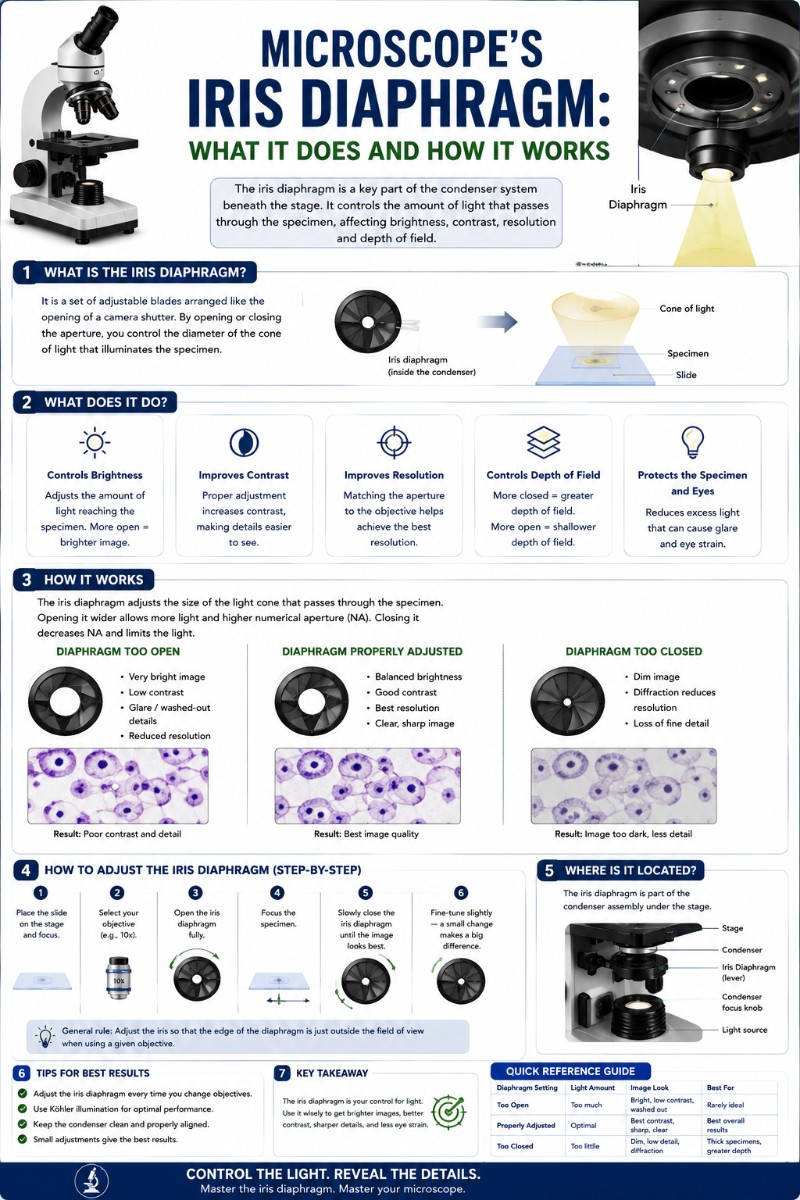
The aperture iris controls the effective numerical aperture of the condenser. NA is the measure of the widest cone of light the lens can accept or deliver; it directly sets the resolution limit and the depth of field of the whole system. Source
Illumination and contrast
When you close the aperture iris down on a live slide, the first thing you notice is that the image appears to “pop” — shadows deepen, edges sharpen, and thin structures become more visible. What you’re seeing is an increase in contrast driven by a narrower illumination cone. But look closely: that apparent sharpness comes at a price.
Resolution vs. contrast trade-off
Closing the iris reduces resolution. The narrower cone of light produces broader diffraction fringes; at some point fine detail — the edges of cells, flagella, thin fibers — starts to blur, and a characteristic diffraction “halo” appears around high-contrast edges. Source A student looking at onion epidermis cells under 40× who sees crispy black cell walls but muddy cytoplasmic detail has very likely over-closed their aperture iris.
Depth of field
Closing the iris also increases depth of field — more of the specimen stays in focus simultaneously, which can feel helpful but actually means the optical sections are thicker and overlapping detail is harder to tease apart in thicker specimens.
Numerical aperture and the 70–80% rule
Every objective has its numerical aperture printed on the barrel — something like 40×/0.65 or 100×/1.25 oil. The standard guidance for the condenser aperture iris is to set it so the condenser is delivering approximately 70–80% of the objective’s NA. Source Source
In practice: remove an eyepiece, look down the tube while slowly opening the aperture iris from fully closed. You will see a bright circle grow from the center of the objective’s back focal plane. Stop when that bright circle fills roughly 70–80% of the back aperture diameter. Re-insert the eyepiece. You will have a well-balanced image — enough contrast to read the slide, enough NA to resolve fine structure.
This is the single most useful adjustment you can make at every objective change. Most beginners never do it because no one tells them it exists.
Köhler illumination: where the iris fits in
Köhler illumination is the standard microscope setup protocol that gives even, glare-free illumination across the full field of view. Both iris diaphragms are essential to it. Source
A simplified Köhler setup sequence:
- Focus on a specimen at low power.
- Close the field iris until a sharp octagonal or circular edge appears in the image.
- Center that edge using the condenser centering screws.
- Open the field iris until its edge just disappears beyond the field of view.
- Switch to your working objective. Remove an eyepiece and adjust the aperture iris to fill 70–80% of the back aperture.
- Replace the eyepiece. Set brightness using the lamp rheostat, not the iris.
Once you run through this once, you will understand why the two irises are different controls and why mixing them up produces frustrating images.
The #1 beginner mistake: using the iris as a brightness control
The image looks washed out. The instinctive fix is to close down the iris. It works — for a moment — but you have just traded resolution for contrast, and in doing so emphasized every speck of dust on your lenses. Source
The correct fix for a washed-out image is to reduce lamp intensity using the brightness rheostat or dimmer, not the iris. The iris is for balancing resolution and contrast — the lamp is for brightness. Once you separate these two mentally, the aperture iris becomes a precision tool rather than a dimmer switch.
Conversely: the image looks grainy, structure has a thick black border, and fine detail has vanished. That is a fully or nearly closed aperture iris, strangling resolution. Open it until the grain disappears and fine detail reappears, then back off a fraction for the contrast you want. Source
Iris diaphragm and objective magnification
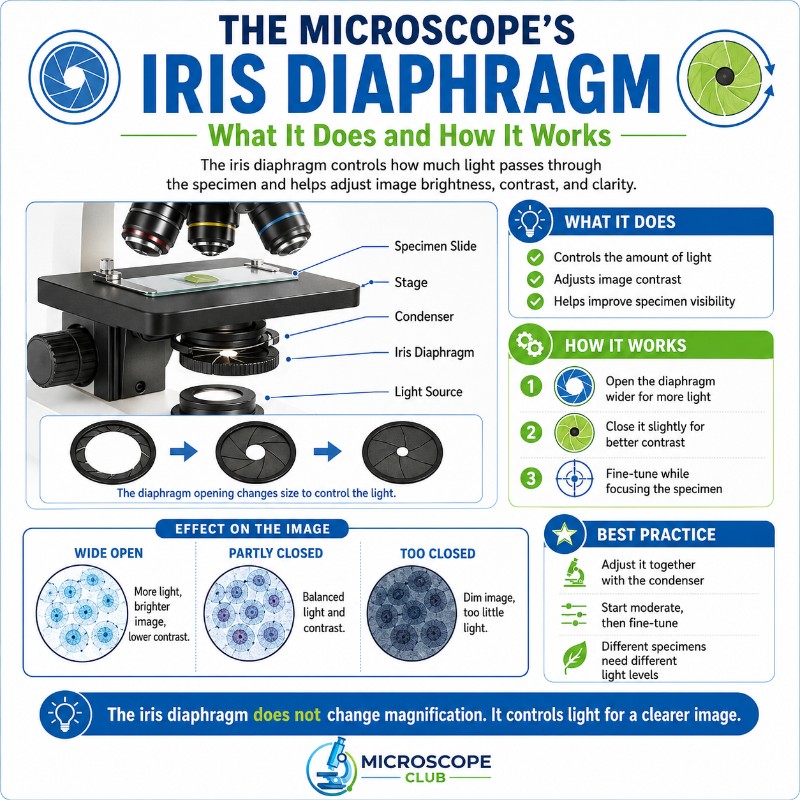
Higher-magnification objectives generally have higher numerical apertures, which means they can resolve finer detail — but only if the condenser is delivering a matching illumination cone. A 100× oil objective with NA 1.25 needs the condenser aperture iris much more open than a 4× objective with NA 0.10. Source The iris is not passively set and forgotten; it needs to be adjusted every time you change objectives as part of a proper Köhler setup.
Iris diaphragm vs. disc diaphragm
Budget student microscopes often substitute a disc diaphragm (also called a disk diaphragm) for a true iris. It is a rotating circular plate with five or six holes of fixed sizes punched into it; you rotate it to select a preset aperture rather than adjusting continuously. Source
The disc diaphragm is functional for basic viewing and survives student abuse well, but it removes the fine-tuning that Köhler illumination requires. If you have a disc diaphragm, use the hole that gives you the best image for the objective in use and understand you are working with an approximation.
Historical forms: Zeiss rotating and Waterhouse diaphragms
Before the modern multi-blade iris became standard, two other designs were common. The Zeiss rotating diaphragm is a circular plate with several apertures of different fixed sizes, functionally similar to today’s disc diaphragm. The Waterhouse diaphragm, developed for 19th-century photographic lenses, is a set of interchangeable metal plates each carrying a different fixed hole — slid into a slot in the lens body. Both are largely historical now; modern lab and research instruments use the multi-blade iris universally.
Care and maintenance
Iris blades can develop an oily film over years of use — lens oil, lubricant migration, or fingerprint contamination — causing the blades to stick, move unevenly, or leave residue on the aperture edge. If the lever moves stiffly or the aperture opens asymmetrically, the condenser unit should be inspected and cleaned by a qualified technician rather than forced. Moving a sticky iris lever hard can bend the blades. For routine use, simply move the control smoothly and avoid getting immersion oil near the condenser.
Other applications of iris diaphragms
Camera lenses use an iris diaphragm as the aperture control — same physics, different goal. In microscopy, the aim is maximum clarity; in photography, aperture also controls depth of field and the character of out-of-focus areas (bokeh). The shape and count of blades determines how round the out-of-focus highlights appear — more blades, rounder bokeh. Some lenses even ship with custom-shaped diaphragm blades to create deliberate bokeh effects, something no microscopist wants from their aperture stop.
Frequently asked questions
What is the function of the iris diaphragm on a microscope?
The condenser aperture iris controls the angular cone of light (effective NA) entering the objective from the condenser. Adjusting it balances contrast, resolution, and depth of field. It is not a brightness control — brightness is set at the lamp.
Where is the iris diaphragm located on a microscope?
The aperture iris is located inside or just below the substage condenser, below the specimen stage. On microscopes with an Abbe condenser, the iris is integrated into the condenser body and its lever or ring is accessed from the side or front of the condenser. The field iris is near the lamp housing at the base of the microscope body.
What is the difference between the aperture iris and the field iris?
The aperture (condenser) iris controls the NA of the illumination cone — it governs resolution, contrast, and depth of field. The field iris controls the diameter of the illuminated area on the specimen — it eliminates stray light and glare but does not change brightness. They are separate controls with separate jobs. Source
How do you adjust the iris diaphragm for the best image?
Remove an eyepiece, look at the objective’s back focal plane, and open the aperture iris until the bright disk fills about 70–80% of the back aperture. Replace the eyepiece. Adjust brightness with the lamp rheostat, not the iris. Source
What happens if the iris diaphragm is closed too much?
Resolution drops sharply. The image develops grainy texture, dark diffraction halos appear around edges, and fine structural detail disappears. Every dust speck on the optics becomes more visible. Contrast increases — but at an unacceptable cost to image quality. Source
What happens if the iris diaphragm is open too wide?
The condenser delivers its full NA, maximizing resolution, but contrast drops and the image looks flat and washed out. Glare from stray light increases. The fix is not to close the iris — it is to reduce lamp intensity.
What is the difference between a disc diaphragm and an iris diaphragm?
An iris diaphragm is continuously adjustable via overlapping blades — it gives you fine control at any aperture size. A disc diaphragm is a rotating plate with five or six fixed holes; it is cheaper and more durable but offers only preset steps. Disc diaphragms are common on entry-level student microscopes. Source
How does the iris diaphragm affect depth of field?
Closing the aperture iris increases depth of field — a larger portion of the specimen appears in focus simultaneously. This sounds useful but actually thickens the optical section, making it harder to resolve structures at different focal planes in thick specimens. For thin preparations, open the iris to its optimum and use fine focus to navigate the specimen.